Thames & Kosmos Robotic Dragon Bank Kit Bedienungsanleitung
Thames & Kosmos Nicht kategorisiert Robotic Dragon Bank Kit
Lies die bedienungsanleitung für Thames & Kosmos Robotic Dragon Bank Kit (10 Seiten) kostenlos online; sie gehört zur Kategorie Nicht kategorisiert. Dieses Handbuch wurde von 14 Personen als hilfreich bewertet und erhielt im Schnitt 5.0 Sterne aus 9 Bewertungen. Hast du eine Frage zu Thames & Kosmos Robotic Dragon Bank Kit oder möchtest du andere Nutzer dieses Produkts befragen? Stelle eine Frage
Seite 1/10
EXPERIMENT MANUAL
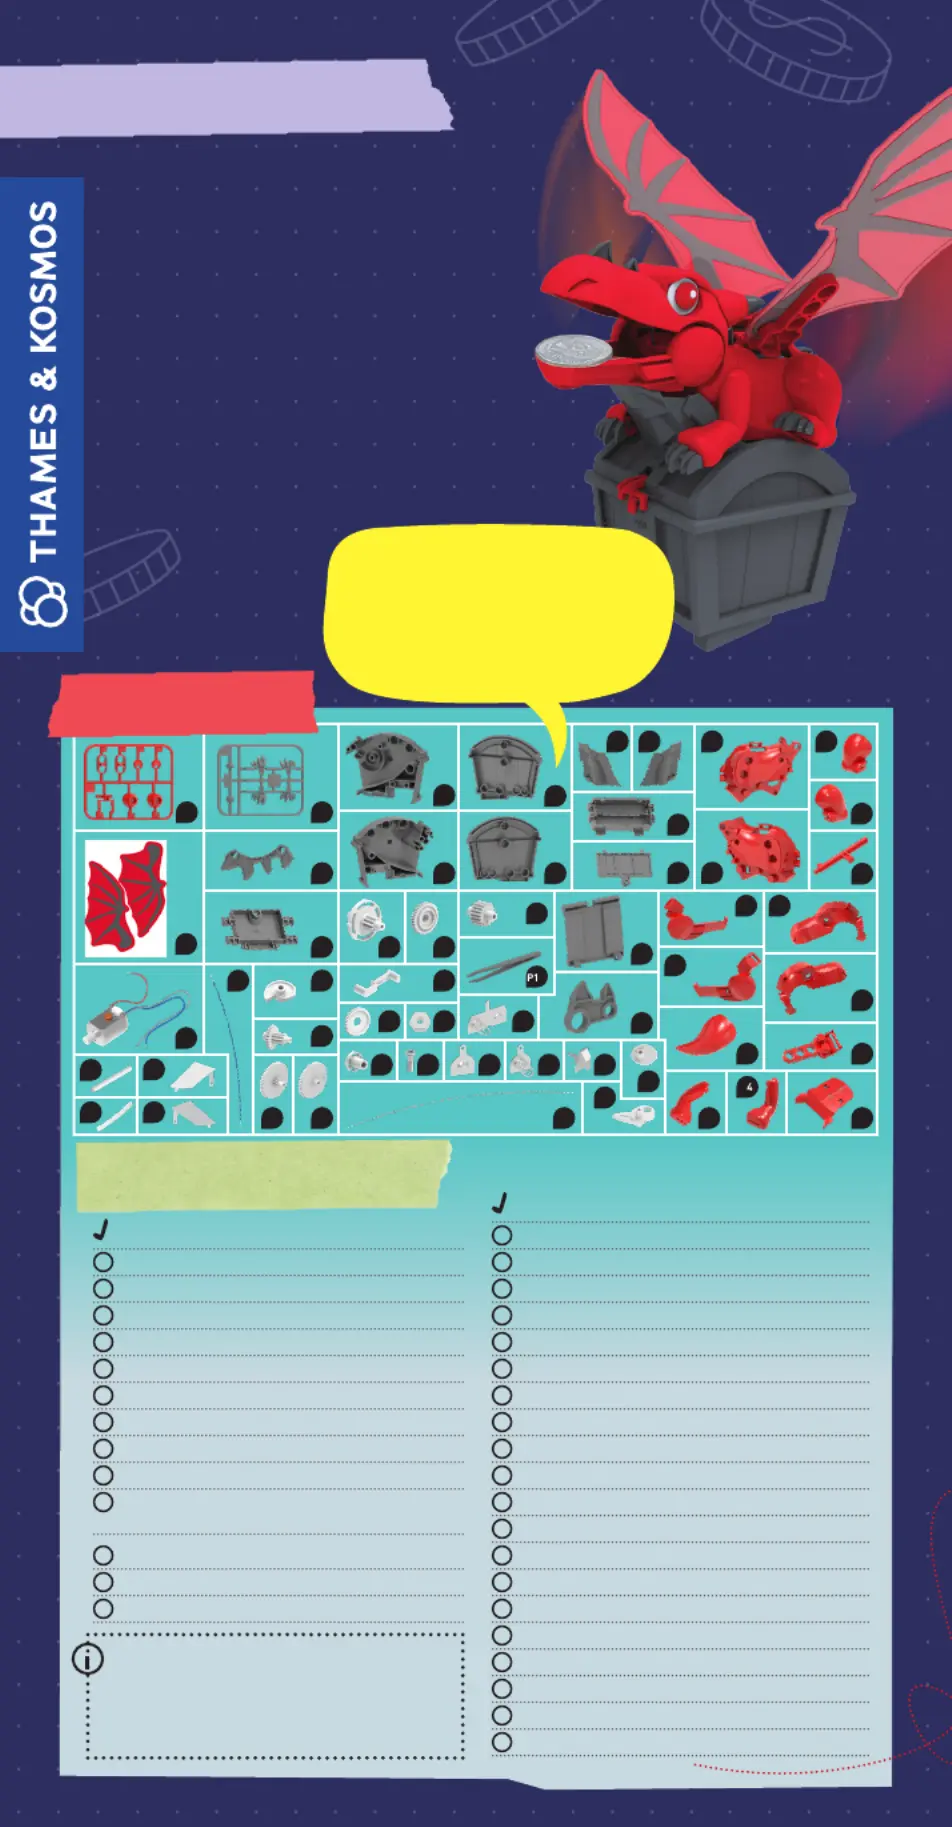
No. Description Quantity Part No.
A Red frame 1 729731
B Gray frame 1 729732
P1 Back leg, right 1 730003
P2 Back leg, left 1 730005
P3 Front leg, right 1 730006
P4 Front leg, left 1 730007
P5 Tail 1 730008
P6 Wing holder 2 730009
P7 Latch 1 730010
P8 Battery compartment 1 730011
cover
P9 Battery compartment 1 730012
P
10 Neck plate, right 1 730013
P
11 Neck plate, left 1730015
No. Description Quantity Part No.
P12 Back spines 1 730016
P13 Neck spines 1 730017
P14 Tweezers 1 730018
P15 Head, right 1 729733
P16 Head, left 1 729734
P17 Jaw right 1 729735
P18 Jaw left 1 729736
P19 Mouth interior 1 729737
P20 Body, right 1 729738
P21 Body, left 1 729739
P22 Hatch 1 729740
P23 Chest bottom 1 729741
P24 Outer chest wall, right 1 729742
P25 Outer chest wall, left 1 729743
P26 Inner chest wall, right 1 729744
P27 Inner chest wall, left 1 729745
P28 Eye 2 729746
P29
Tension rod 1 729747
P30
Cam 2729748
P31 Axle gear 1729749
Checklist:
KIT CONTENTS
You will also need:
Small Phillips-head screwdriver, diagonal
cutter or scissors and a nail file, 2 AAA
batteries (1.5-volt, type LR03)
Robotic
Dragon
Bank Kit
A
B
P53
P41
P43
P30
P23
P35
P36
P32
P46
P48
P44
P37
P50
P13
P28
P22
P8
P21
P17
P16
P15
P6
P5
P
P19
P3
P18
P20
P1
P2
P7
P11
P10
P9
P47
P40
P49
P33
P29
P34
P38
P39
P52
P51
P45
P42
Good to know!
If you are missing any parts,
please contact Thames &
Kosmos technical support.
P12
P27
P25
P31
4
P24
P26
Produktspezifikationen
| Marke: | Thames & Kosmos |
| Kategorie: | Nicht kategorisiert |
| Modell: | Robotic Dragon Bank Kit |
Brauchst du Hilfe?
Wenn Sie Hilfe mit Thames & Kosmos Robotic Dragon Bank Kit benötigen, stellen Sie unten eine Frage und andere Benutzer werden Ihnen antworten
Bedienungsanleitung Nicht kategorisiert Thames & Kosmos

1 Februar 2026
1 Februar 2026
31 Januar 2026
31 Januar 2026
Bedienungsanleitung Nicht kategorisiert
Neueste Bedienungsanleitung für -Kategorien-
3 April 2026
3 April 2026
3 April 2026
3 April 2026
3 April 2026
3 April 2026
3 April 2026
3 April 2026
3 April 2026
3 April 2026