TP-Link Omada ER706WP-4G Bedienungsanleitung
Lies die bedienungsanleitung für TP-Link Omada ER706WP-4G (2 Seiten) kostenlos online; sie gehört zur Kategorie Router. Dieses Handbuch wurde von 27 Personen als hilfreich bewertet und erhielt im Schnitt 4.5 Sterne aus 14 Bewertungen. Hast du eine Frage zu TP-Link Omada ER706WP-4G oder möchtest du andere Nutzer dieses Produkts befragen? Stelle eine Frage
Seite 1/2
Slow Flashing:
System is running normally.
Quick Flashing:
The gateway is being reset.
On/O:
System is starting up or running abnormally.
Green On: The port is supplying power normally.
Green Flashing: Overload or short circuit is detected.
O: Not providing PoE power on the port.
Flashing: Connecting to the 4G network.
On: Indicates the signal strength the gateway received from the
mobile internet. More bars indicate a better signal strength.
O: No mobile internet signal.
O: No SIM card is detected.
On: SIM card is detected, but is not connected to the mobile internet.
Quick Flashing: SIM card is connecting to the mobile internet.
Slow Flashing: SIM card is connected to the mobile internet.
On: Running at 1000 Mbps, but no activity.
O: No device the corresponding port. is linked to
Flashing: Running at 1000 Mbps, and transmitting or receiving data.
Green On: Running at 1000 Mbps, but no activity.
Green Flashing: Running at 1000 Mbps and transmitting or receiving data.
Amber On: Running at 100/10 Mbps, but no activity.
Amber Flashing: Running at 100/10 Mbps and transmitting or receiving
data.
O: No device is linked to the corresponding port.
On:
Wireless networking is enabled.
O:
Wireless networking is disabled.
LTE Signal
(3 LEDs)
PoE
(Ports 3-6)
Speed
(Ports 2-6)
LTE1/LTE2
SFP
WLAN
SYS
LED Indication
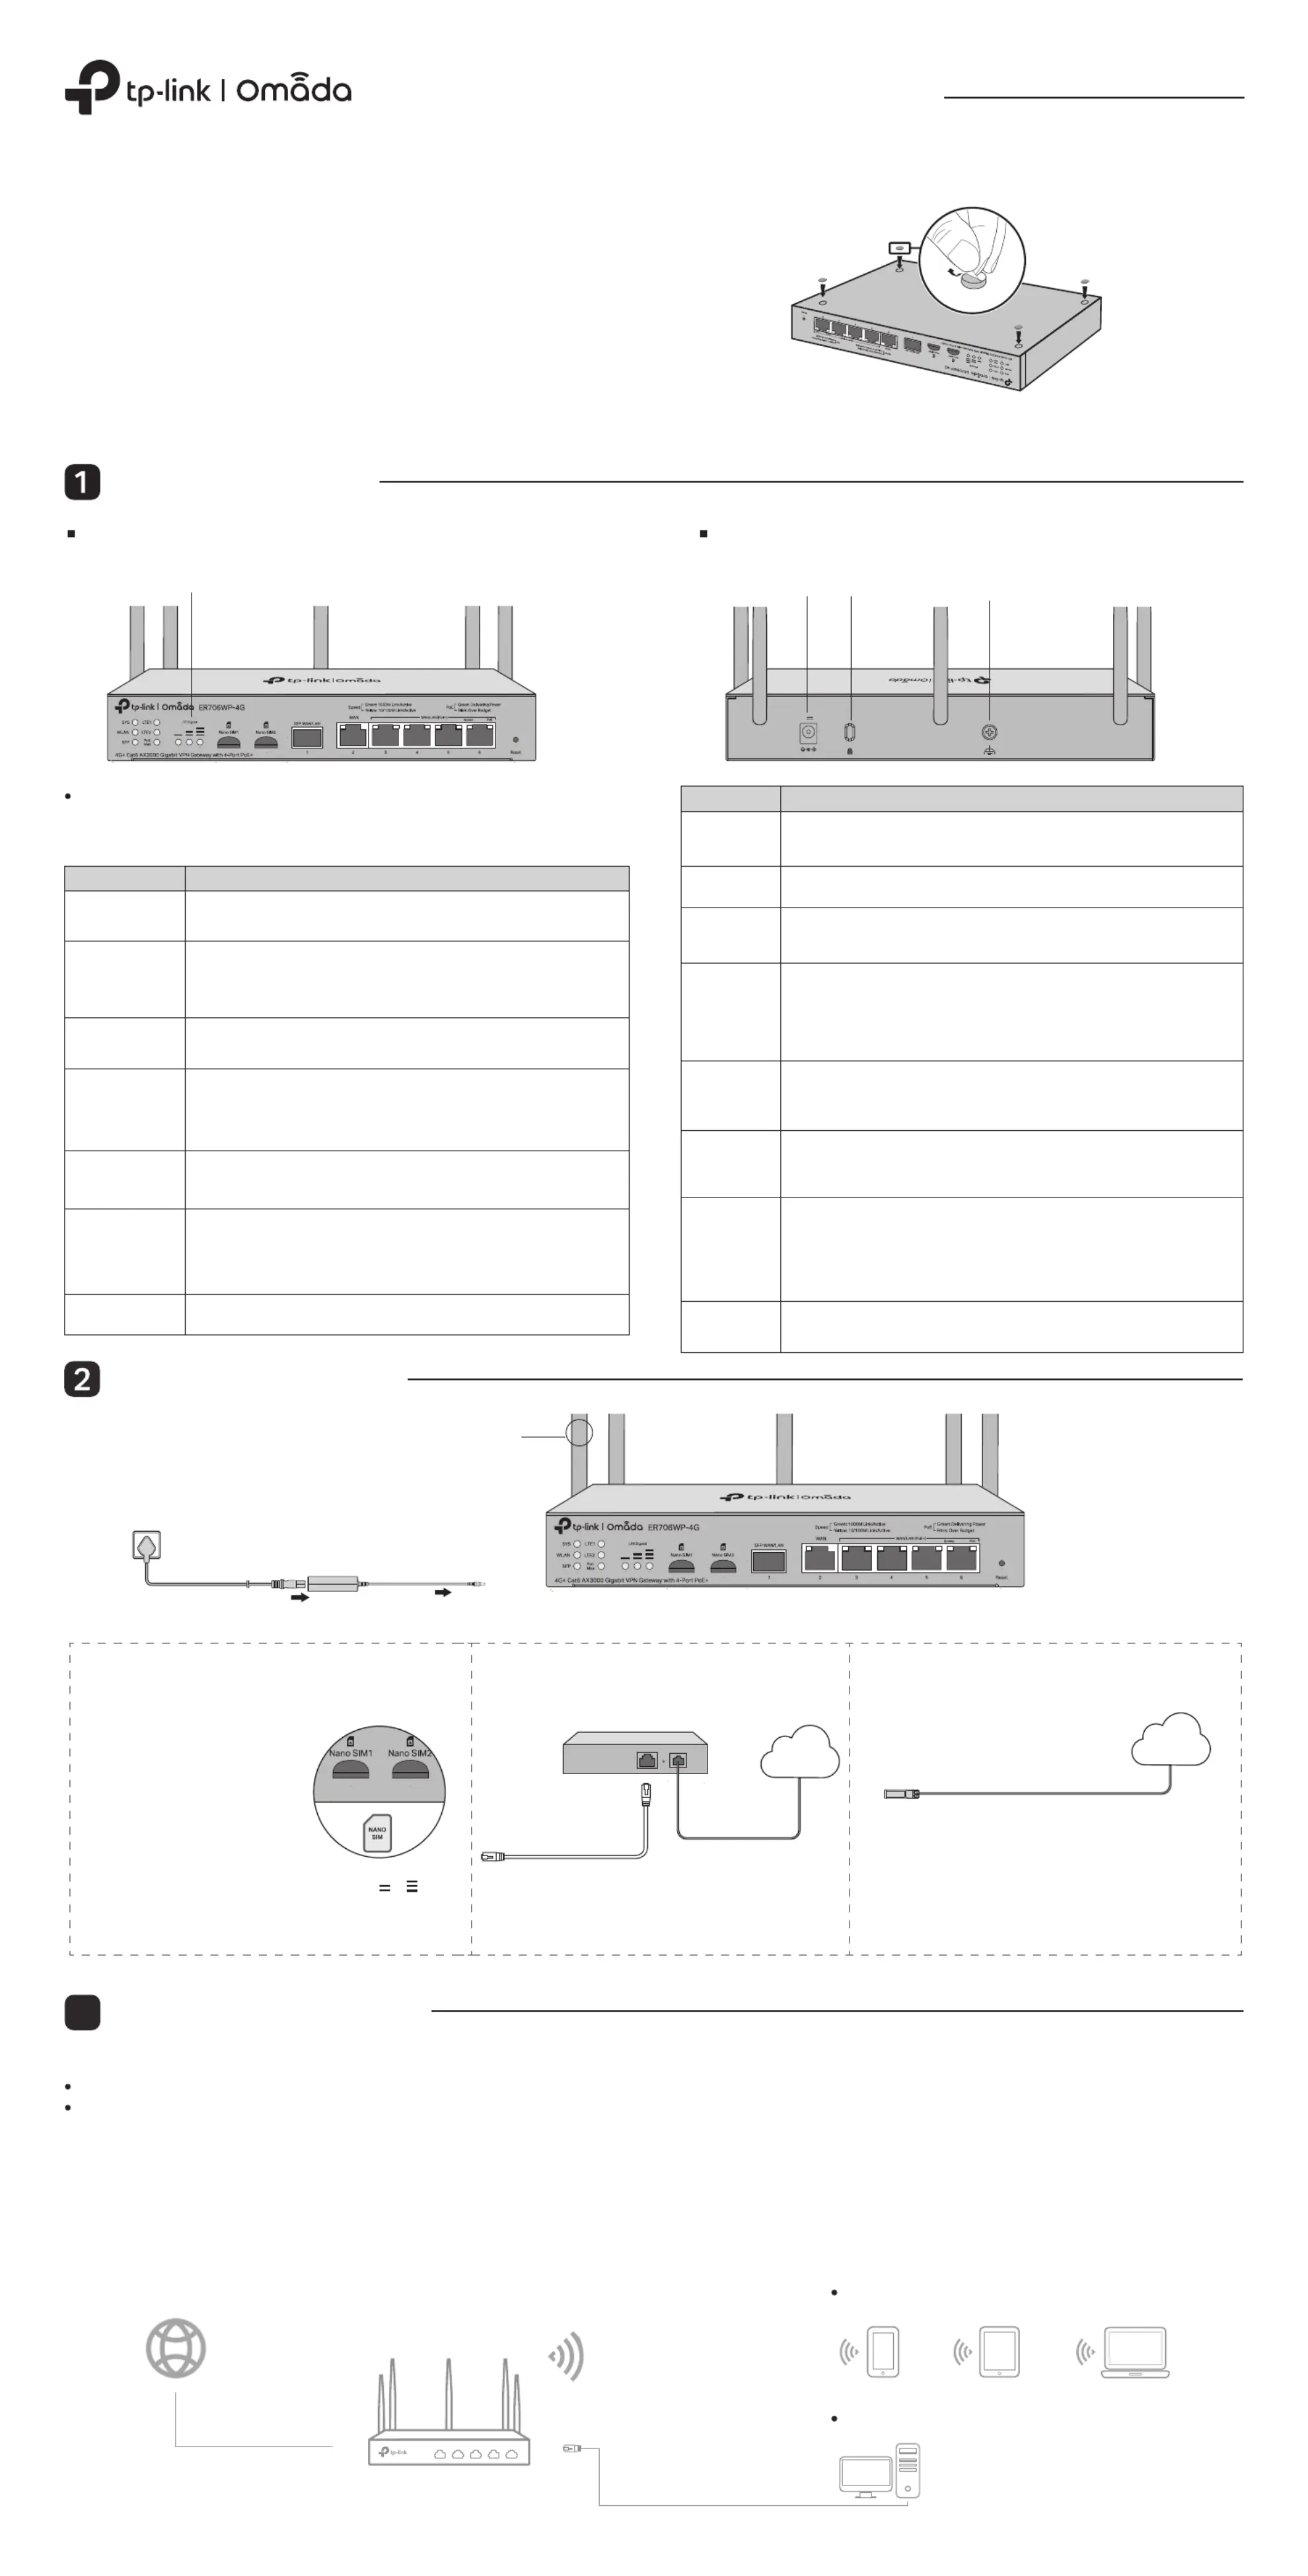
1. Remove the adhesive backing papers from the rubber feet.
2. Turnover the device and attach the supplied rubber feet to the bottom of
the device to prevent it from slipping when placed on a desktop.
3. Place the device on a at table.
Desktop Installation
Note: This device also supports wall and rack mounting, but the mounting kit is not provided.
Installation Guide
4G+ Cat6 AX3000 Gigabit VPN Gateway with 4-Port PoE+
Hardware Overview
Note: The image may dier from the actual product.
The gateway already comes with lightning protection mechanism.
For detailed lightning protection measures, refer to the Lightning
Protection Guide:
https://www.tp-link.com/us/conguration-guides/lightning_protection_guide/.
© 2025 TP-Link 7106512039 REV1.0.2
Front Panel
Back Panel
Reset: Press and hold the button for 5 seconds, the SYS LED will ash
quickly, indicating the device is being reset to its factory default
settings.
LED
Kensington
Security Slot
Power
Socket
Grounding
Terminal
Hardware Connection
Fiber-Optic Cable
SFP Module
Connect to SFP WAN Slot
Internet
Option 3 Connect to Internet via FiberOption 2 Connect to Internet via Ethernet
Modem
Connect to Port 2
Internet
Note: To connect to the internet via another RJ45 WAN port
(ports 3-6), congure your desired port to WAN, then
connect the port to the internet via an RJ45 cable. Refer to
FAQ-Q1 for more details.
Gigabit SFP WAN/LAN port connecting to an SFP module.
By default, it is a WAN port.
You can congure it to a LAN port on the management page.
The device supports two nano SIM cards, but only one is active
for internet at a time while the other is used for network backup.
Gigabit RJ45 WAN port.
Gigabit RJ45 WAN/LAN ports.
By default, they are LAN ports connecting to local PCs or switches.
You can congure each port to a WAN port on the management page.
Secure the lock (not provided) into the security slot to prevent the
device from being stolen.
Connect to the power outlet via the provided power adapter.
Power Socket
Grounding
Terminal
Kensington
Security Slot
WAN/LAN(PoE+)
(Ports 3-6)
WAN
SFP WAN/LAN
Interface
Nano SIM 1/
Nano SIM 2
Description
3. Connect to the internet using one or multiple options.
2. Connect to the power source using the
provided power adapter.
1. Attach the Wi-Fi antennas and 4G antennas.
Antennas can be distinguished by their markings.
With the gold contacts facing
down, insert the nano SIM card
into the slot until you hear a click.
Note: For better internet connection, make sure or LTE
Signal LED is lit. Otherwise, try relocating the gateway to a
spot that may receive a stronger mobile network signal,
such as near a window.
Software Conguration
3
The gateway supports two conguration options:
Standalone Mode: Congure and manage the gateway by itself.
Controller Mode: Congure and manage network devices centrally. It is recommended in large-scale networks, which consist of a large number of devices such
as access points, switches, and gateways.
Option 1: Standalone Mode
Note:
1. When the gateway is managed by a controller, congurations of the gateway will be overridden by the controller.
2. For the detailed congurations, refer to the User Guide of the gateway and the controller. The guides can be found on the download center of our ocial website:
https://www.tp-link.com/support/download/.
Gateway
Wireless Internet Connection
Wired Internet Connection
Option 1 Connect to Internet via 4G SIM card
Wait until the SYS LED ashes
slowly and the LTE Signal LED
turns solid, indicating the
gateway is connected to the
internet.
Note: Make sure you attach the Wi-Fi antennas and 4G
antennas to the correct connectors.
You can insert two SIM cards, but only one is active for
internet at a time while the other is used for network backup.
Note: When two SIM cards are inserted, only the LTE LED of the active SIM card will light up,
while the LED of the other SIM card will be o.
PoE Max
On: The remaining PoE power is ≤ 7 W.
Flashing: The remaining PoE power keeps ≤ 7 W after this LED is on for
2 minutes.
O: The remaining PoE power is > 7 W.
DC Power AdapterAC Power Cord
53.5V 1.31A
Wi-Fi
ANT
Wi-Fi
ANT
Wi-Fi
ANT
Wi-Fi
ANT
Wi-Fi
ANT
Wi-Fi
ANT
4G
ANT
4G
ANT
Produktspezifikationen
| Marke: | TP-Link |
| Kategorie: | Router |
| Modell: | Omada ER706WP-4G |
Brauchst du Hilfe?
Wenn Sie Hilfe mit TP-Link Omada ER706WP-4G benötigen, stellen Sie unten eine Frage und andere Benutzer werden Ihnen antworten
Bedienungsanleitung Router TP-Link

24 September 2025
21 September 2025
14 September 2025
4 September 2025
30 August 2025
30 August 2025
30 August 2025
28 August 2025
17 August 2025
17 August 2025
Bedienungsanleitung Router
- Accelerated
- Luxul
- KPN
- StarIink
- Proximus
- Lancom
- Moxa
- Telstra
- Nilox
- Atlona
- Digiconnect
- TCL
- Wintec
- Aruba
- Barco
Neueste Bedienungsanleitung für -Kategorien-
13 Januar 2026
11 Januar 2026
10 Januar 2026
10 Januar 2026
5 Januar 2026
30 Dezember 2026
28 Dezember 2025
28 Dezember 2025
16 Dezember 2025
1 Dezember 2025