Tristar KA-5094 Bedienungsanleitung
Lies die bedienungsanleitung für Tristar KA-5094 (7 Seiten) kostenlos online; sie gehört zur Kategorie Heizung. Dieses Handbuch wurde von 14 Personen als hilfreich bewertet und erhielt im Schnitt 4.2 Sterne aus 9 Bewertungen. Hast du eine Frage zu Tristar KA-5094 oder möchtest du andere Nutzer dieses Produkts befragen? Stelle eine Frage
Seite 1/7
KA-5094
EN | Instruction manual
NL | Gebruiksaanwijzing
FR | Mode d’emploi
DE | Bedienungsanleitung
ES | Manual de usuario
PT | Manual de utilizador
IT | Manuele utente
SV | Bruksanvisning
PL | Instrukcja obsługi
CS | Návod na použití
SK | Návod na použitie
PL
CS
SK
PARTS DESCRIPTION / ONDERDELENBESCHRIJVING / DESCRIPTION DES PIÈCES / TEILEBESCHREIBUNG /
DESCRIPCIÓN DE LAS PIEZAS / DESCRIÇÃO DOS COMPONENTES / DESCRIZIONE DELLE PARTI /
BESKRIVNING AV DELAR / OPIS CZĘŚCI / POPIS SOUČÁSTÍ / POPIS SÚČASTÍ
1
8
2
3467
5
This product is only suitable for well insulated spaces or occasional use.
Dit product is uitsluitend geschikt voor goed geïsoleerde plaatsen of voor incidenteel gebruik.
Ce produit ne peut être utilisé que dans des locaux bien isolés ou de manière occasionnelle.
Dieses Produkt ist nur für gut isolierte Räume oder für den gelegentlichen Gebrauch geeignet.
Este producto está indicado únicamente en lugares abrigados o para una utilización puntual.
Este produto é adequado apenas para espaços bem isolados espaços ou utilização ocasional.
Il presente prodotto è adatto solo a ambienti correttamente isolati o ad un uso occasionale.
Denna produkt är endast lämpad för välisolerade utrymmen eller sporadisk användning.
Ten produkt jest odpowiedni tylko do sporadycznego użytku lub do stosowania w dobrze
izolowanych pomieszczeniach.
Tento výrobek je vhodný pouze pro dobňe izolované prostory nebo obĀasné používání.
Tento výrobok je určený iba do dobre izolovaných priestorov alebo na príležitostné použitie.
[WEEE LOGO]
Tristar Europe B.V. | Swaardvenstraat 65
5048 AV Tilburg | The Netherlands
ENInstruction manual
SAFETY
•By ignoring the safety instructions the
manufacturer cannot be held responsible for
the damage.
•If the supply cord is damaged, it must be
replaced by the manufacturer, its service
agent or similarly qualified persons in order to
avoid a hazard.
•Never move the appliance by pulling the cord
and make sure the cord cannot become
entangled.
•The appliance must be placed on a stable,
level surface.
•The user must not leave the appliance
unattended while it is connected to the supply.
•This appliance is only to be used for
household purposes and only for the purpose
it is made for.
•This appliance can be used by children aged
from 8 years and above and persons with
reduced physical, sensory or mental
capabilities or lack of experience and
knowledge if they have been given
supervision or instructions concerning use of
the appliance in a safe way and understand
the hazards involved.
•Children shall not play with the appliance.
•Cleaning and user maintenance shall not be
made by children without supervision.
•Children of less than 3 years should be kept
away unless continuously supervised.
•Children aged from 3 years and less than 8
years shall only switch on/off the appliance
provided that it has been placed or installed in
its intended normal operating position and
they have been given supervision or
instruction concerning use of the appliance in
a safe way and understand the hazards
involved.
•Children aged from 3 years and less than 8
years shall not plug in, regulate and clean the
appliance or perform user maintenance.
•To protect yourself against an electric shock,
do not immerse the cord, plug or appliance in
the water or any other liquid.
•WARNING: Some parts of this product can
become very hot and cause burns. Particular
attention has to be given where children and
vulnerable people are present.
•Do not use this heater in the immediate
surroundings of a bath, a shower or a
swimming pool.
•Joists, beams and rafters shall not be cut or
notched to install the appliance.
•Please do not install the appliance close to
curtains and other combustible materials. This
could cause a fire.
•The appliance shall, under no circumstances,
be covered with insulating material or similar
material.
•The heater must not be located immediately
below a socket-outlet.
•Do not use this heater if it has been dropped.
•WARNING: The heater must not be used if
the glass panels are damaged.
•Use this heater on a horizontal and stable
surface, or fix it to the wall, as applicable.
•WARNING: Do not use this heater in small
rooms when they are occupied by persons not
capable of leaving the room on their own,
unless constant supervision is provided.
•WARNING: To reduce the risk of fire, keep
textiles, curtain, or any other flammable
material a minimum distance of 1m from the
air outlet.
•The heater needs to be installed so that the
switches and other controls cannot be
touched by a person in the bath or shower.
•WARNING: In order to avoid overheating,
do not cover the heater.
Waste electrical products should not be disposed of with
household waste. Please recycle where facilities exist. Check with your
local Authority or local store for recycling advice.
This product complies with conformity requirements of the
applicable European regulations or directives.
The Green Dot is the registered trademark of Der Grüne Punkt
– Duales System Deutschland GmbH and is protected as a trademark
worldwide. The logo may only be used by customers of DSD GmbH
holding a valid trademark usage contract or by engaged waste
management companies within the Federal Republic of Germany. This
also applies to reproduction of the logo by third parties in a dictionary, an
encyclopaedia or an electronic database containing a reference manual.
Separate collection / Check your local municipal guidelines.
The product and packaging materials are recyclable, subject to
extended manufacturer responsibility. Dispose it separately, following the
illustrated packaging symbols, for better waste treatment. The Triman logo
is valid in France only.
PARTS DESCRIPTION
1.On / Off switch
2.Display
3.On / Off touch button
4.Menu touch button
5.Select touch button
6.Down touch button
7.Up touch button
8.Feet
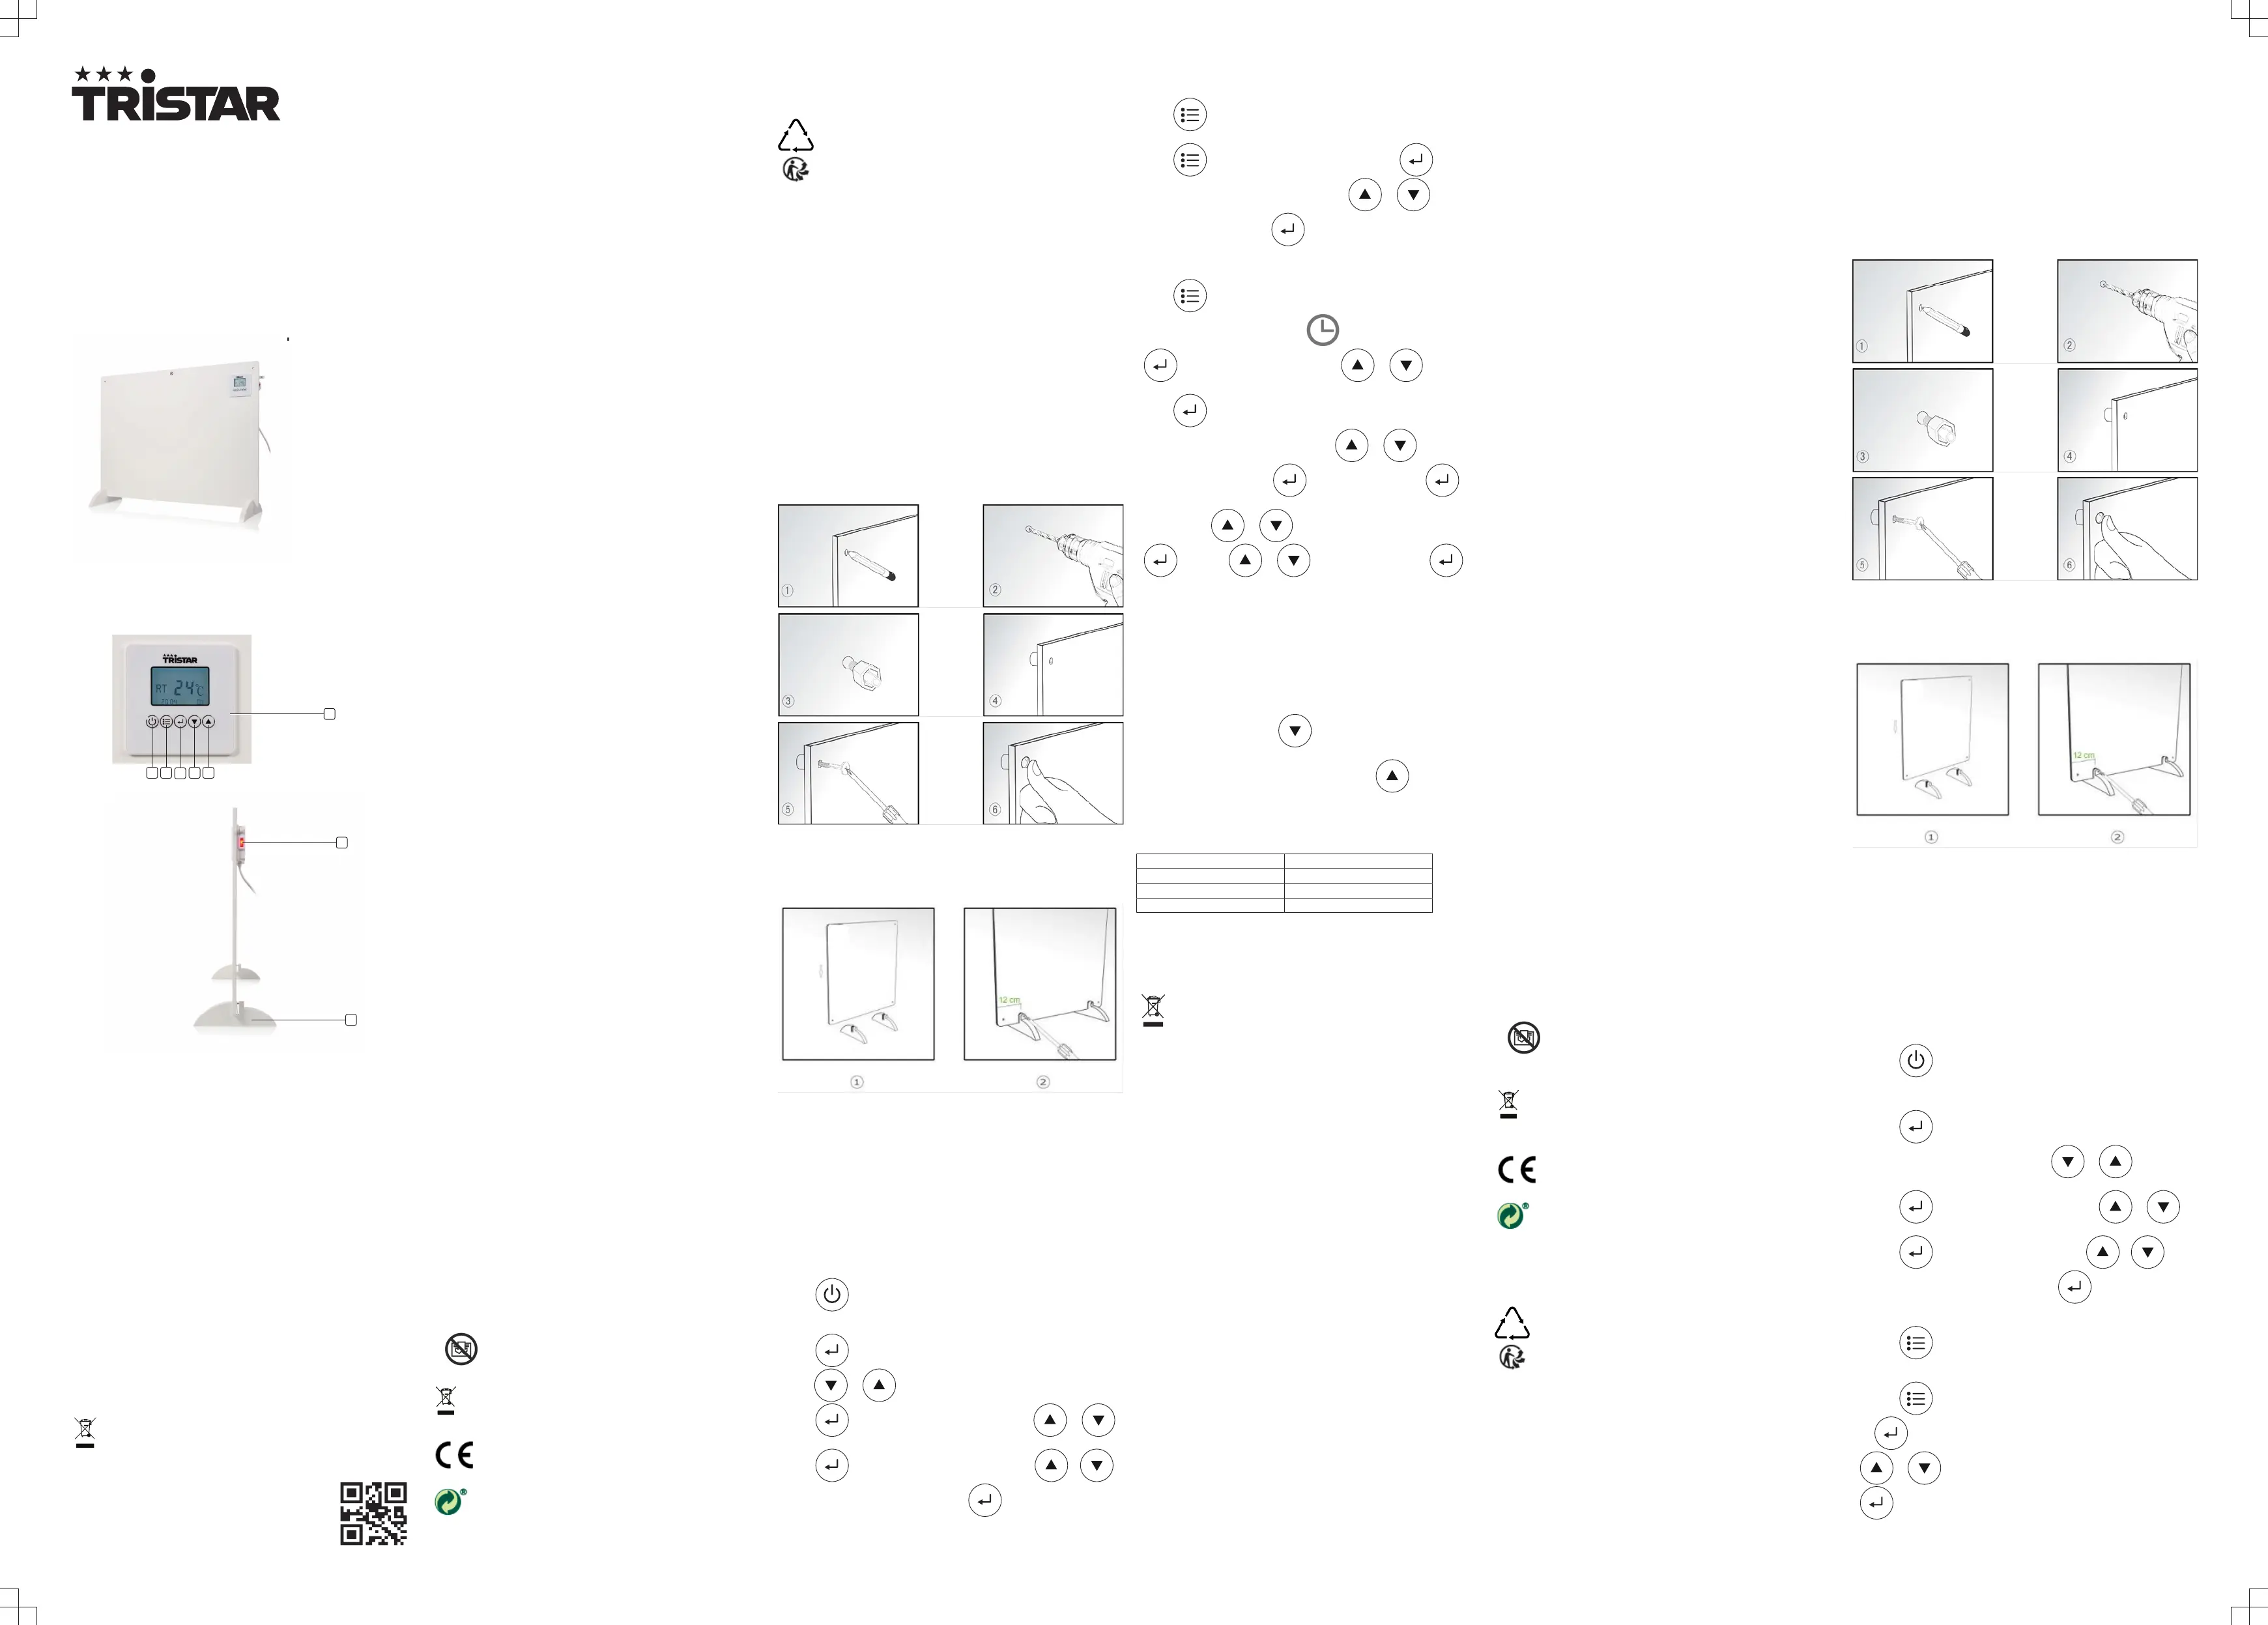
INSTALLATION
Wall mounting
1.Mark the positions of the four holes to be drilled on the wall. (Better
install the heater 20cm to 100cm height from the floor to get best
performance.)
2.Drill the holes with the drill bit from the accessories pack.
3.Insert the plastic rails fitting into the holes.
4.Install the panel heater onto the four rails fittings matching the four
holes in the heater.
5.Screw the four fasten bolts into the plastic rails fitting.
6.Put the caps onto the fasten bolts. It is recommended to use some
normal glue to stick the caps onto the bolts steadily.
•To take down the unit from the wall, just open the bolt caps and unscrew
the bolts with a screw driver and then take the heater down.
•Make sure the distance between the bottom of the heater and the floor is
no less than 20cm.
Foot assembly
•If the heater is not mounted on the wall, the supplied feet must be fitted
to the unit.
•Place the feet and secure them by putting the screws into the housing.
•Take care to ensure that the feet are located correctly on the bottom end
of the heater.
BEFORE THE FIRST USE
•When the device is turned on for the first time, a slight odour will occur.
This is normal, ensure adequate ventilation. This smell is only temporary
and will soon fade.
•During heating up and cooling down there may be some noises caused
by the heater casing expanding and contracting, this is normal and does
not indicate any fault.
•Connect the power cable to the socket. (Note: Make sure the indicated
voltage on the device matches the local voltage before connecting the
device. Voltage 220V-240V~ 50-60Hz.)
TOUCH BUTTON/DISPLAY FUNCTIONS
USE
•Push the on/off switch on the side of the heater to turn the heater
completely on or off.
Touch button functions
Power setting:
•Press to turn the heater on, the display shows the room
temperature, pressing it again will set the device into stand-by mode.
Date and time setting:
•Press for 3 seconds for timetable setting, the hour code will flash,
press or to set the hour from 1-23.
•Press again, the minute code will flash, press or
to set the minute from 00-59.
•Press once again, the week code flash, press or
to set the weekday from MO-SU, press to save or after 5
seconds it will automatically be saved.
Menu setting:
•Press to select between normal mode or weekly mode, in normal
mode the heater works without the timer setting.
•Press , select heater under normal mode, press , the LCD
screen flashes the room temperature, press or to set the
desired temperature, press to save the settings or after 5
seconds it will automatically be saved. (The temperature must be set
higher than the room temperature)
•Press to select the weekly mode, the LCD shows the days of the
week (MO-SU) on top, and display on the left corner, press
, the temperature code flash, press or to set the
desired temperature.
•Press , the screen will show “ON” to set the timer start setting, the
hour code flashes, to set the timer, press or to select the
desired starting hour, press to set the minutes, press , the
screen will show “OFF” to set the timer stop setting, the hour code
flashes, press or to select the desired stop hour, press
and press or to set the minutes, press to
complete the timer.
•The stop time must be later than the start time, if the stop time is earlier
than the start time, the timer will not work for this date.
•Do not turn off the device after setting the weekly timer. If the device is
switched off, the set weekly timer will not be executed.
Room temperature control with open window detection
•The appliance has automatic open window detection. If the ambient
temperature drops more than 3⁰C, the device will not work to save
energy; If heating is required, all windows and doors must be closed or
the ventilation system must be switched off, then the appliance must be
switched on again before it can continue to heat.
•The open window detection function is enabled by default, the function
can by canceled by pressing for 5 seconds. A sound will emit and
the window opening symbol in the top right of the display will go out. To
resume the open window detection function press for 5 seconds,
the window opening symbol will be displayed and the function will work
normally again.
Technical Specification
DetailsKA-5094
Voltage220-240V~
Frequency50-60Hz
Power550W
CLEANING AND MAINTENANCE
•Before cleaning, unplug the appliance and wait for the appliance to cool
down.
•Clean the appliance with a damp cloth. Never use harsh and abrasive
cleaners, scouring pad or steel wool, which damages the device.
ENVIRONMENT
The crossed out wheelie bin symbol means that this product shall
not be disposed of with normal household waste. Electronic and Electrical
Equipment not included in the selective sorting process are potentially
dangerous for the environment and human health due to the presence of
hazardous substances. Please dispose of responsibly at an approved
waste or recycling facility.
Support
You can find all available information and spare parts at www.tristar.eu!
NLGebruiksaanwijzing
VEILIGHEID
•Als u de veiligheidsinstructies negeert, kan de
fabrikant niet verantwoordelijk worden
gehouden voor de mogelijke schade.
•Als het netsnoer beschadigd is, moet het
worden vervangen door de fabrikant, de
onderhoudsmonteur van de fabrikant of door
personen met een soortgelijke kwalificatie om
gevaar te voorkomen.
•Verplaats het apparaat nooit door aan het snoer
te trekken en zorg dat het snoer niet in de war
kan raken.
•Het apparaat moet op een stabiele, vlakke
ondergrond worden geplaatst.
•De gebruiker mag het apparaat niet onbeheerd
achterlaten terwijl het op de voeding is
aangesloten.
•Dit apparaat is uitsluitend voor huishoudelijk
gebruik en voor het doel waar het voor bestemd
is.
•Dit apparaat mag door kinderen van 8jaar en
ouder en personen met verminderde
lichamelijke, zintuiglijke of verstandelijke
capaciteiten of gebrek aan kennis worden
gebruikt, mits dit gebeurt onder toezicht of zij de
juiste instructies hebben gekregen over het
gebruik van het apparaat en de gevaren van het
gebruik begrijpen.
•Kinderen mogen niet spelen met het apparaat.
•Het apparaat mag niet zonder toezicht worden
gereinigd of onderhouden door kinderen.
•Kinderen van 3jaar en jonger moeten uit de
buurt van het apparaat worden gehouden, tenzij
er constant toezicht is.
•Kinderen van 3 tot 8jaar mogen het apparaat
alleen in- en uitschakelen als het op de
gewenste plek is geplaatst of geïnstalleerd, mits
dit gebeurt onder toezicht of zij de juiste
instructies hebben gekregen over het veilige
gebruik van het apparaat en de gevaren van het
gebruik begrijpen.
•Kinderen van 3 tot 8jaar mogen het apparaat
niet op een stopcontact aansluiten of het
apparaat bedienen, reinigen of onderhouden.
•Dompel het snoer, de stekker of het apparaat
niet onder in water of andere vloeistoffen om
elektrische schokken te voorkomen.
•WAARSCHUWING: Sommige onderdelen van
dit product kunnen zeer heet worden en
brandwonden veroorzaken. Wees extra
voorzichtig als u het apparaat gebruikt in de
buurt van kinderen en kwetsbare personen.
•Gebruik de verwarmer niet in de directe
omgeving van een bad, douche of zwembad.
•Er dient niet in dwarsbalken, balken en spanten
te worden gesneden of gekerft om het apparaat
te installeren.
•Installeer het apparaat niet in de buurt van
gordijnen en andere brandbare materialen. Dit
kan brand veroorzaken.
•Het apparaat dient onder geen enkele
omstandigheden afgedekt te worden met
isolerend of soortgelijk materiaal.
•De verwarming dient niet direct onder een
stopcontact geplaatst te worden.
•Gebruik deze kachel niet nadat hij is gevallen.
•WAARSCHUWING: Gebruik de heater niet als
de glazen panelen beschadigd zijn.
•Zet deze kachel op een horizontaal en stabiel
oppervlak of bevestig hem aan de wand, voor
zover van toepassing.
•WAARSCHUWING: Gebruik deze kachel niet in
kleine kamers waar zich personen bevinden die
niet in staat zijn de kamer zelfstandig te
verlaten, tenzij zij onder voortdurend toezicht
staan.
•WAARSCHUWING: Houd om de kans op brand
te verkleinen weefsels, gordijnen of eventuele
andere brandbare materialen op een
minimumafstand van 1m van de luchtuitlaat.
•De kachel moet zodanig worden gemonteerd
dat de knoppen en andere
bedieningselementen niet vanuit het bad of de
douche bediend kunnen worden.
•WAARSCHUWING: Om oververhitting te
voorkomen, raden we u aan om het apparaat
niet te bedekken.
Afgedankte elektrische producten mogen niet samen met
huishoudelijk vuil worden weggegooid. Gelieve te laten recyclen bij de
daartoe aangewezen faciliteiten. Neem contact op met uw gemeente of
plaatselijke winkel voor advies over recycling.
Dit product voldoet aan de conformiteitseisen van de
toepasselijke Europese verordeningen of richtlijnen.
The Green Dot is het geregistreerde handelsmerk van Der Grüne
Punkt - Duales System Deutschland GmbH en is een wereldwijd
beschermd handelsmerk. Het logo mag uitsluitend worden gebruikt door
klanten van DSD GmbH die in het bezit zijn van een geldig
handelsmerkgebruikscontract of door aangewezen
afvalverwerkingsbedrijven binnen de Bondsrepubliek Duitsland. Dit geldt
ook voor de reproductie van het logo door derden in een woordenboek,
een encyclopedie of een elektronische databank met een naslagwerk.
Gescheiden inzameling / Controleer uw gemeentelijke richtlijnen.
Het product en de verpakkingsmaterialen zijn recyclebaar, binnen
de grenzen van de uitgebreide verantwoordelijkheid van de fabrikant.
Verwijder het gescheiden, volgens de geïllustreerde
verpakkingssymbolen, voor een betere afvalverwerking. Het Triman-logo
is alleen in Frankrijk geldig.
ONDERDELENBESCHRIJVING
1.Aan/uit-schakelaar
2.Scherm
3.Aan/uit-aanraaktoets
4.Menu-aanraaktoets
5.Aanraaktoets selecteren
6.Omlaag-aanraaktoets
7.Omhoog-aanraaktoets
8.Pootjes
INSTALLATIE
Wandmontage
1.Markeer de posities van de vier boorgaten op de muur. (Installeer de
verwarming bij voorkeur op 20 tot 100 cm hoogte van de vloer voor de
beste prestaties).
2.Boor de gaten met de boor uit het accessoirepakket.
3.Steek de plastic railbevestigingen in de gaten.
4.Installeer het verwarmingspaneel op de vier railbevestigingen die
overeenkomen met de vier gaten op de verwarming.
5.Schroef de vier bouten in de plastic railbevestigingen.
6.Plaats de afdekdoppen op de bouten. Het is aan te raden om wat
gewone lijm te gebruiken zodat de doppen goed op de bouten blijven
zitten.
•Verwijder de doppen, schroef de bouten los en til het verwarmingspaneel
naar beneden om het apparaat van de muur te halen.
•Zorg ervoor dat de afstand tussen de onderkant van het
verwarmingselement en de vloer niet minder dan 20 cm bedraagt.
Voetjes monteren
•Als u de heater niet aan de muur monteert, moet u de meegeleverde
voetjes aan het apparaat bevestigen.
•Plaats de poten en bevestig ze door de schroeven in de behuizing te
schroeven.
•Zorg dat u de voetjes correct plaatst in de onderkant van de heater.
VOOR HET EERSTE GEBRUIK
•Als het apparaat voor de eerste keer wordt aangezet, ontstaat een lichte
geur. Dit is normaal, zorg voor voldoende ventilatie. Deze geur is maar
tijdelijk en zal spoedig vervliegen.
•Tijdens het opwarmen en afkoelen van de heater kunnen er geluiden uit
de heater komen als gevolg van uitzetten en samentrekken. Dit is
normaal en wijst niet op een defect.
•Sluit de stroomkabel op het stopcontact aan. (Let op: controleer of de
aangegeven spanning op het apparaat overeenkomt met de plaatselijke
spanning, alvorens het apparaat aan te sluiten. Spanning 220V-240V~
50-60Hz.)
FUNCTIES VAN TOETSEN/DISPLAY
GEBRUIK
•Druk op de aan/uit-schakelaar aan de zijkant van de heater om deze
volledig in of uit te schakelen.
Functies van de aanraaktoetsen
Instelling van het vermogen:
•Druk op om de verwarming in te schakelen, het scherm toont de
kamertemperatuur, door er opnieuw op te drukken gaat het apparaat in
de stand-bymodus.
Instelling van datum en tijd:
•Druk op gedurende 3 seconden voor de instelling van het
tijdschema, de uurcode knippert, druk op of om het uur
op 1-23 in te stellen.
•Druk op , de minutencode knippert, druk op of om
de minuten op 1-23 in te stellen.
•Druk op , de weekcode knippert, druk op of om de
weekdag van MO-SU in te stellen, druk op om op te slaan of het
wordt na 5 seconden automatisch opgeslagen.
Menu-instelling:
•Druk op om te wisselen tussen de normale modus en de
wekelijkse modus. In de normale modus werkt de verwarming zonder de
timerinstelling.
•Druk op , selecteer de verwarming onder de normale modus, druk
op , de kamertemperatuur knippert op het LCD-scherm, druk op
of om de gewenste temperatuur in te stellen, druk op
om de instellingen op te slaan of het wordt na 5 seconden
automatisch opgeslagen. (De ingestelde temperatuur moet hoger zijn
dan de kamertemperatuur)
Produktspezifikationen
| Marke: | Tristar |
| Kategorie: | Heizung |
| Modell: | KA-5094 |
Brauchst du Hilfe?
Wenn Sie Hilfe mit Tristar KA-5094 benötigen, stellen Sie unten eine Frage und andere Benutzer werden Ihnen antworten
Bedienungsanleitung Heizung Tristar

31 März 2026
28 Februar 2026
23 Februar 2026
31 Januar 2026
13 Januar 2026
24 Dezember 2025
23 Dezember 2025
9 Dezember 2025
6 Dezember 2025
6 September 2025
Bedienungsanleitung Heizung
Neueste Bedienungsanleitung für -Kategorien-
3 April 2026
3 April 2026
3 April 2026
2 April 2026
2 April 2026
1 April 2026
31 März 2026
31 März 2026
31 März 2026
31 März 2026