Wilbur Curtis CAFE PC1 Bedienungsanleitung


Lies die bedienungsanleitung für Wilbur Curtis CAFE PC1 (8 Seiten) kostenlos online; sie gehört zur Kategorie Kaffeemaschine. Dieses Handbuch wurde von 2 Personen als hilfreich bewertet und erhielt im Schnitt 4.8 Sterne aus 1.5 Bewertungen. Hast du eine Frage zu Wilbur Curtis CAFE PC1 oder möchtest du andere Nutzer dieses Produkts befragen? Stelle eine Frage

Seite 1/8
1
Symbols
WARNINGS To help avoid personal injury
Important Notes/Cautions from the factory
Sanitation Requirements
1. Connectawaterlinefromyourfacilitytothe1/4”arewaterinletttingofthevalve,behindthemachine.Watervolumegoingtothe
machineshouldbestable.Usetubingsizedsufcientlytoprovideaminimumowrateofonegallonperminute.
2. Plugthepowercordintoanelectricaloutletratedat20A.
3. Switchonthetoggleswitch,behindtheunit,thatrunspowertothecomponentsinthemachine.ThedisplaywindowandStop/Wash
4. Waterintheheatingtankwillrequireabout½hourtoreachoperatingtemperature(factorysettingof190°F).AtthistimetheReady
lightwillappear.
5. Removeandllthecanisterswithpowderedcappuccinomixes.
FOR THE LATEST SPECIFICATIONS AND INFORMATION GO TO WWW.WILBURCURTIS.COM
Thisapplianceisdesignedforcommercialuse.Anyservicingotherthancleaningandmaintenanceshouldbeperformedbyanautho-
rizedWilburCurtisservicecenter.
DoNOTimmersetheunitinwateroranyotherliquid
Toreducetheriskofreorelectricshock,doNOTopentoppanel.Nouserserviceablepartsinside.Repairshouldbedone
onlybyauthorizedservicepersonnel.
Keephandsandotheritemsawayfromhotpartsofunitduringoperation.
Nevercleanwithscouringpowdersorharshimplements.
Your Curtis CAFE System is Factory Pre-Set and Ready to Go Right from the Carton.
FollowingaretheFactorySettingsforyourPrimoCappuccinoBeverageSystem:
•TankTemperature=190°F •FlavorControls=Setat50% •DispensingModeSetforManualDispensing
Generallytherewillneverbeareasontochangeyourprogramming.However,shouldyouneedtomakeslightadjustmentstomeet
yourdispensingneeds,programminginstructionsareprovidedlaterinthismanual.
SystemRequirements:
•WaterSource20–90PSI(MinimumFlowRateof1GPM)
•Electrical:Seeattachedschematicforstandardmodelorvisitwww.wilburcurtis.comforyourmodel.
Equipmenttobeinstalledtocomplywithapplicablefederal,state,orlocalplumbing/electricalcodeshavingjurisdiction.
SETUP STEPS
Theunitshouldbelevel(lefttorightandfronttoback),locatedonasolidcountertop.Connectawaterlinefromthewaterltertothe
brewer.NOTE:Sometypeofwaterltrationdevicemustbeusedtomaintainatrouble-freeoperation.(Inareaswithextremelyhardwa-
ter,wesuggestthatasedimentaryandtaste&odorlterbeinstalled.)Thiswillprolongthelifeofyourdispensingsystemandenhance
cappuccinoproductquality.
NSFInternationalrequiresthefollowingwaterconnection:
1. Aquickdisconnectoradditionalcoiledtubing(atleast2xthedepthoftheunit)isrequiredsothattheunitcanbemovedfor
cleaning.
2. Thisunitmustbeinstalledwithadequateback-owprotectiontocomplywithapplicablefederal,stateandlocalcodes.
3.Waterpipeconnectionsandxturesdirectlyconnectedtoapotablewatersupplyshallbesized,installedandmaintainedin
accordancewithfederal,state,andlocalcodes.
FILL CANISTERS DAILY
1. Openthefrontdoortoaccessthecoffeecanisters.
2. Thecanistersmustberemovedfromtheunitforlling.Turntheproductdelivery
elbowsupward.
3. Repositionthecanistersonthemachine,turningtheproductdeliveryelbowsdown-
wardandaligningthegearsocketwiththemotorshaft.
Important Safeguards & Symbols
CAUTION: DONOT
connect this unit to hot
water.Theinletvalveis
notratedforhotwater.
CAUTION: Please use
thissetupprocedure
beforeattemptingtouse
thisappliance.Failuretofollowthe
instructionscanresultininjuryorthe
voidingofthewarranty.
WARNINGHOTLIQUID,
Scaldingmayoccur.
Avoidsplashing.
Models Included
wCAFEPC1
wCAFEPC1WITHLIGHTBOX
wCAFEPC2
wCAFEPC2WITHLIGHTBOX
wCAFEPC3
wCAFEPC3ICEDCAPPUCCINO
w CAFEPC3WITHLIGHTBOX
w CAFEPC4
w CAFEPC4WITHLIGHTBOX
OPERATING INSTRUCTIONS
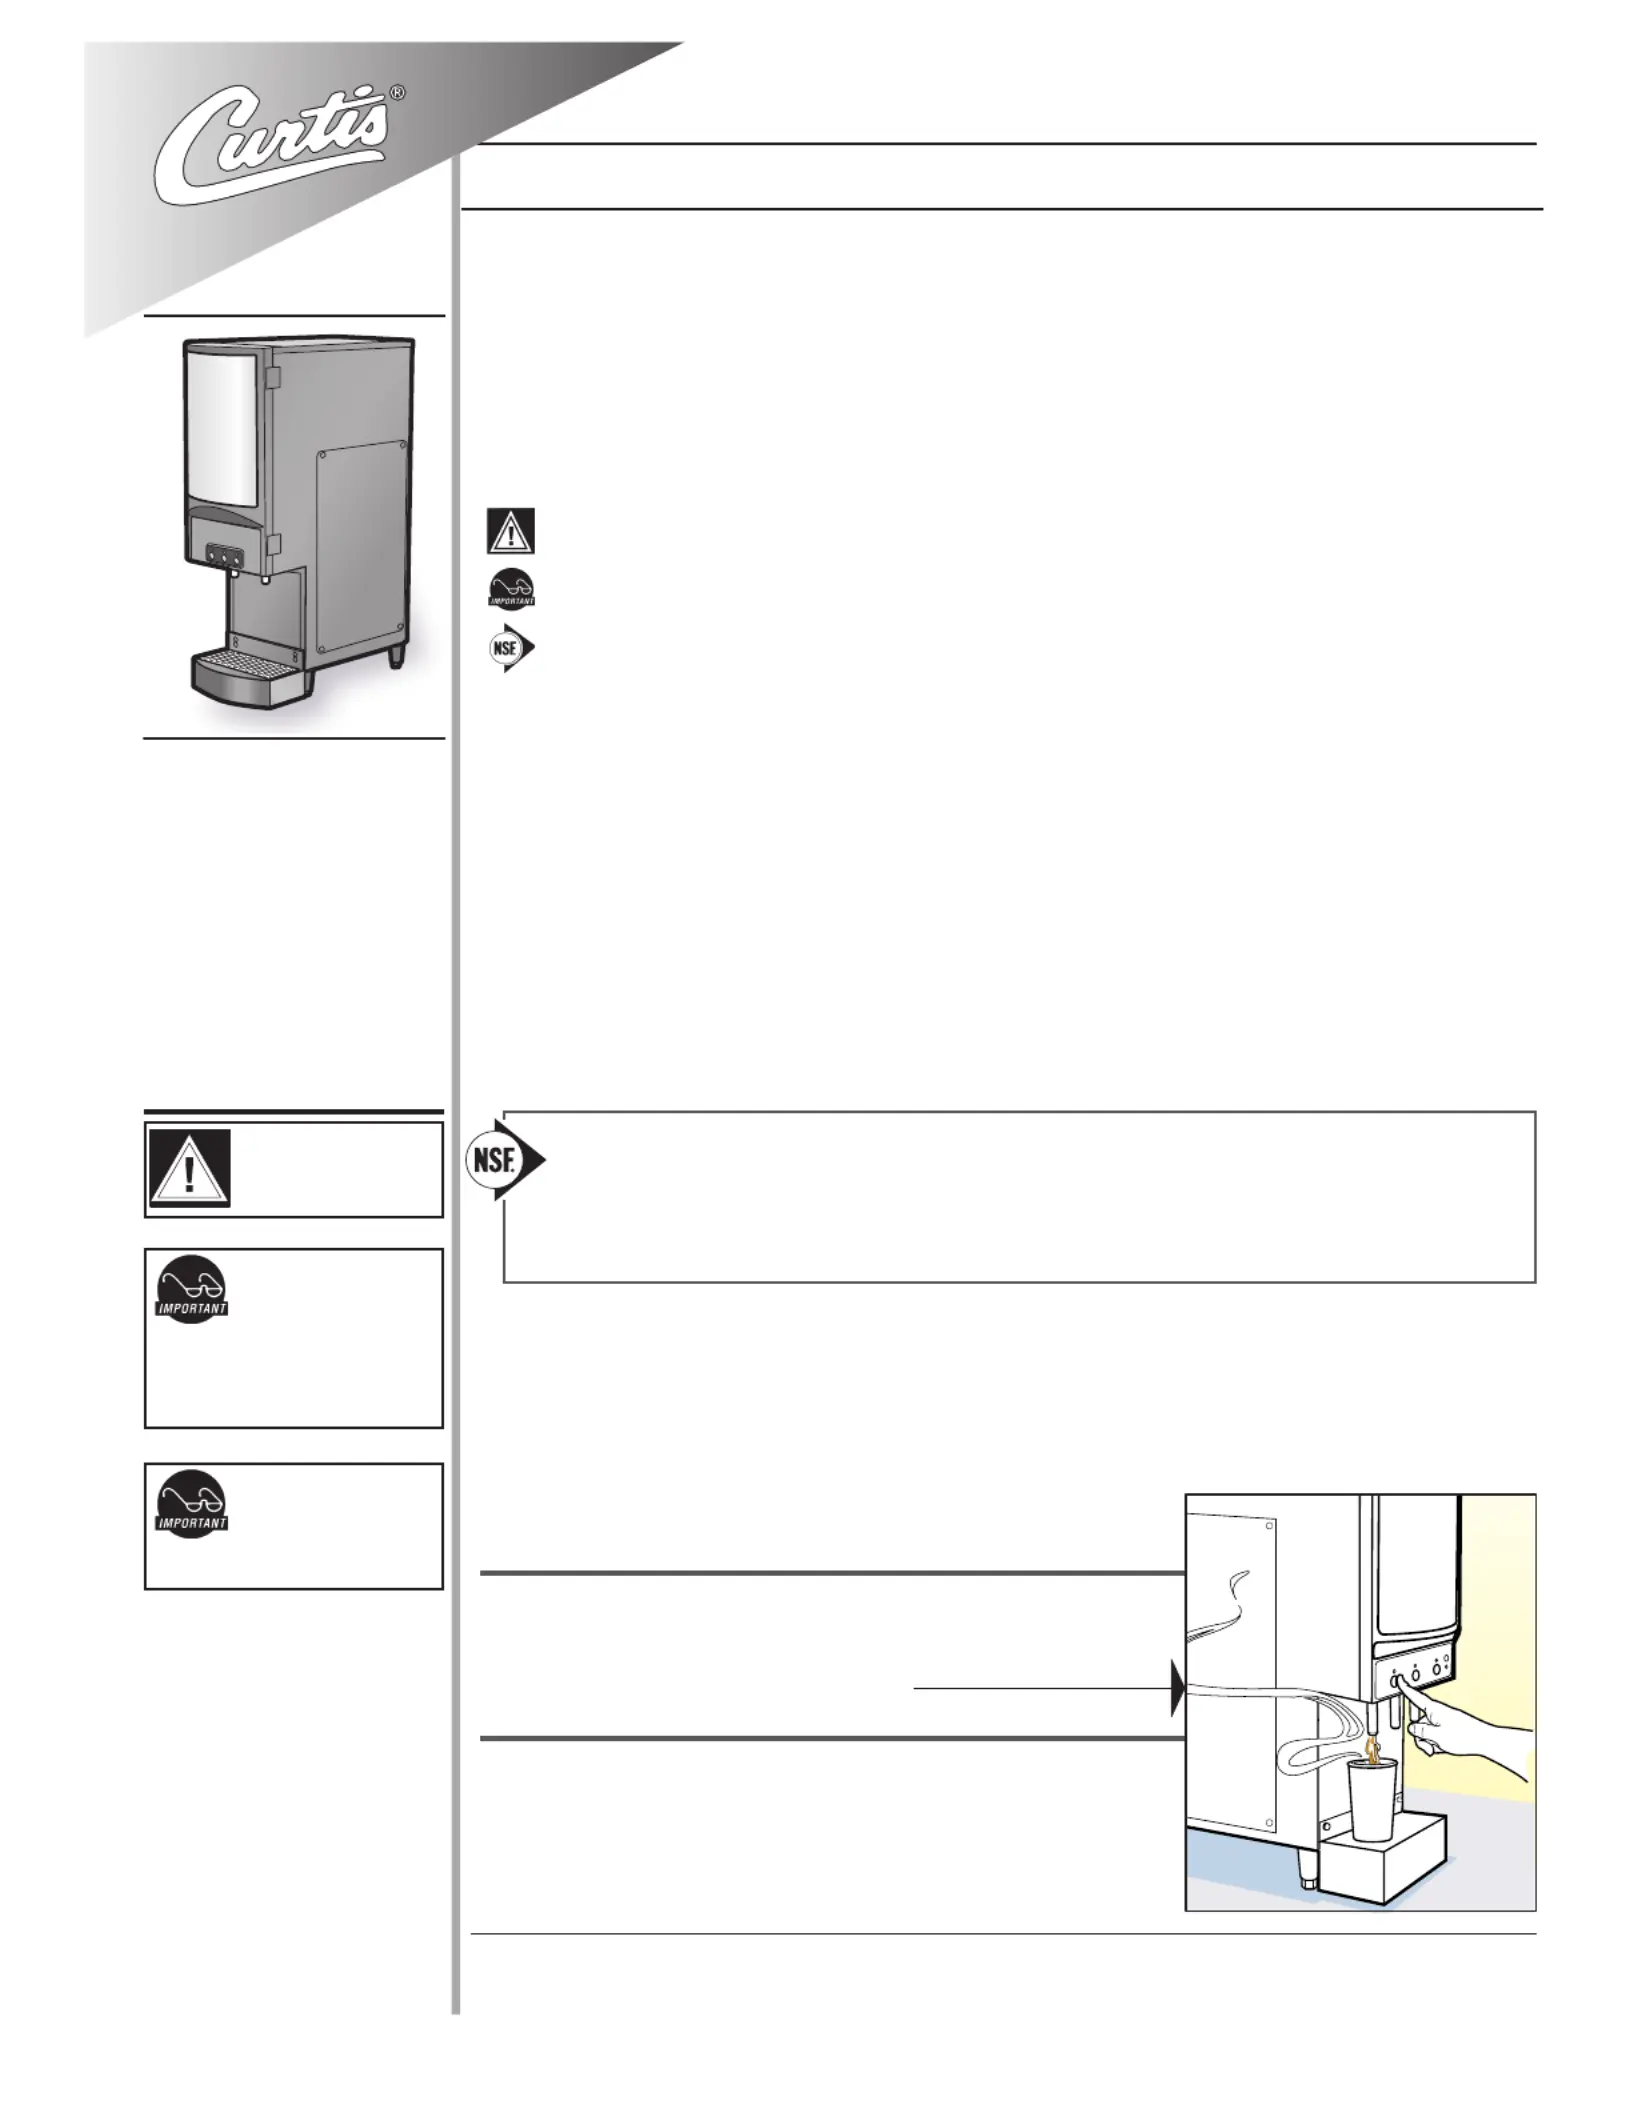
1. Chooseaavor.Placeyourcupunderthespoutbeneaththedesiredavor.
2. Pushandholdthedispensingbuttonforthisavor.
3. Releasethebuttonwhenthecupis¾full.
W C Cilbur urtis ompany nC, i .
ServiceManual–CAFEPC
ISO9001:2008REGISTERED
WILBURCURTISCO.,INC.
6913WestAccoStreet
Montebello,CA90640-5403
Forthelatestinformationgoto
www.wilburcurtis.com
Tel:800-421-6150
Fax:323-837-2410
2
Steps to Programming
Your Curtis Cafe System is Factory Pre-Set for Optimum Performance. Usually this Does Not Change.
Manual Liquid Dispensing Mode
ThisfeaturesetsuptheCaféPCunittodispenseproductonlyaslongastheuserholdsdowntheselectedPUSHbutton.
Assoonastheuserstopspressingthebutton,productstopsowingintothecup.SettingtheunitforManualLiquidDispensewillturnoffthe
PortionControlDispenseMode.
Enter Program Mode STOP/WASHpressandhold foraboutten[10]secondsuntilall
lightsstartblinking.
To program Product % Ratio,pressandholdtheselectedPUSHbuttonforapproximately
onesecond,thenrelease.ThecurrentsettingwillbeindicatedbyLEDashes.
To change the product throw,pressandholdthebuttonuntillightstartsquickashing.Eachquickashincreases
theamountby10%.Releasethebuttonwhenthedesiredthrowamountisachieved.Afterreleasingthebutton,the
numberofblinksrepresentthenewsetting.
To exit the Powder Dispensing Mode,pushanyotherPUSHbutton.
Product % Ratio
Thiscontrolstheamountofdryproductthatismeteredfromthehoppers.Thiscanbeprogrammedfrom10%to100%
ofthecapacityofthedispensingsystem.BycountingLEDashesyoucandeterminetheproduct%ratiocurrentlyset
forthisdispensebutton(seetable).
Portion Control Liquid Dispensing Mode
Thisprogramadjustmentallowsyoutosetupthemachinetoautomaticallydispenseapresetvolumeofcappucinoproduct.Whentheuser
makesaPUSHbuttonselection,theunitdispensesonlythevolumeofcappucinoproductprogrammedbythePortionControlDispensing
Mode.BysettingtheunitforPortionControlDispensing,youhavelockedoutthemanualdispensefeature.
Enter Program Mode STOP/WASH pressandhold foraboutten[10]secondsuntilalllightsstartblinking.
To select & change the Portion Control Dispensing Volume whileintheprogrammingmode,pressandholdthe
selectedPUSHbuttonuntiltheliquidbeginstoow,thenrelease.Thetimingstartswhenliquidbeginstoow.
Stop & Exit When3/4ofthecupvolumeisachieved,pressthePUSHbuttononceagaintostopthedispensing.
Youhavenowsetthetimingforthisbuttonandhaveexitedtheprogrammingmode.Pressingthedispensebutton
nowwillprovidetheliquidvolumethatyoujustset.Toresetthetiming,youmuststartagainbyenteringtheprogram-
mingmode.
WARNINGHOTLIQUID,Scalding
mayoccur.Avoidsplashing.
Placeanemptycontainerunderthe
dispensingnozzleswhileprogramming.
Allprogrammingisperformedatthecontrolpanel
(illustration,right).
TheSTOP/WASH BUTTONhasseveralfunc-
tions.ThisbuttonisusedtostopaPortionControl
dispensecycle.Itisusedtowashoutthemixinganddispensingsystemsanditisusedtoenterprogrammingfunctions.
3
Number of
Blinks
80ºF
85ºF
90ºF
95ºF
100ºF
105ºF
110ºF
120ºF
140ºF
185ºF
190ºF
192ºF
194ºF
196ºF
198ºF
200ºF
202ºF
204ºF
1
2
3
4
5
6
7
8
9
10
11
12
13
14
15
16
17
18
Temperature
Temperature Settings
Conrm/Reset Temperature (Factory set at 190ºF . . . Cold Capppuccino set at 100ºF)
Enter Program Mode STOP/WASHpressandhold foraboutten[10]secondsuntilalllightsonthecontrolpanel
areblinking.
Set Manual Dispense Whileyouareintheprogrammingmode,pressandholdthePUSHbutton.
Hotliquidwillstarttoow.
ContinuetoholddownthePUSHbuttonuntilliquidstopsowing,thenreleasethebutton.
Atthistime,youhaveselectedtheManualLiquidDispensingModeandhaveexitedoutoftheprogrammingmode.
Thesefeaturesallowyoutochecktheheatingtanktemperatureorchangethetemperatureifdesired.Thetem-
peratureinthetankisprogrammablefrom80ºF,in5degreeincrementsupto140ºF,thentemperaturewilljump45
degreesto185ºF,thenresume2degreeincrementsuptoamaximum204°F(seeTemperatureSettingstable,right).
Enter Program Mode STOP/WASHpressandhold foraboutten[10]secondsuntilall
lightsonthecontrolpanelareblinking.
Enter Temperature Program Mode STOP/WASHPressandhold forapproximately1
second,thenrelease.ThecurrentsettingwillbeindicatedbyLEDashes.
To Change Temperature.ReleaseSTOP/WASHbutton,thenpressandholdagain.Each
quickashrepresentsatemperatureincrease.SeetheTemperatureSettingstableforthe
actualtemperatures.ReleaseSTOP/WASHwhendesiredtemperatureisreached.
To Set and Exit,pressonofthePUSHbuttons.
To Change Tank Temperature
Programming Continued ...
WATER LEVEL ERROR 3LONGAND1SHORT
Whenthiscodeisseenonthecontrolpanel,thereisamalfunctioninthewaterlevelcontrolsystem.
TEMPERATURE SENSOR ERROR 3LONGAND2SHORT
Whenthislightpatternisashingonthecontrolpanelthereisasystemfailurewiththeheatingtank.
COMMUNICATION ERROR 3LONGAND3SHORT
Thisashinglightpatternindicatesacommunicationerrorbetweentheswitchpanelonthedoorand
thepowermodule.
ERROR CODES:CurtisCafesystemscontainvarioussafetyfeaturesintheelectroniccircuitrythatshutdownthefunctionsoftheunitintheeventofasystem
failure.Errorcodesaresignalledbythe lightblinkingoneofthreepatterns:READY
FlushingtheWhipperChambers
Everythreetofourhoursormoreoftenifnecessaryushthewhipperchamber/dispensingsystem.
A. MakesurepowerisON.
B. PressandholdtheSTOP/WASHbutton.SelectoneofthePUSHdispensingbuttonsandpress.Hotrinsewaterwillushoutthesystem.
LiftofftheSTOP/WASHbuttonwhenwaterrunsclear.
C. Cleanupanywaterthatmayhavespilled.
Cleaning
A. Switchofftheunitatthepowertoggleswitch,markedCONTROL,behindtheunit.
B. Wipeallexteriorsurfaceswithadampcloth;removinganyspills,dustordebrisfromtheunit.
C. Removethedriptrayandlouveredscreenandwashoutitscontents.Forhardtocleandeposits,useamilddetergentsolution.
D. Cleanaroundthedispensingarea,wipingwithanontoxiccleaner.


Produktspezifikationen

Marke: Wilbur Curtis
Kategorie: Kaffeemaschine
Modell: CAFE PC1

Brauchst du Hilfe?

Wenn Sie Hilfe mit Wilbur Curtis CAFE PC1 benötigen, stellen Sie unten eine Frage und andere Benutzer werden Ihnen antworten