BBB BottomPress PF30 BBO-01 Bedienungsanleitung
BBB Nicht kategorisiert BottomPress PF30 BBO-01
Lies die bedienungsanleitung für BBB BottomPress PF30 BBO-01 (1 Seiten) kostenlos online; sie gehört zur Kategorie Nicht kategorisiert. Dieses Handbuch wurde von 7 Personen als hilfreich bewertet und erhielt im Schnitt 4.3 Sterne aus 7 Bewertungen. Hast du eine Frage zu BBB BottomPress PF30 BBO-01 oder möchtest du andere Nutzer dieses Produkts befragen? Stelle eine Frage
Seite 1/1
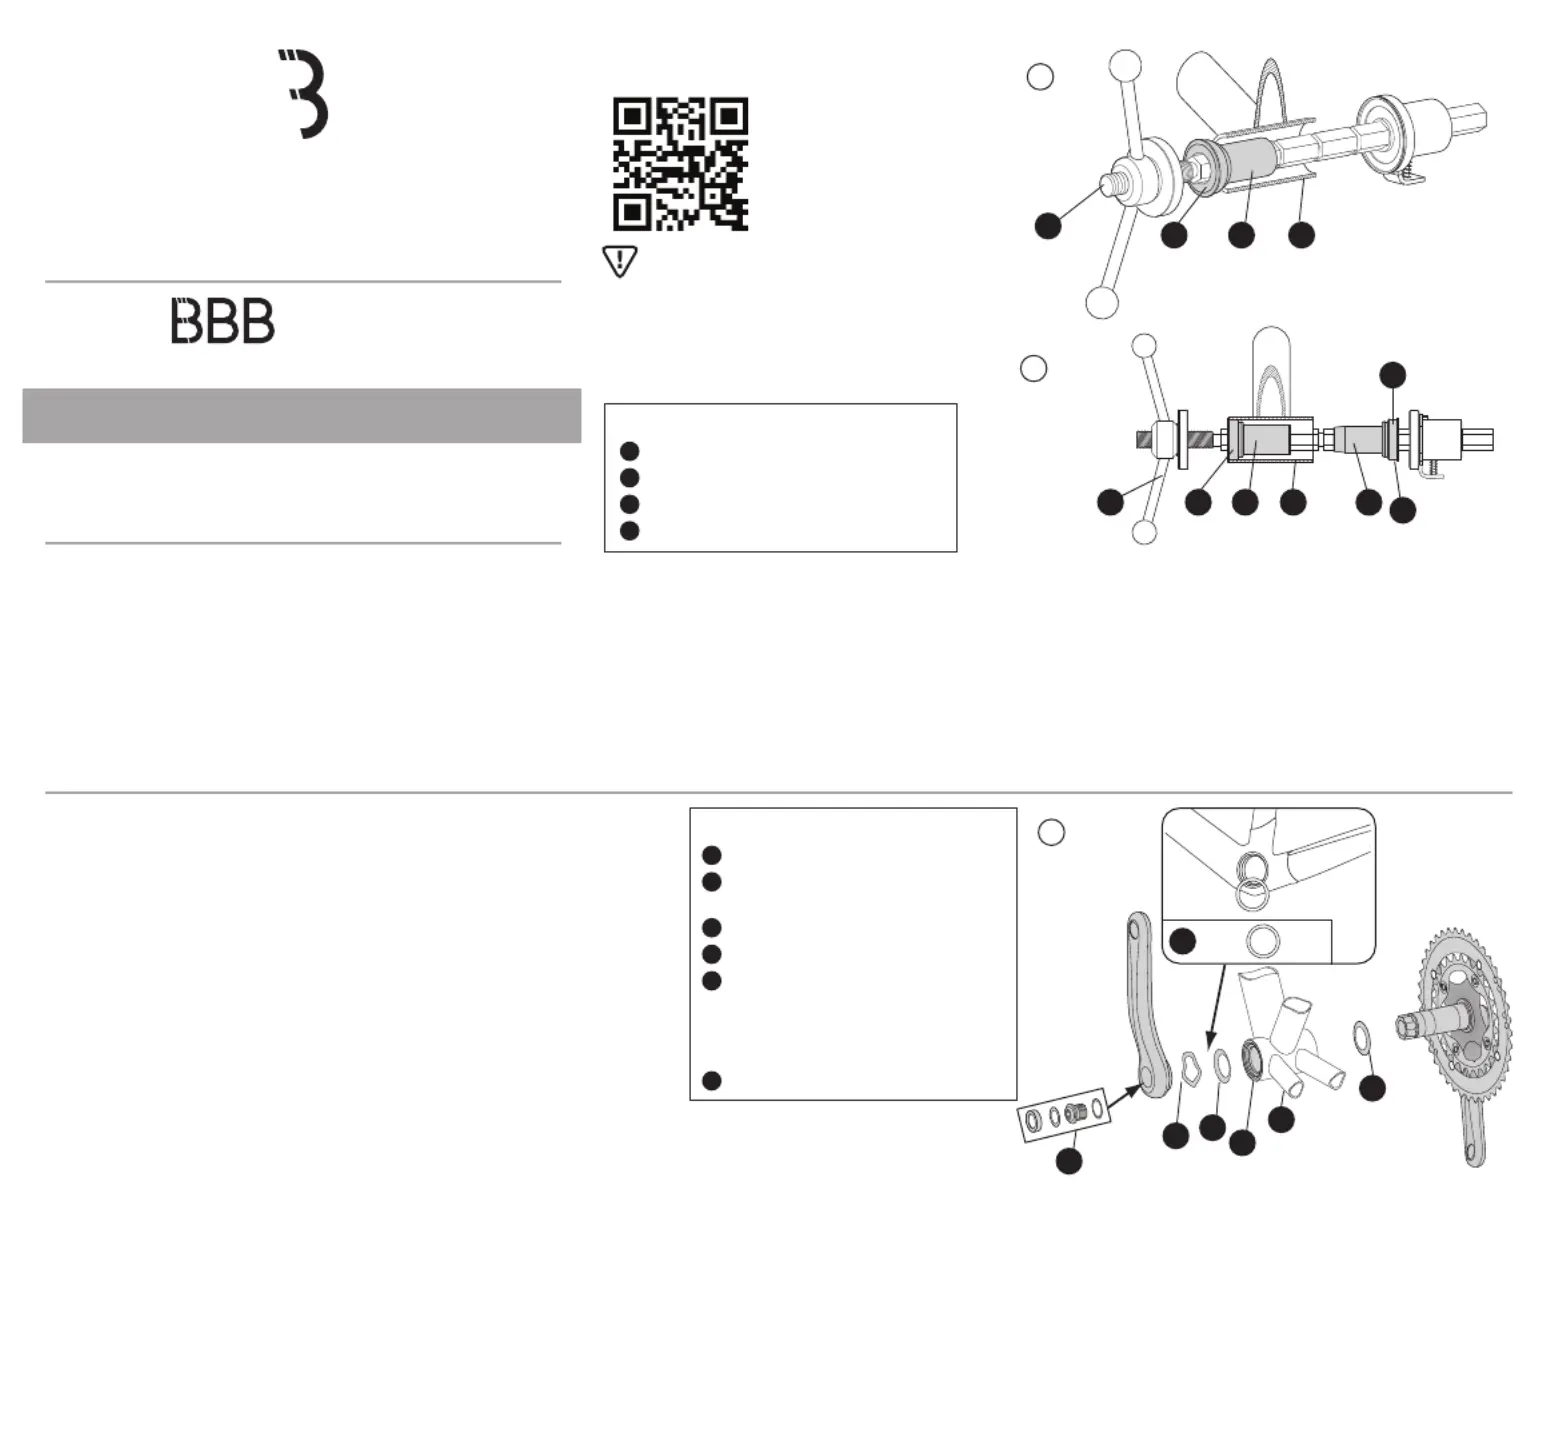
PRESS FIT BOTTOM BRACKET INSTALLATION, ILLUSTRATIONS A AND B :
1. Ensure that bottom bracket (BB) shell is clean and free of metal chips, dirt and excess paint.
2. Install only bearing cup
③
in the BB shell at a time to avoid damage to the plastic center sleeve
②
.
3. Place bearing cup
③
with half of plastic sleeve
②
on the press tool
④
(illustration A). Note: right and left bearing cups are the same. Apply threadlocker on bearing cup “A” before installing.
4. Slide the press tool
④
through the bottom bracket shell
①
.
5. Use the press tool
④
to press the bearing cup
③
with sleeve
②
into the BB shell. Tighten until the thrust face of the bearing cup
③
is flush with the outer face of the bottom bracket shell
①
.
6. Repeat steps 4 through 6 to install remaining bearing cup with sleeve. Be certain that the center sleeve halves are aligned properly to avoid damage. One side of the center sleeve should
easily fit over the other (illustration B). Note: be certain that the veering cups and tool faces are aligned and square otherwise damage to the plastic covers and bottom bracket shell may
occur.
7. When bottom bracket is completely installed, unscrew the press tool and carefully remove from the bottom bracket.
8. Check bearings for rotational smoothness. If bearings feel rough, it may be an indication the cups are not perfectly aligned in the bottom bracket shell. It may be necessary to carefully
remove and reinstall the bearings to be assured the bearing alignment in the bottom bracket shell is correct. the plastic cups used for PF30 may be damaged if removed after Note:
installation. If damage occurs the cups should be replaced.
BBB CYCLING.COM
ROOSEVELTSTRAA T 46, 2321 BM
LEIDEN. THE NETHERLANDS
ENDEFRNLESPT MANUAL / HANDBUCH / MANUEL / HANDLEIDING / MANUAL / MANUAL /
ITHUPLCZ MANUALE / HASZNÁLATI UTASÍTÁS / PODRĘCZNIK / UŽIVATELSKÁ PŘÍRUČKA
/ MANUÁL / JP使用説明書/RUРУКОВОДСТВО ПОЛЬЗОВАТЕЛЯ / SKNOHÅNDBOK
WARNING
Sold only by professional bicycle dealers.
For proper installation, ask your BBB dealer.
Not following the instructions in this manual
may cause damage to the product not covered
under warranty, damage to the bicycle, or
cause an accident resulting in injury or death.
FIND YOUR TRANSLATION
ON BBBCYCLING.COM
BOTTOMPRESS
/BBO-01
BOTTOM BRACKET
COMPONENTS:
Bottom bracket shell
Plastic center sleeve (x 1)
Bearing cup (x 2)
Headset Press Tool (not included)
2
3
4
1
2
3
41
A
B
1
2
3
4
2
3
A
CRANKSET INSTALLATION, ILLUSTRATION C :
1. Place the seal
③
over the drive side bearing with rubber side (with printing
MS223) facing away from PF30 bottom bracket
②
. Apply a layer of Tip:
grease between seal
③
and bearing to reduce friction, as well as improve
protection from water and other contaminants. Completely insert the drive
side crank arm and spindle through the right and left BB30 bearings.
2. Place remaining seal
③
on spindle with rubber side (with MS223 printing)
facing away from bearing. Apply a layer of grease between seal and bearing.
Install wave spring washer
④
over spindle on the left side of BB shell.
Note: If BB shell is eccentric, spindle will not go through the left and right
bearings or the bearing will not rotate smoothly after installation. If bearings
feel tight or do not roll smooth after spindle is installed, it may be necessary
to remove and reinstall the bottom bracket so the bearings are in alignment.
3. Self-extracting crank bolt assembly
⑤
is pre-installed from factory. Install
the left crank by engaging the spindle hole of the crank to the spindle.
Thread the self-extracting crank bolt into the spindle using a torque wrench
and 10mm Allen key. Tighten the crank bolt to a torque of 380-410 kgf.cm /
38-41 Nm / 337-363 in.lbs. Always use a calibrated torque wrench to tighten
the crank bolt. Stripping or breakage due to installing without a torque
wrench is NOT covered under manufacturing warranty.
Caution: The MS188 shim will be necessary when the bottom bracket shell is not made to exact specifications.
The shim is not required when the BB30 specifications of the frame are correct. The 0.5mm thick adjusting spacer
MS188 is included. It is to be used only when you need to adjust the side-to-side spindle movement in the bottom
bracket (referred to as “Side Play” or “Free Play”) or to make small modifications to the chain-line of the bicycle.
If too many spacers are used, the wave spring washer will become completely compressed and lose its spring
function, possibly causing the left arm to come loose after a short time of use. Correct use of the spacer results in
no side play and a small amount of spring washer compression after the crank arm bolts are fully torqued.
The ideal compressed gap is between 1.5 and 2.2mm.
Note: 1. When needing to use one shim, put it on the left side.
2. If the BB shell width is out of tolerance causing the chain-line to be under spec., you can use one shim
on the right side to bring the chain-line into spec.
BBB has no responsibility for misprints or changed technical content.
1
2
43
3
5
C
COMPONENTS:
Bottom bracket shell
PF30 bottom bracket
(already installed)
MS223 seal (x 2)
Wave spring washer (x 1)
Self-extracting crank bolt assembly:
- Washer (x 1)
- M25 BB30 crank bolt (x 1)
- Washer (x 1)
- M18 retaining nut (x 1)
MS188 BB30 Shim
2
3
4
1
6
5
6
Produktspezifikationen
| Marke: | BBB |
| Kategorie: | Nicht kategorisiert |
| Modell: | BottomPress PF30 BBO-01 |
Brauchst du Hilfe?
Wenn Sie Hilfe mit BBB BottomPress PF30 BBO-01 benötigen, stellen Sie unten eine Frage und andere Benutzer werden Ihnen antworten
Bedienungsanleitung Nicht kategorisiert BBB

14 Februar 2026
13 Februar 2026
12 Februar 2026
11 Februar 2026
10 Februar 2026
8 Februar 2026
8 Februar 2026
8 Februar 2026
7 Februar 2026
7 Februar 2026
Bedienungsanleitung Nicht kategorisiert
Neueste Bedienungsanleitung für -Kategorien-
3 April 2026
3 April 2026
3 April 2026
3 April 2026
3 April 2026
3 April 2026
3 April 2026
3 April 2026
3 April 2026
3 April 2026