Cotech FIB75600v1-pt Bedienungsanleitung
Cotech Beleuchtung FIB75600v1-pt
Lies die bedienungsanleitung für Cotech FIB75600v1-pt (4 Seiten) kostenlos online; sie gehört zur Kategorie Beleuchtung. Dieses Handbuch wurde von 14 Personen als hilfreich bewertet und erhielt im Schnitt 4.6 Sterne aus 5 Bewertungen. Hast du eine Frage zu Cotech FIB75600v1-pt oder möchtest du andere Nutzer dieses Produkts befragen? Stelle eine Frage
Seite 1/4
UITED KINGDOMinternet www.clasohlson.co.uk
Ver. 20220516
LED Grow Light
Art.no 36-8557 Modell FIB75600v1-pt
Please read theentire instruction manual before using theproduct and
then save it for future reference. We reserve theright for any errors in text or
images and any necessary changes made to technical data. In theevent of
technical problems or other queries, please contact our Customer Services.
Safety
Warning:
• Do not use thelight if it or its mains lead and plug are damaged in
any way.
• Thelight should only be connected to awall outlet with a230 V,
50 Hz power supply.
• Do not mount thelight in anenvironment where it is exposed to
water, moisture or extreme temperatures.
• Never try to open theproduct, repair or modify it in any way.
Electric shock hazard
• Thebulb in this light fitting must only be replaced by aqualified
electrician.
• Installation and maintenance work on theproduct involves therisk
of anelectric shock.
• If themains lead is damaged it must be replaced by a cable of
identical specifications as theoriginal.
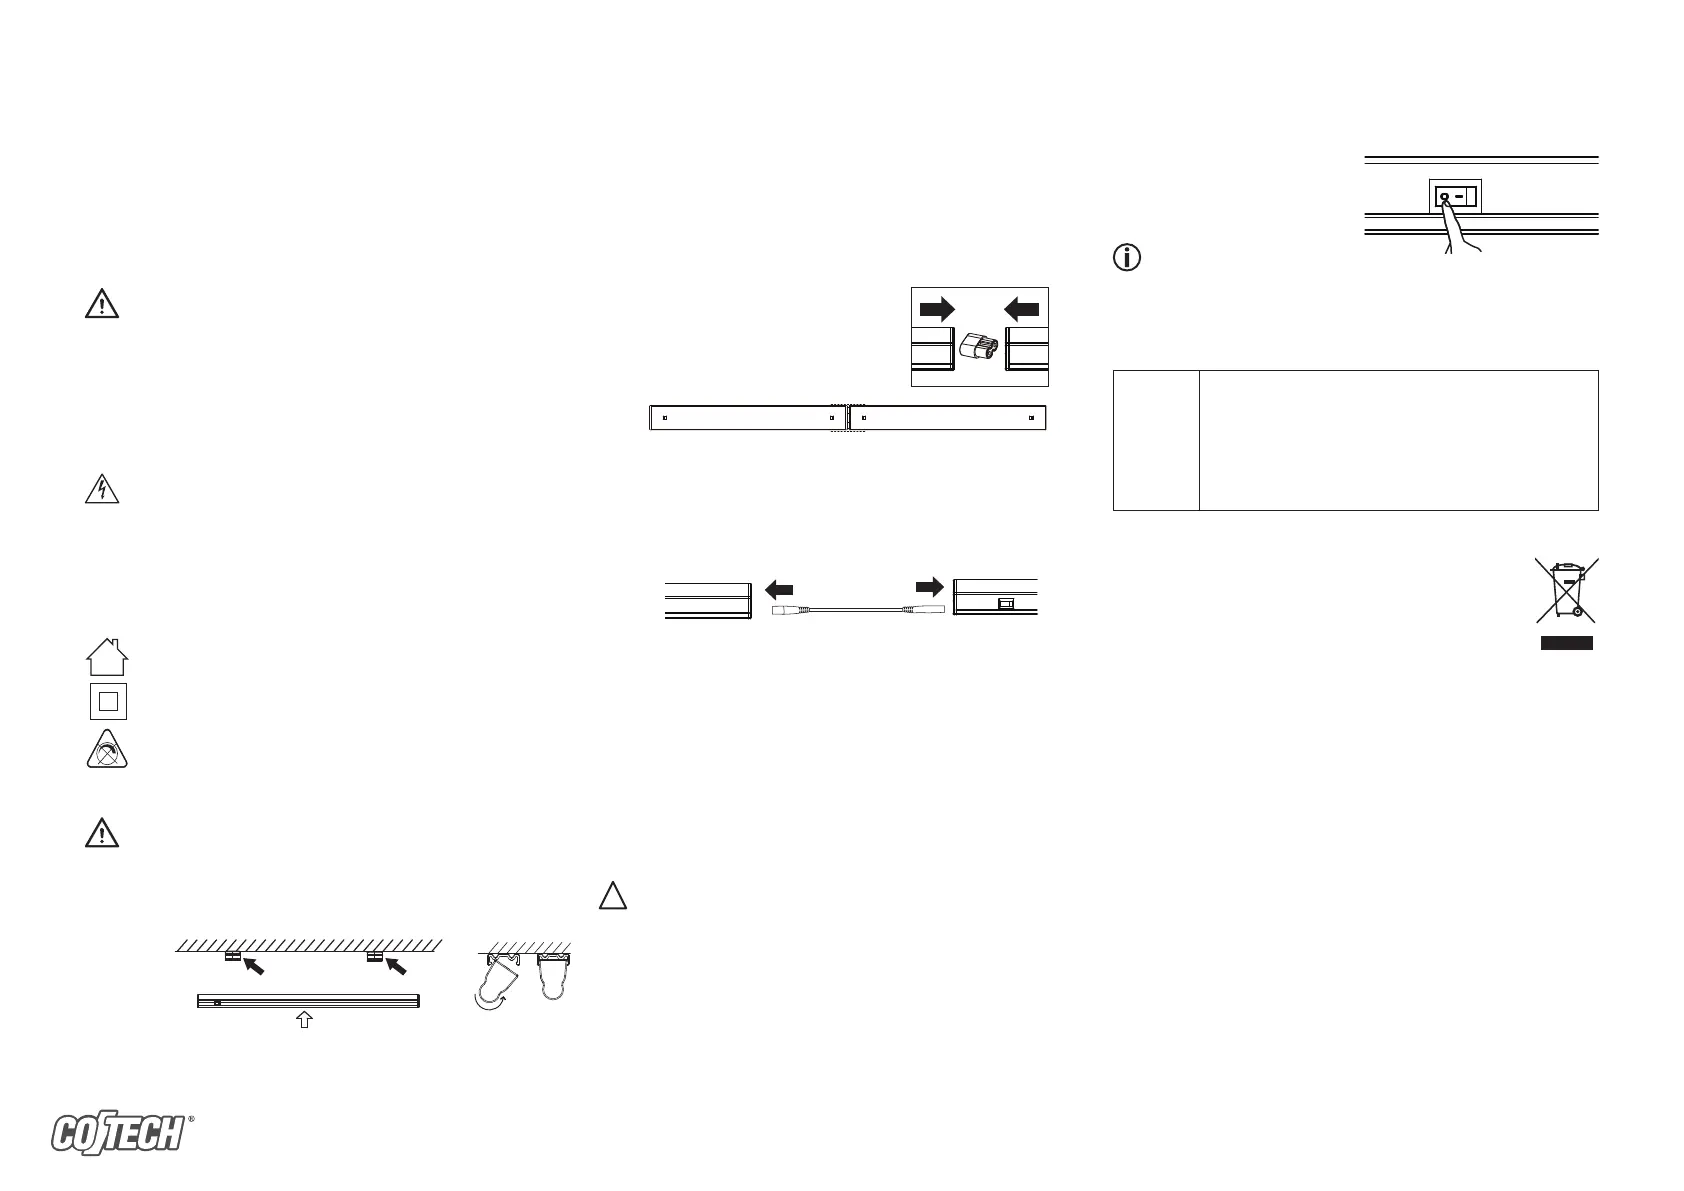
Connecting thelights using aconnector
This product is intended for indoor use only.
Connecting several lights together
Up to 10 light fittings can be interconnected. There are two different
ways of connecting thelights together:
1. Thefirst is with aconnector, which enables thelights to be joined
end to end.
2. Thesecond is using aseries connection cable, which enables
thelights to be joined about 10 cm apart (handy for corner mounting).
1. Push thesupplied connector into
themains socket on thelight fitting.
2. Connect thetwo lights together. Make sure that theconnector is securely
inserted and that both lights are securely connected to each other.
3. Repeat thesame procedure if you wish to connect additional lights.
Connecting thelights using aconnection cable
Installation
Warning:
Ensure that there are no electrical wires or water pipes in theceiling or
wall where you intend to drill/screw.
1. Mount theceiling bracket using thescrew. Use amasonry drill and
wall plug to create ananchor hole if necessary.
• Plant illumination time: Most plants grow better when not exposed
to 24-hour light, they also require aperiod of darkness.
We recommend that thegrow light is used with atimer.
Handy tip
• It is agood idea to connect thelight fitting/s to awall socket which
is controlled by anon/off switch.
Class II luminaire.
Thelight bulb is not dimmable.
Switch thelight fitting on and off
by pressing thepower switch.
1. Use thesupplied series connection cable to connect thefirst light to
thesecond.
2. Repeat thesame procedure if you wish to connect additional lights.
Care and maintenance
• Thelight fitting should be cleaned using adry cloth or vacuum cleaner.
• Unplug thelight fitting from thewall socket if theproduct is not be
used for anextended period.
Instructions for use
Note
• Distance: Theintensity of thelight is inversely proportional to
thesquare of thedistance from thesource, which means that if you
double thedistance between thelight and anobject, only aquarter
of thelight will reach theobject. It is therefore important that
thelights are as close as possible to theplants and equally spaced.
Troubleshooting guide
Thelight
doesn’t
come on.
• Check that thelight is turned on.
• Make sure that themains lead is undamaged and
is securely connected to both thewall socket and
thelight.
• Is thewall socket energised?
• Check that any interconnected lights are intact and
properly connected to each other.
Responsible disposal
This symbol indicates that this product should not be
disposed of with general household waste. This applies
throughout theentire EU. In order to prevent any harm to
theenvironment or health hazards caused by incorrect waste
disposal, theproduct must be handed in for recycling so that
thematerial can be disposed of in aresponsible manner. When
recycling your product, take it to your local collection facility or contact
theplace of purchase. They will ensure that theproduct is disposed of
in anenvironmentally sound manner.
Specifications
Rated voltage220–240 V AC, 50/60 Hz
Mains lead 1.8 m
Bulb LED
Photosynthetic photon flux
PPF 17 μmol/s
PPFD @20 cm 10 μmol/m²/s
WavelengthBlue450 nm
Red 660 nm
Series connection cable 20 cm
Wattage 8.5 W
IP rating IP20
Operating temperature−30 ºC to +40 ºC
Dimensions 600×24×35 mm
2. Press thelight fitting into thebrackets until it clicks into place.
3. Plug themains lead into awall socket.
Produktspezifikationen
| Marke: | Cotech |
| Kategorie: | Beleuchtung |
| Modell: | FIB75600v1-pt |
Brauchst du Hilfe?
Wenn Sie Hilfe mit Cotech FIB75600v1-pt benötigen, stellen Sie unten eine Frage und andere Benutzer werden Ihnen antworten
Bedienungsanleitung Beleuchtung Cotech

2 September 2025
2 September 2025
1 September 2025
26 März 2024
21 Februar 2024
19 Februar 2024
11 Februar 2024
9 Februar 2024
11 Januar 2024
14 November 2023
Bedienungsanleitung Beleuchtung
Neueste Bedienungsanleitung für -Kategorien-
3 April 2026
3 April 2026
3 April 2026
3 April 2026
3 April 2026
3 April 2026
3 April 2026
3 April 2026
3 April 2026
3 April 2026