Franke HWF23 Bedienungsanleitung
Franke
Nicht kategorisiert
HWF23
Lies die bedienungsanleitung für Franke HWF23 (12 Seiten) kostenlos online; sie gehört zur Kategorie Nicht kategorisiert. Dieses Handbuch wurde von 5 Personen als hilfreich bewertet und erhielt im Schnitt 4.6 Sterne aus 3 Bewertungen. Hast du eine Frage zu Franke HWF23 oder möchtest du andere Nutzer dieses Produkts befragen? Stelle eine Frage
Seite 1/12

1
02/22 | OZOZMI-02-2022 | OZO-FLO FAUCET installation
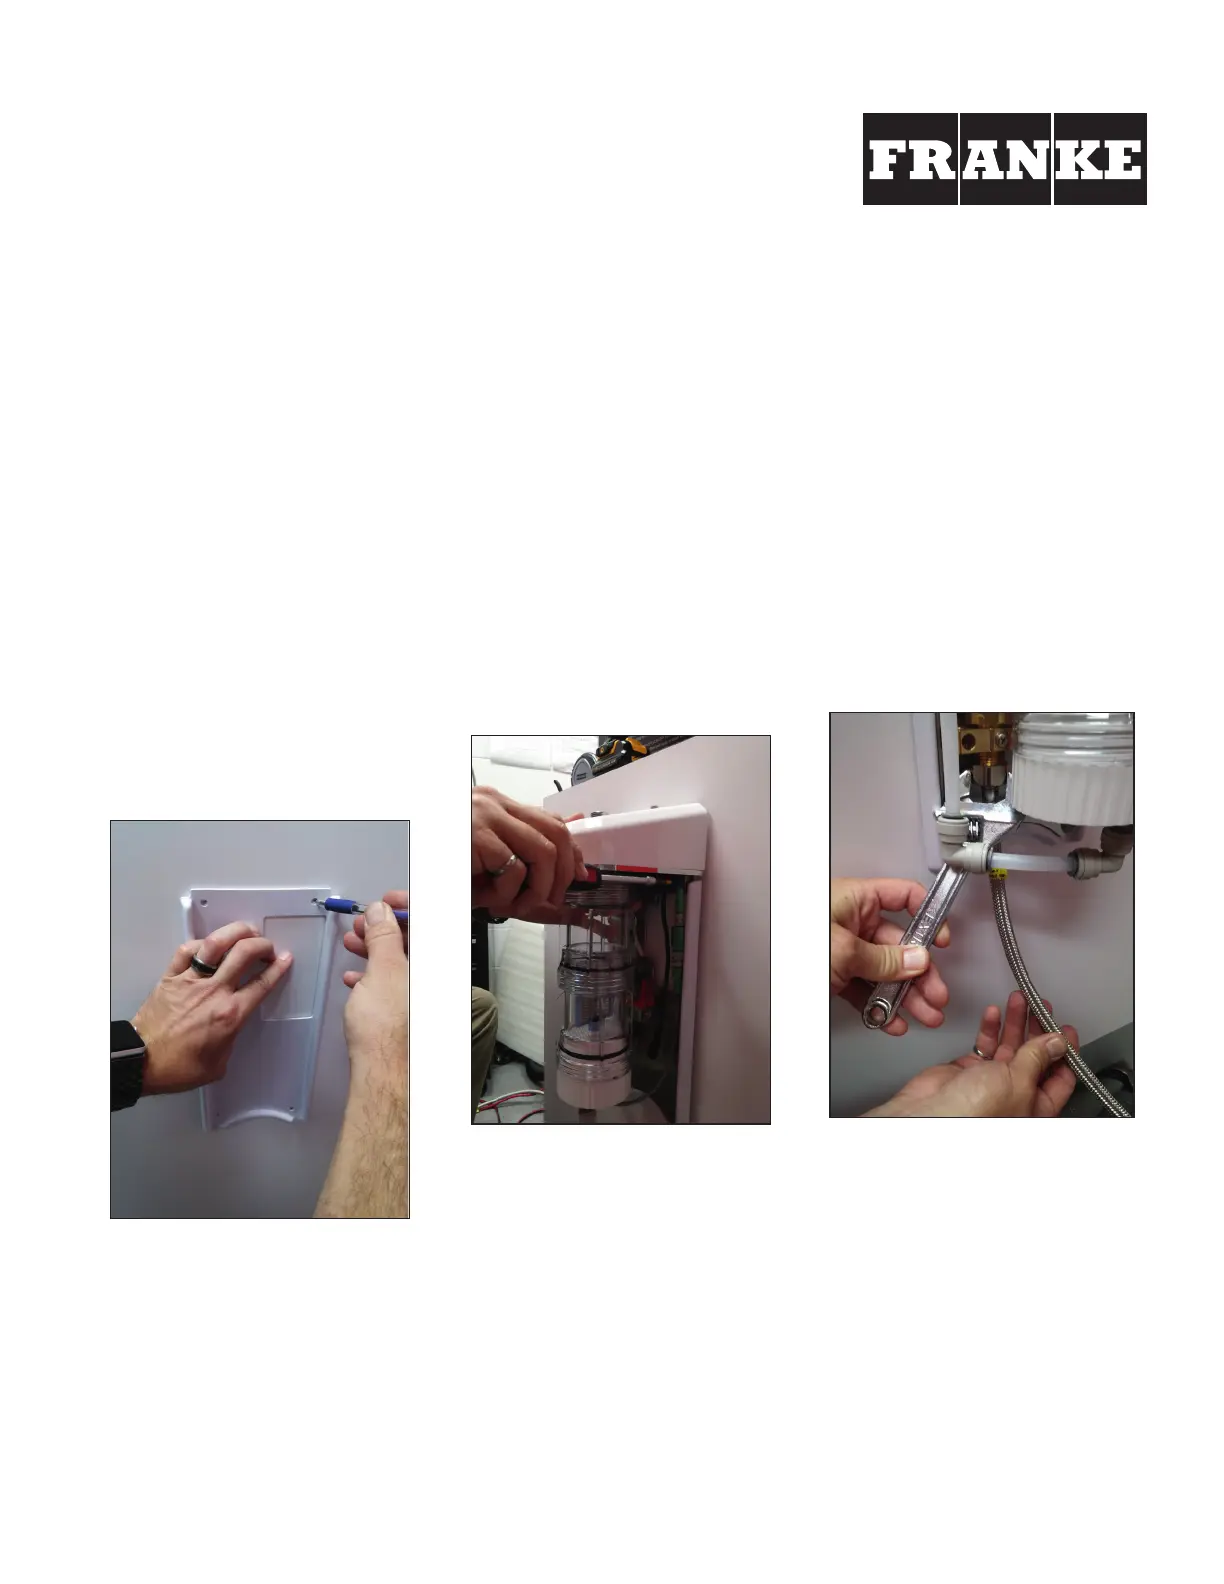
a) Install the faucet onto the sink or wall
b) Determine the optimum location for the
wall housing - under or near the sink.
Ensure that cable connections can be
made.
c) Using the white wall plate as a template,
mark the screw hole locations (4)
d) Using hardware appropriate for the
installation wall, place the white backing
plate behind the stainless steel plate
and secure to the wall.
e) Use a standard 1/2" braided faucet
supply hose, connect this to the brass
threaded inlet of the solenoid valve.
OZO-FLO FAUCET AND HOUSING
INSTALLATION
INSTRUCTIONS FOR HWF05, HWF23, HWF43
Figure D.jpg
Figure C.jpg
Preface
Ozonated water has been proven as a safe and extremely effective way to help sanitize the sink and keep the drain and trap free of CPOs
and other pathogens. This also improves the efficiency of hand washing. Other control features include a post-wash cycle of 3 seconds
which ensures all soap residue and bacteria has been washed down the sink, and a daily purge cycle to prevent stagnant water in the lines
and ensure continuouswaste disinfection. Any standard P-trap will be disinfected with this process.
Ozo-flo has been exclusively designed for sinks intended for hand washing only. It is not recommended as a drinking source. Recommend-
ed for areas with normal water conductivity in the range of 75 - 350 total dissolved solids (TDS). If unaware of your local water conductiv-
ity, please contact customer service and this can easily be determined for you before you install the product.
Ozo-flo is recommended to be installed with a thermostatic mixing valve and set to a temperature of 27-35C. (Optional accessory MEDI-
MIX is available from Franke).
INSTRUCTIONS:
Figure E.jpg

2
02/22 | OZOZMI-02-2022 | OZO-FLO FAUCET installation
f) If necessary connect the 5.1mm
extension cable to the control board.
Figure F.jpg
g) Pass the other end to the supply hose
through the hole in the bottom of the
shroud. Mark and drill the wall which will
later be used to secure the shroud to the
wall.
h) Connect the ½" supply hose from the
bottom of the faucet to the top of the
Ozo-flo housing. Do not over-tighten
(hand tighten plus 1/4 turn).
Figure H.jpg
i) Make note of the red and yellow colour
markings of the electrical connectors
and match them with the bands on the
cables coming from the faucet. The
connectors are keyed and will only push
together one way. Gently push and rotate
the connection until they assemble and
screw closed.
j) Plug in the power supply, wait 10
seconds and activate the faucet. It may
take 10 seconds for the ozonation
chamber to fill with water and then come
through the faucet.
k) Check for any leaks and proper oper-
ation. Once checked, complete the
assembly by securing the shroud to the
wall.
TESTING
When the faucet is activated, water should flow and the blue ring on
the tap will illuminate. When you remove your hands the tap will stop
water flow and start its lathering timer. During this time the LED ring
will pulse in intensity. During this timed operation, the concentration
of ozone and other mixed oxidants are building in the chamber. The
faucet will slowly drip from the spout. This is normal as the volume in
the chamber is increasing due to the oxidant generation. At the end
of the lathering timer (default 20 seconds), the tap will automatically
run for 3 seconds. This 3-second run time has two purposes.
a) Can be used as a timer for users to ensure they have lathered to
the recommended time.
b) It helps rinse any remaining soap residue in the sink away after a
user has walked away.
TROUBLESHOOTING
Ozo-flo will briefly release traces of ozonated water post-usage (as
part of the ozonation purge cycle). An additional factory set purge
cycle will activate once every 24 hours. The timing can be modified
using our optional hand-held programmer (part number AC01-005).
No water flow - Ensure power is connected and you have water
supply pressure. When you trigger the tap by placing your hands
underneath, you should see the LED ring illuminate. If the LED does
not illuminate check to see that the wire connections from the tap to
the wall housing are correct (match colour red and yellow bands on
the cable). If the LED illuminates and no water flow check to see that
the spade connectors are properly installed on the solenoid valve
located inside the wall housing. The brown wire should be closest to
the wall. If these wires are not connected, the solenoid will not func-
tion. You should hear a click of the solenoid valve when triggered. If
Produktspezifikationen
Marke: | Franke |
Kategorie: | Nicht kategorisiert |
Modell: | HWF23 |
Brauchst du Hilfe?
Wenn Sie Hilfe mit Franke HWF23 benötigen, stellen Sie unten eine Frage und andere Benutzer werden Ihnen antworten
Bedienungsanleitung Nicht kategorisiert Franke
25 Juli 2025
24 Juli 2025
23 Juli 2025
19 Juli 2025
19 Juli 2025
19 Juli 2025
19 Juli 2025
19 Juli 2025
19 Juli 2025
19 Juli 2025
Bedienungsanleitung Nicht kategorisiert
- Plugwise
- Extech
- Terraillon
- Maktec
- Ctek
- Tributaries
- Itho
- LISS
- Carrera
- Lasita Maja
- IMC Toys
- Tempo
- NComputing
- BORA
- Mr. Heater
Neueste Bedienungsanleitung für -Kategorien-
30 Juli 2025
30 Juli 2025
30 Juli 2025
30 Juli 2025
30 Juli 2025
30 Juli 2025
30 Juli 2025
30 Juli 2025
30 Juli 2025
30 Juli 2025