Hager WJC061B Bedienungsanleitung
Hager Nicht kategorisiert WJC061B
Lies die bedienungsanleitung für Hager WJC061B (2 Seiten) kostenlos online; sie gehört zur Kategorie Nicht kategorisiert. Dieses Handbuch wurde von 14 Personen als hilfreich bewertet und erhielt im Schnitt 4.9 Sterne aus 9 Bewertungen. Hast du eine Frage zu Hager WJC061B oder möchtest du andere Nutzer dieses Produkts befragen? Stelle eine Frage
Seite 1/2
1
Safety instructions
Electrical equipment may only be installed and
assembled by a qualied electrician in accor-
dance with the relevant installation standards,
guidelines, regulations, directives, safety and
accident prevention regulations of the country.
Failure to comply with these instructions may
result in damage to the device, re or other
hazards.
Hazard due to electric shock. Do not operate
the device without a cover.
Hazard due to electric shock. The device is not
suited for safe disconnection of the mains sup-
ply. Even when the device is switched o, the
load is not galvanically separated from the
mains supply.
Do not connect any non-dimmable lamps, their
transformers or operating devices. Observe
manufacturer's data.
Hazard of re. During operation with conventio-
nal transformers, fuse each transformer on the
primary side according to manufacturer's data.
Use safety transformers that comply with
EN61558-2-6 only.
These instructions are an integral component
of the product and must be retained by the end
user.
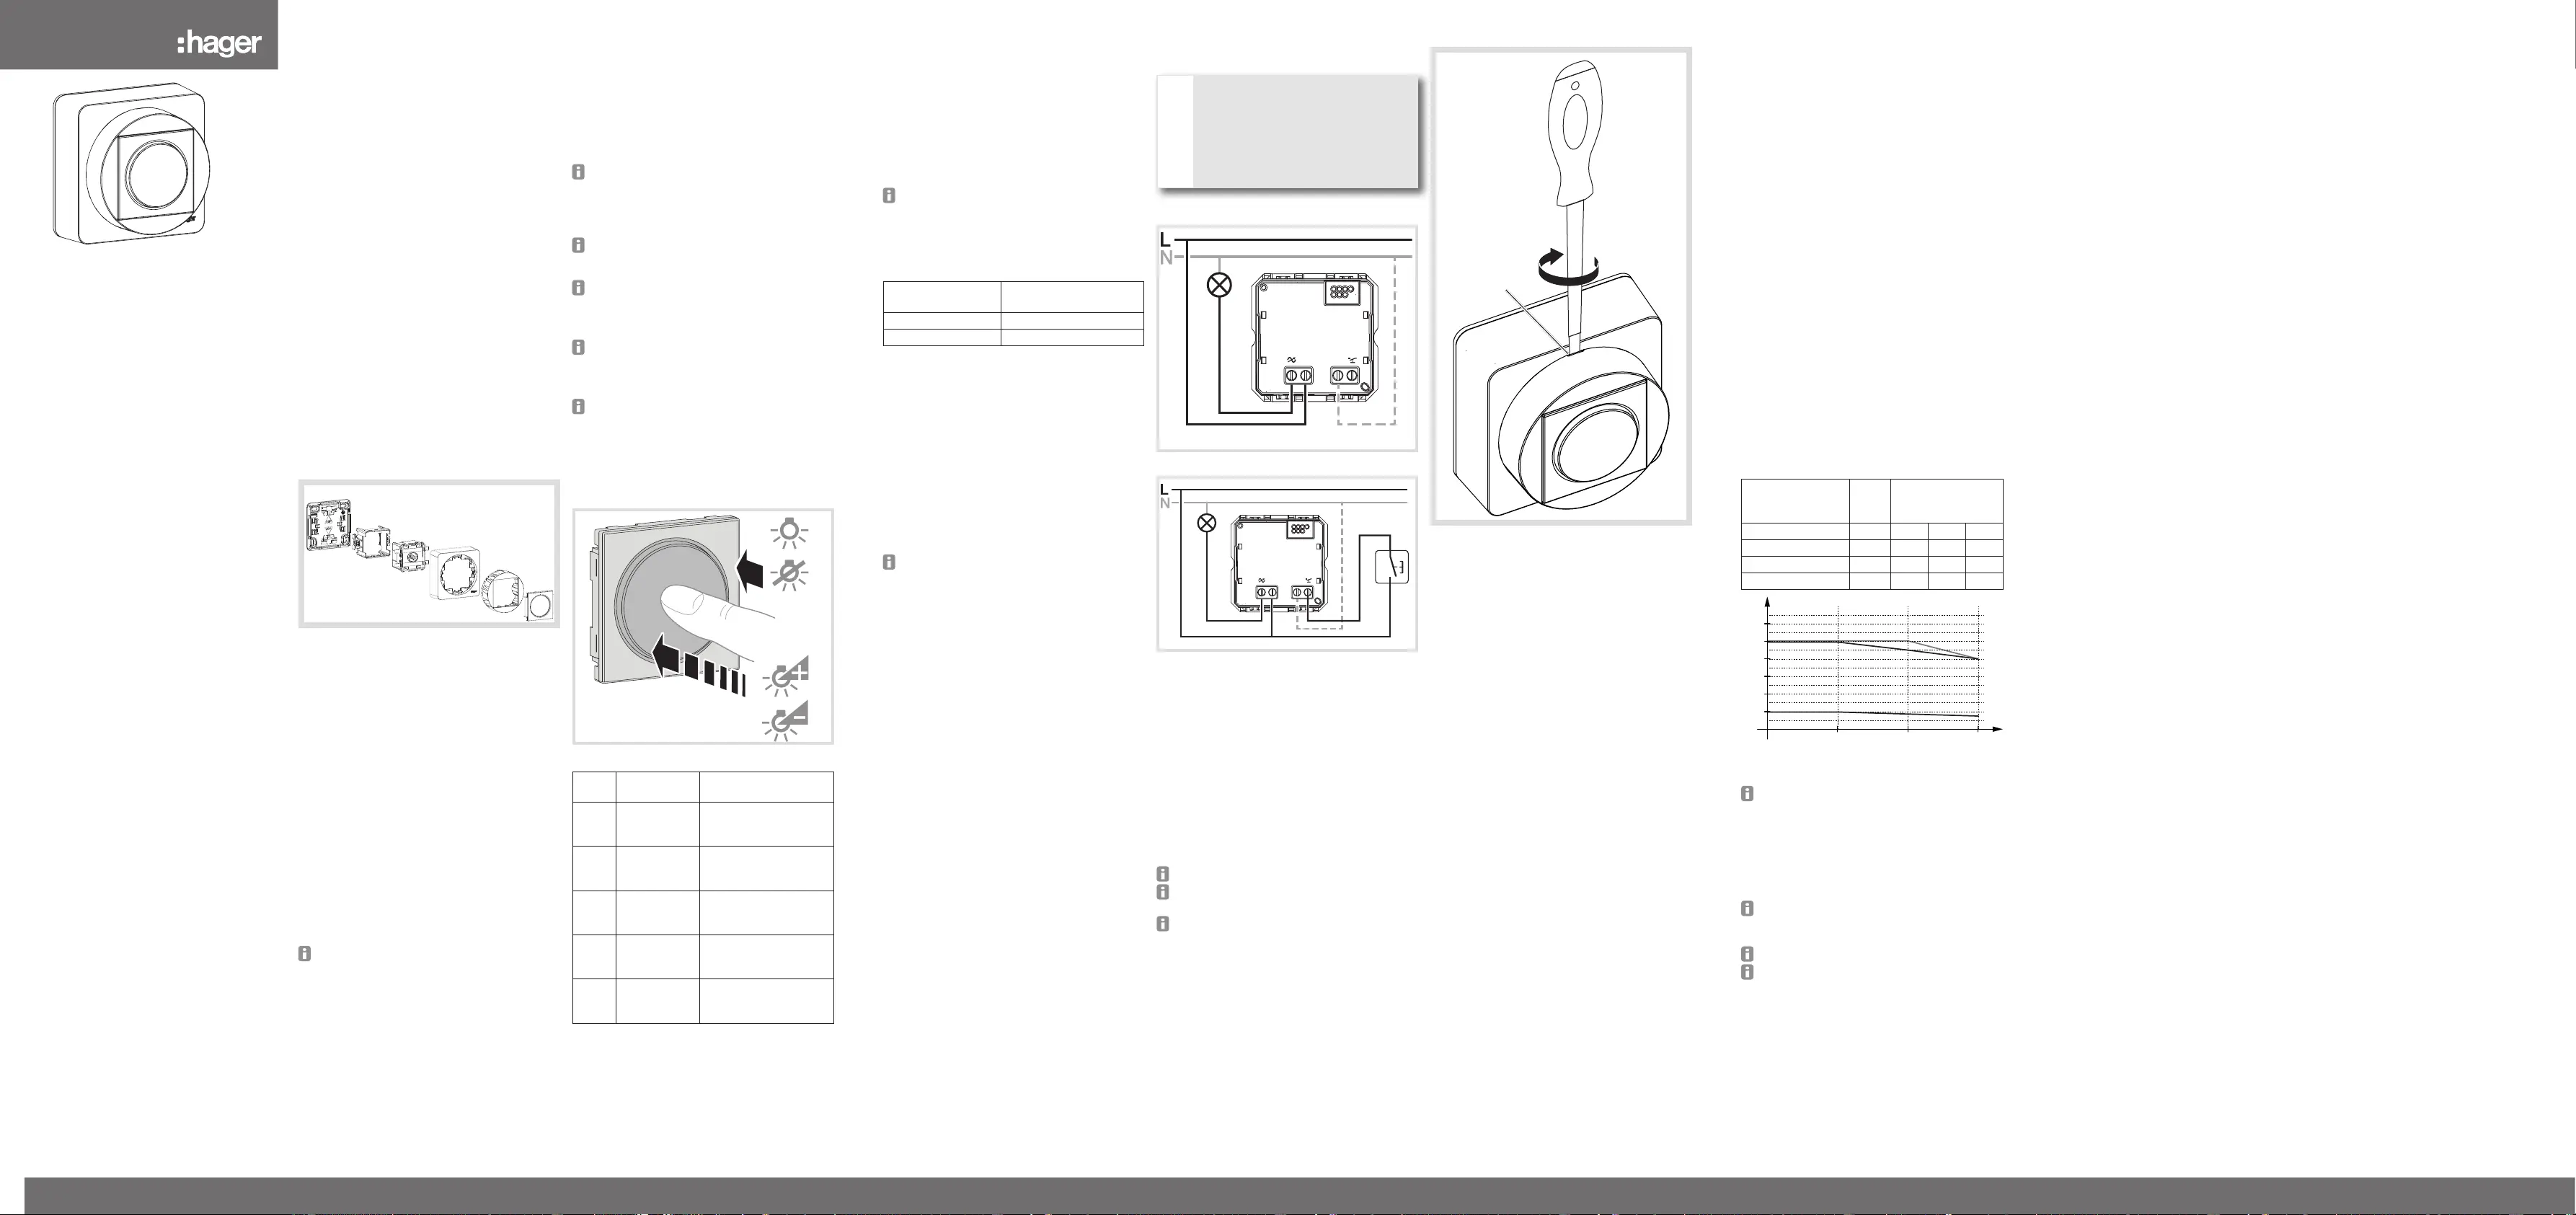
Design and layout of the device
(1)
(2)
(3)
(4)
(5)
(6)
Figure 1: WJC061B touch dimmer
(1) Mounting plate
(2) Mounting adapter
(3) Touch dimmer
(4) Upper casing
(5) Mounting device cover
(6) Button
Function
Correct use
-Switching and dimming of incandescent lamps,
HV halogen lamps, dimmable 230 V LED
lamps, electronic and dual-mode transformers
or conventional transformers with low voltage
halogen lamps
-Only suitable for use in indoor areas with no
drip and no spray water
-Assembly on the wall
No mixed load operation of capacitive and
inductive loads possible at the output.
Product characteristics
-Automatic setting of load-dependent dimming
principle and optional ne setting of minimum
brightness via button, e.g. for 230 V LED lamps
-Automatic saving of switch-on brightness level
-Electronic short circuit protection
-Electronic overload and overheating protection
-Allows connection of extension units (push-
button, NO contact)
-Soft start/stop for bulb protection
6LE007525A
WJC061Bateha
Touch dimmer
Variateur à touches
z
a
09/2020 - 6LE007525AHager Controls S.A.S., 33 rue Saint-Nicolas, B.P. 10140, 67703 SAVERNE CEDEX, France - www.hager.com
Performance after mains breakdown
When power returns, the light is restored to the last
brightness level dened
Dimming principle
During commissioning, the dimmer performs
automatic load detection and applies the correct
dimming principle for the load connected (phase
cut-on, phase cut-o).
Flickering of connected lamps possible due to
the load falling below the specied minimum
level, ripple control pulses (tari signals) from
power stations, or replacement of 230 V LED
lamps.
Short term ickering during load detection
possible. No operation is possible during load
detection. These are not defects of the device.
If the dimming performance of 230 V LED
lamps is unsatisfactory in factory setting, a load
setting must be carried out (see Setting the
load).
When circuiting several loads to one output
(parallel circuiting ) optimise dimming perfor-
mance via load setting if necessary (see Setting
the load).
After each replacement of the load (lamp) an
automatic load detection has to be carried out
(see Setting the load).
Operation
Touch dimmer operating concept
Figure 2: Switching and dimming
Load
status
ActionResult
OFFShort press
of push-button
(< 400 ms)
Switch ON with saved
switch-on brightness
level.
> 0%Short press
of push-button
(< 400 ms)
Switch OFF and save
brightness as switch-on
brightness level.
> 0%Long press
of push-button
(> 400 ms)
Dim alternately down
and up each time the
push-button is pressed.
OFFLong press
of push-button
(> 10 s)
Select load type (see
Setting the load)
OFFLong press
of push-button
(> 15 s)
Fine setting of minimum
brightness (see corre-
sponding section)
Table 1: Touch dimmer operation
Setting the load
If the dimming and switching performance of loads
is unsatisfactory, especially when circuited to
energy-saving lamps and 230 V LED lamps, a load
setting must be carried out at the touch dimmer.
Switch off load.
Press the button for more than 10 but less than
15 seconds.
The connected load ashes once. The device is
now in setting mode.
If no further actions are performed within the
next 10 seconds, the dimmer switches to
normal operation.
Briefly press the button repeatedly to activate
the desired mode (Table 1).
The load setting is executed.
Briey press the
button
Setting mode
1xAutomatic load detection
2xLED phase cut-on
Table 2: Setting the load type
Fine setting of minimum brightness
To prevent poor switch-on behaviour or ickering of
the load in the lower dimming range, the dimming
angle for minimum brightness (phase cut-on/
cut-o) can be set individually for each load type.
Switch off load.
Hold the button down for more than
15 seconds.
The connected load will ash once after 10 s
and again after 15 s. The device is now in ne-
setting mode for the minimum brightness.
If no further actions are performed within the
next 10 seconds, the dimmer switches to
normal operation.
Briefly press the button.
The device will switch repeatedly between the
various predened dimming angles (brightness
levels).
When the optimal setting is reached, hold the
button down (> 5 s).
This saves the selected dimming angle for the
minimum brightness.
The load is then switched o.
Information for electricians
Installation and electrical connection
DANGER!
Touching live parts can result in an
electric shock!
An electric shock can be lethal!
Disconnect the connecting cables
before working on the device and
cover all live parts in the area!
ç
Connection diagram
L
E
opt.
N
Figure 3: Connecting diagram (basic circuit)
L
E
opt.
N
Figure 4: Connection diagram with push-button,
NO contact as extension unit
Install a miniature circuit breaker of max. 16 A as
device protection.
Mount the mounting plate (1) correctly on a
suitable surface (fastening material not within
scope of delivery.
Connect touch dimmer (3), and extension units
is desired, according to the connection diagram.
Insert touch dimmer (3) into the mounting
adapter (2) and snap onto the mounting plate.
Snap upper casing (4) with mounting device
cover (5) and button (6) on the touch dimmer (3).
Do not mount dimmer on ammable surface.
Illuminated mechanical push-buttons must be
equipped with a separate N-terminal.
Connecting the optional N-conductor has
advantages for the switching/dimming
performance in the case of LED loads and
transformers.
Removing cover
(7)
Figure 5: Remove button
Insert the screwdriver into the opening (7)
and lever off the cover by slightly turning the
screwdriver.
Appendix
Technical data
Operating voltage 230 V~ +10 / -15 %
Frequency 50 Hz
MCB max. 16 A
Degree of protection IP 21
Protection class IK03
Power consumption in idle state < 0.2 W
230 V incandescent and halogen lamps 20 … 250 W
Dimmable conventional transformers 20 … 250 VA
Dimmable electronic and
dual-mode transformers 20 … 250 VA
Dimmable 230 V LED lamps 3 ... 50 W
Dimming speed 0 ... 100 %, approx. 4 s
Extension unit cable length max. 50 m
Load cable length max. 100 m
Operating temperature -5 … 45 °C
Storage temperature -20 … 60 °C
Relative humidity
(without condensation) 10 … 95 %
Connecting terminals conductor cross-sections
-rigid 1 x 1.5 ... 2.5 mm²
2 x 1.5 mm²
-flexible 1 x 1.5 ... 2.5 mm²
Operating conditions
LoadtypeCurveMaximum output
power
in Watt (W)
25°C35°C45°C
Ohmic loadsA)250225200
TransformersB)250250200
LED lampsC)504540
253545
°C
50
100
150
200
250
300
W
A)
B)
C)
Diagram 1: Maximum output power depending on
the ambient temperature
When connecting conventional transformers,
connect the optional N-conductor to obtain a
stable dimming performance. Conventional
transformers should be operated with at least
50 % nominal load. Nonetheless, 75% is
recommended because in individual cases,
depending on the transformer, unstable
dimming performance may occur.
Carry out loading of conventional, electronic
and dual-mode transformers according to
manufacturer's instructions.
Do not use non-dimmable 230 V LED lamps.
In the case of 230 V LED lamps, the power
supply to the dimmer can cause the lamp to
glow slightly even when it is switched o.
Troubleshooting
After some time the load dims down of its own
accord.
The electronic overload protection has tripped.
Execute load detection
Reduce total load.
Use another lamp.
The lamp cannot be dimmed down suciently.
The dimming angle is set too high.
Decrease the value in ne-setting of the
minimum brightness.
The lamp switches o while being dimmed
down.
The dimming angle is set too low.
Increase the value in ne-setting of the
minimum brightness.
Use another lamp.
The load does not switch on.
The dimming angle and brightness value are set
too low.
Increase the value in ne-setting of the
minimum brightness.
The electronic short-circuit protection has tripped
repeatedly.
Check electrical installation and disconnect
dimmer briey from mains.
LED lamp does not switch on.
Load setting mode not correct
Start automatic load detection or set LED phase
cut-on mode.
The load generates noise.
The load type is set incorrectly.
Set the load type to automatic load detection.
If the error persists, replace the lamp.
Dimmer switches o of its own accord.
The electronic overload protection has tripped.
Check the load connected (maximum output
power).
The electronic short-circuit protection has tripped.
Check electrical installation and disconnect
dimmer briey from mains.
Load ickers while switched o.
LED load too low.
Increase LED load at output or use
compensation module LED.
The connected load cannot be dimmed.
Be sure always to use dimmable loads.
Dimming and switching performance is
unsatisfactory.
Start automatic load detection
Set dimmer to LED phase cut-on.
Connect neutral conductor or compensation
module LED and start automatic load detection
again
z
Produktspezifikationen
| Marke: | Hager |
| Kategorie: | Nicht kategorisiert |
| Modell: | WJC061B |
Brauchst du Hilfe?
Wenn Sie Hilfe mit Hager WJC061B benötigen, stellen Sie unten eine Frage und andere Benutzer werden Ihnen antworten
Bedienungsanleitung Nicht kategorisiert Hager

27 September 2025
27 September 2025
26 September 2025
26 September 2025
26 September 2025
26 September 2025
26 September 2025
26 September 2025
26 September 2025
26 September 2025
Bedienungsanleitung Nicht kategorisiert
Neueste Bedienungsanleitung für -Kategorien-
28 Februar 2026
28 Februar 2026
28 Februar 2026
28 Februar 2026
28 Februar 2026
28 Februar 2026
28 Februar 2026
28 Februar 2026
28 Februar 2026
28 Februar 2026