Kichler 15601 Bedienungsanleitung
Kichler Beleuchtung 15601
Lies die bedienungsanleitung für Kichler 15601 (1 Seiten) kostenlos online; sie gehört zur Kategorie Beleuchtung. Dieses Handbuch wurde von 9 Personen als hilfreich bewertet und erhielt im Schnitt 4.2 Sterne aus 5 Bewertungen. Hast du eine Frage zu Kichler 15601 oder möchtest du andere Nutzer dieses Produkts befragen? Stelle eine Frage
Seite 1/1
FOR 12 VOLTINSTALLATION
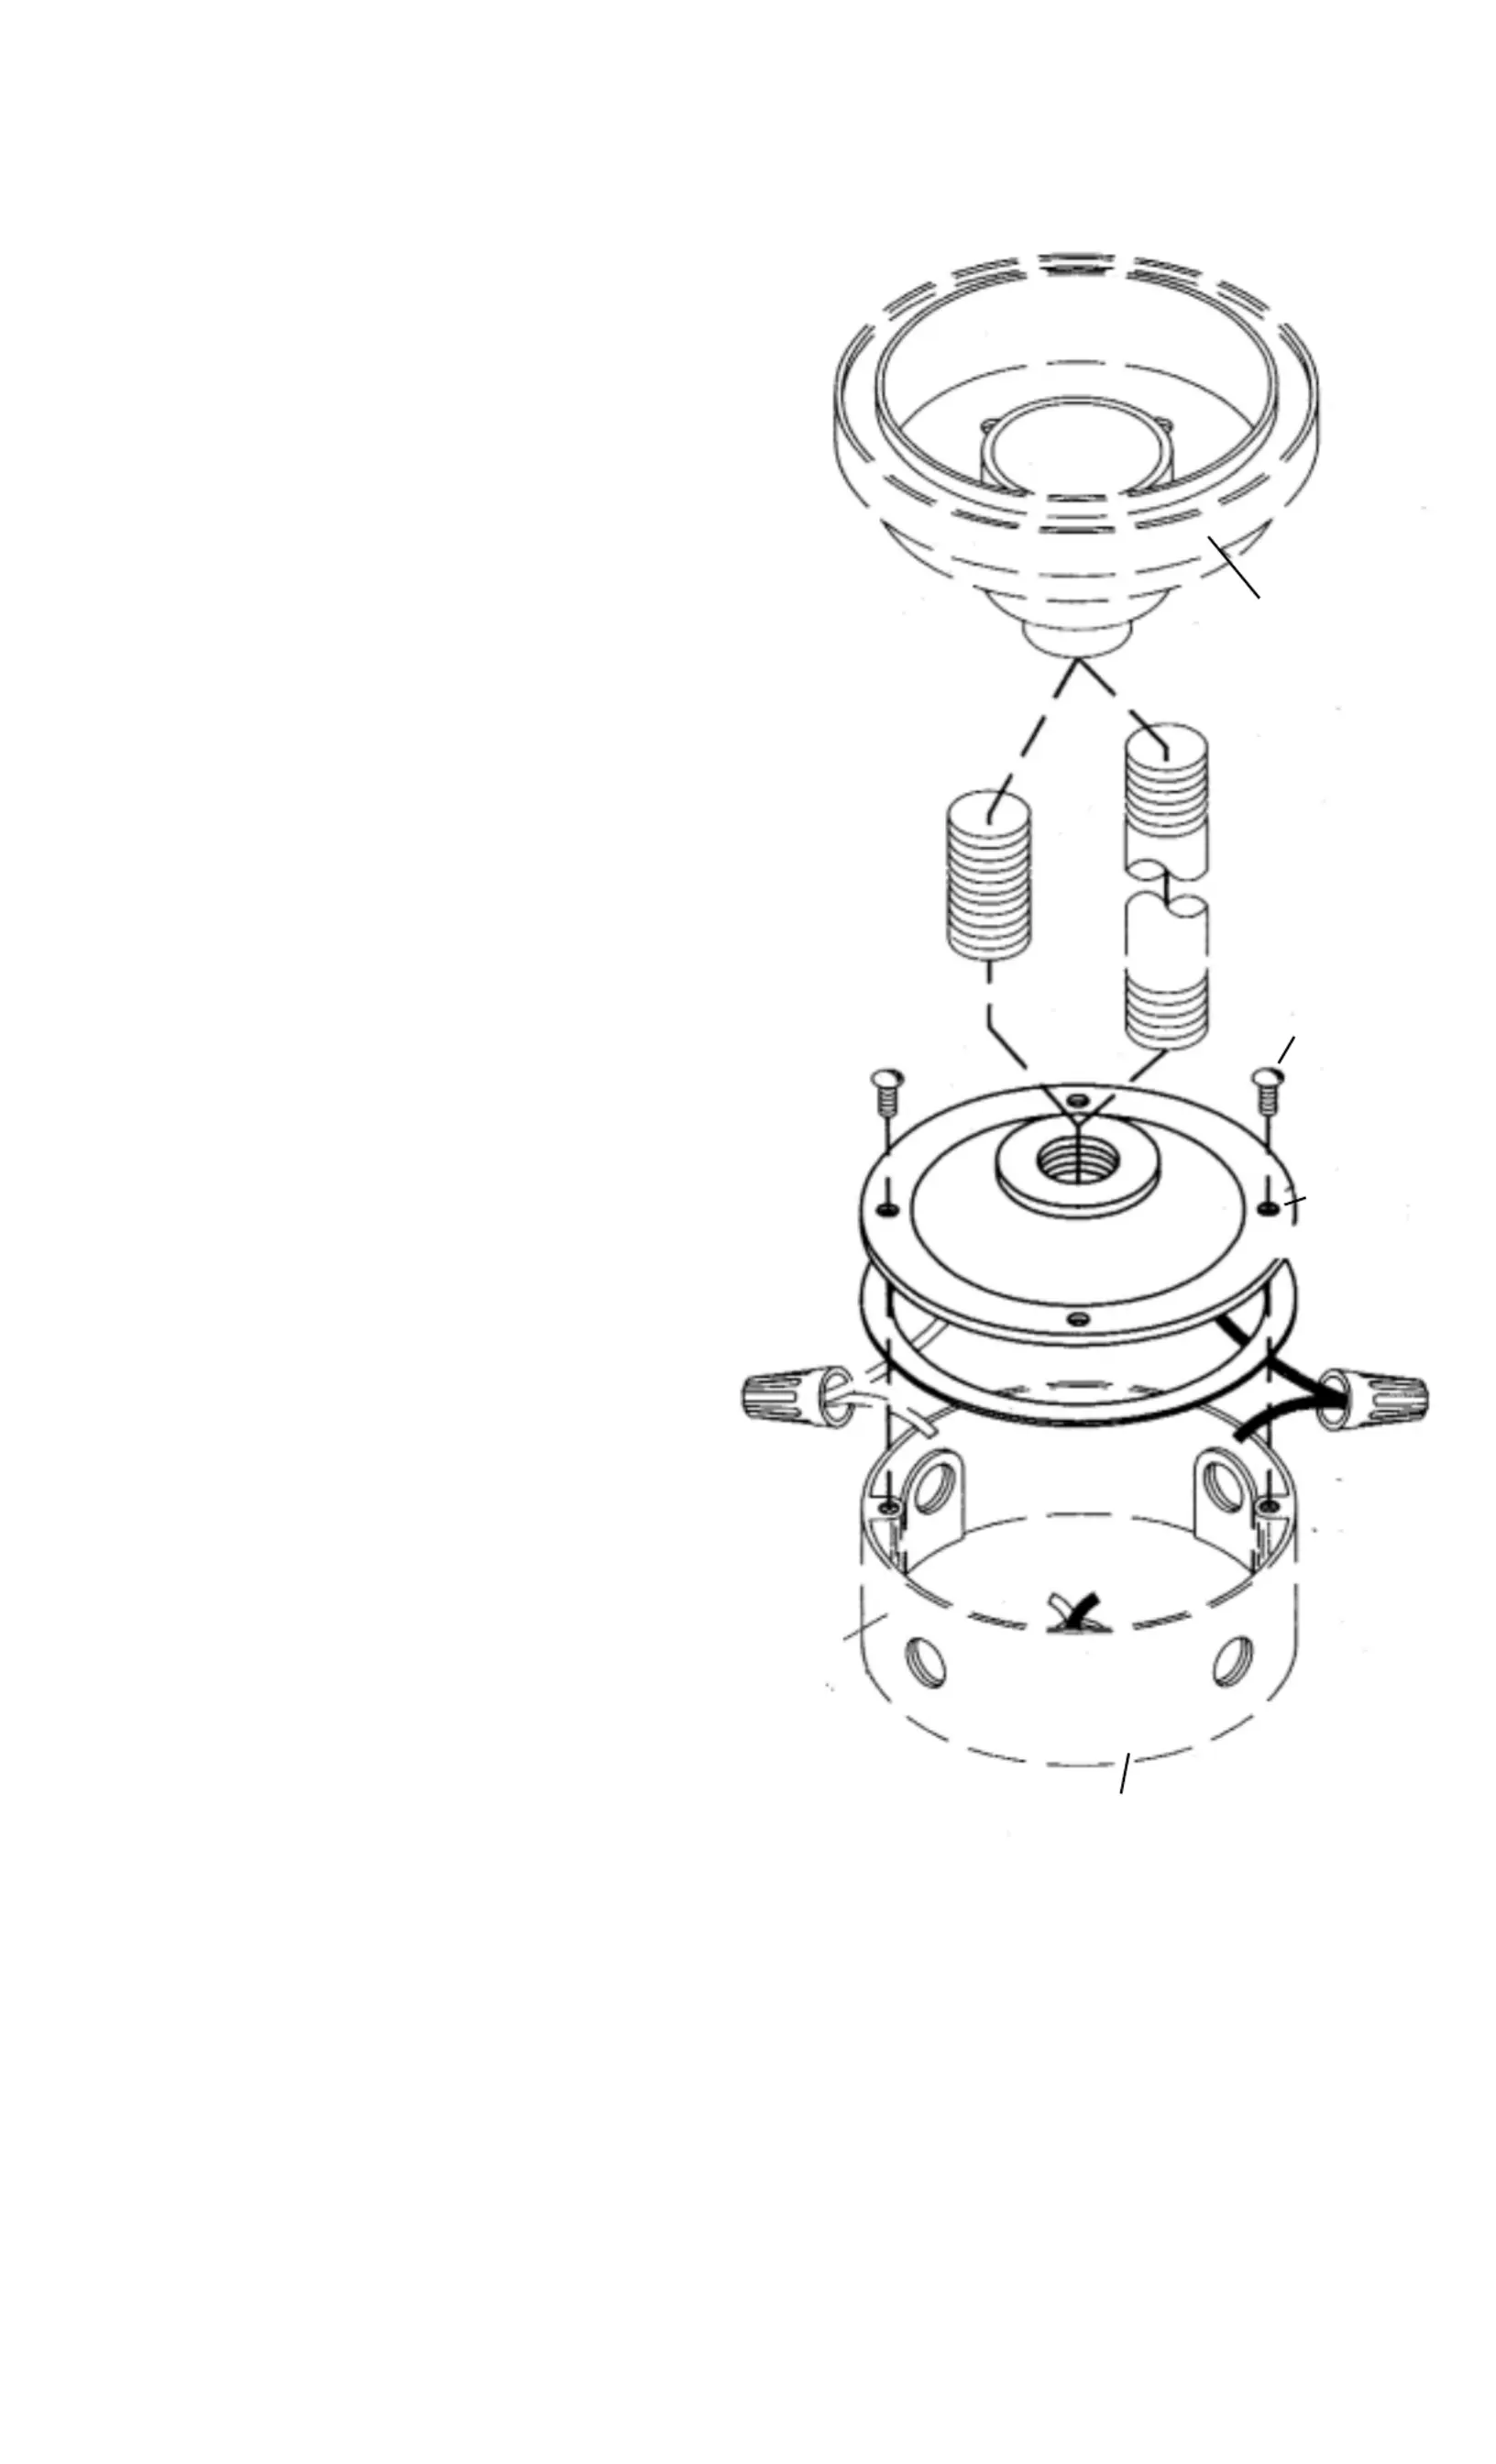
1) Position surface mounting flange on deck. Mark center of all
four wood screw mounting holes and center hole for power supply
wire to pass through. Drill pilot holes for supplied wood screws
with 1/8” drill. Next drill 3/8” hole to accommodate power supply
cord.
2) Place surface mounting flange over drilled pilot holes. Neoprene
gasket is not to be used. Start each wood screw. Tighten until
secured to deck.
3) Pass fixture lead wires through threaded center hole on top of
flange and through drilled hole in deck. Mount fixture according
to instruction sheets. Make wire connections.
FOR 120VOLTINSTALLATION.
Surface mounting flange must be used with 4” round wiring com-
partment (not included). Neoprene gasket is suppled to ensure
watertight seal. Consult qualified electrician regarding deck mount-
ing and wiring procedures so as to be certain all local requirements
and codes are followed.
PARAINSTALACIONES DE 12 VOLTIOS.
1) Ponga la brida de montaje superficial en la terraze de madera.
Marque el centro de los cuatro agujeros de montaje de los
tornillos para madera y el centre del agujero para que pase el
alambre electrico. Taladre agujeros pilotos para los tornillos
suministrados con una broca de 1/8”. En seguida, taladre un
agujero de 3/8” para el cordon electrico.
2) Colocar la brida de montaje encima de los agujeros pilotos tal
adrados. Puede botar la empaquetadura de Neopreno.
Empiece a atornillar cada tornillo para madera. Apriete hasta
que este bien sujeto a la terraza de madera.
3) Pase los alalbres de la lampara por el centro del agujero
roscado situado encima de la brida y traves del aguuero
taladrado en la terraze. Instale la lampara de acuerdo a lo indicado
en las hojas de instrucciones. Conecte los alambres.
PARAINTALACIONES DE 120 VOLTIOS
Se debe usar la brida de montaje superficial con compartimiento
para alambres recondo de 4” (no insluido). Se proporciona la
empaquetadura de Neopreno para asegural hermeticidad al agua.
consulte a un electricista competente respecto a los procedimientos
de montaje en la terraza y conexiones de cables, para tener la
seguridad de que se cumple con los rreglamentos y bormas corre-
spondientes.
INSTRUCTIONS POUR L’ASSEMBLAGE ETL’INSTALLATION
POUR UNE INSTALLATION DE 12 VOLTS
1) Placez le collet de montage sur la terrasse. Marquez le centre
des quartre trous de montage (vis a bois) et le trou central pour
l’alimentation du courant. Forez des trous de guidage pour les
vis a bois avec une meche de 1/8”. Ensuite forez un trou de
3/8”pour accommoder les fils electriques.
2) Placez le collet de montage au-dessus des trous de guidage.
Ne pas employer le joint de Neoprene. Vissez chaque vis a
bois.
3) Passez les fils du luminaire par le trou central filete du collet de
montage et par le trou fore dans la terrasse. Installez le luminaire
suivant les feuillets d’instructions. Completez le raccord des
fils.
POUR INSTALLATION DE 120 VOLTS: Un collet doit etre utilse
avec la boite de jonction de 4” (non fourni). Un joint neoprene doit
etre installe pour garantir l’etancheite. Consultez un electricien qual-
ifie concernant l’installation et la raccordement electrique afin d’etre
certain de respecter les codes locaux et federaux.
FIXTURE
LAMPARA
LUMINAIRE
SCREW
TORNILLOS
VIS ABOIS
FLANGE
BRIDA
COLLETDE MONTAGE
NEOPRENE
GASKET
EMPAQUET
ADURADE
NEOPRENO
JOINTNEOPRENE
4”ROUND WIRING COMPARTMENT
COMPARTIMIENTO PARAALAMBRES
REDONDO DE 4”
4”BOITE DE JONCION
Date Issued: 11/13/98IS-15601-BL
WARRANTY
WE WARRANTTHE LANDSCAPE PRODUCTS FEATURED IN OUR LANDSCAPE LIGHTING CATALOG (WITH THE EXCEPTION OF LIGHTBULBS) FOR THREE YEARS AGAINST
DEFECTS IN MATERIALS AND WORKMANSHIPIF ITWAS PROPERLYINSTALLED AND FAILED UNDER NORMALOPERATING CONDITIONS, PROVIDED ITIS RETURNED TO THE
POINTOF PURCHASE, WHERE ITWILLBE REPAIRED OR, AS ITMAYBE DETERMINED, TO REPLACE THE LANDSCAPE PRODUCTOR PARTS USED ON THATPRODUCT.
GARANTIA
NOSOTROS GARANTIZAMOS POR TRES ANOS LOS PRODUCTOS PANORAMICOS QUE OFRECEMOS EN NUESTRO CATALOGO DE ILUMINACION PANORAMICA(CON EXCEPCION
DE LAS BOMBILLAS), QUE ESTAN EXENTOS DE DEFECTOS DE MATERIALES YMANO DE OBRA, SI SE INSTALARON CORRECTAMIENTE YFALLARON EN CONDICIONES DE
OPERACION NORMAL, SIEMPRE QUE SE DEVUELVAN ALLUGAR DE COMPRA, DONDE SERAN REPARADOS O, SEGUN PUEDADETERMINARSE, SERAN CAMBIADOS LOS PRO-
DUCTOS PANORAMICOS O LAS PIEZAS UTILIZADAS EN ESE PRODUCTO
GARANTIE
NOUS GARANTISSONS LES PRODUITS DE PAYSAGES FIGURANTDANS NOTRE CATALOGUE DES LUMIERES PAYSAGISTES (AL’EXCEPTION DES AMPOULES0 PENDANTUNE
PERIODE DE TROIS ANS CONTRE TOUS DEFAUTS DE MATERIAUX ETDE MAIN D’OEUVRE SOUS CONDITION QUE L’INSTALLATION AITETE EFFECTUEE CORRECTEMENTET
QUE LES PROBLEMES SE SOIENTPRODUITS AU COURS D’UN EMPLOI NORMAL. LE PRODUITDOITETRE RETOURNE AU LIEU DE VENTE OU ILSERAREPARE OU, SUITE AUNE
EVALUATION, LE PRODUITDE PAYAGE OU LES PIECES QUI LE COMPOSENTSERONTREMPLACEES.
Produktspezifikationen
| Marke: | Kichler |
| Kategorie: | Beleuchtung |
| Modell: | 15601 |
Brauchst du Hilfe?
Wenn Sie Hilfe mit Kichler 15601 benötigen, stellen Sie unten eine Frage und andere Benutzer werden Ihnen antworten
Bedienungsanleitung Beleuchtung Kichler

31 März 2026
20 März 2026
20 März 2026
20 März 2026
18 März 2026
18 März 2026
11 März 2026
24 Februar 2026
23 Februar 2026
16 Februar 2026
Bedienungsanleitung Beleuchtung
Neueste Bedienungsanleitung für -Kategorien-
3 April 2026
3 April 2026
3 April 2026
3 April 2026
3 April 2026
3 April 2026
3 April 2026
3 April 2026
3 April 2026
3 April 2026