Kichler Alvaro 52694PN Bedienungsanleitung
Kichler Beleuchtung Alvaro 52694PN
Lies die bedienungsanleitung für Kichler Alvaro 52694PN (3 Seiten) kostenlos online; sie gehört zur Kategorie Beleuchtung. Dieses Handbuch wurde von 7 Personen als hilfreich bewertet und erhielt im Schnitt 4.6 Sterne aus 7 Bewertungen. Hast du eine Frage zu Kichler Alvaro 52694PN oder möchtest du andere Nutzer dieses Produkts befragen? Stelle eine Frage
Seite 1/3
A
B
F
G
E
C
D
For warranty information please visit: kichler.com/warranty
REV 9-JAN-2024
We’re here to help 866-558-5706
Hrs: M-F 9am to 5pm EST
CAUTIONS
CAUTION – RISK OF SHOCK:
Disconnect Power at the main circuit breaker panel or main fusebox before starting and during
the installation.
WARNING:
1. This fixture is intended for installation in accordance with the National Electrical Code (NEC)
and all local code specifications. If you are not familiar with code requirements, installation by a
certified electrician is recommended. Failure to adhere to these codes and instructions may result
in serious injury and/or property damage and will void the warranty.
CLEANING:
• Always be certain that electric current is turned o before cleaning.
• Only a soft damp cloth should be used. Harsh cleaning products may damage the finish.
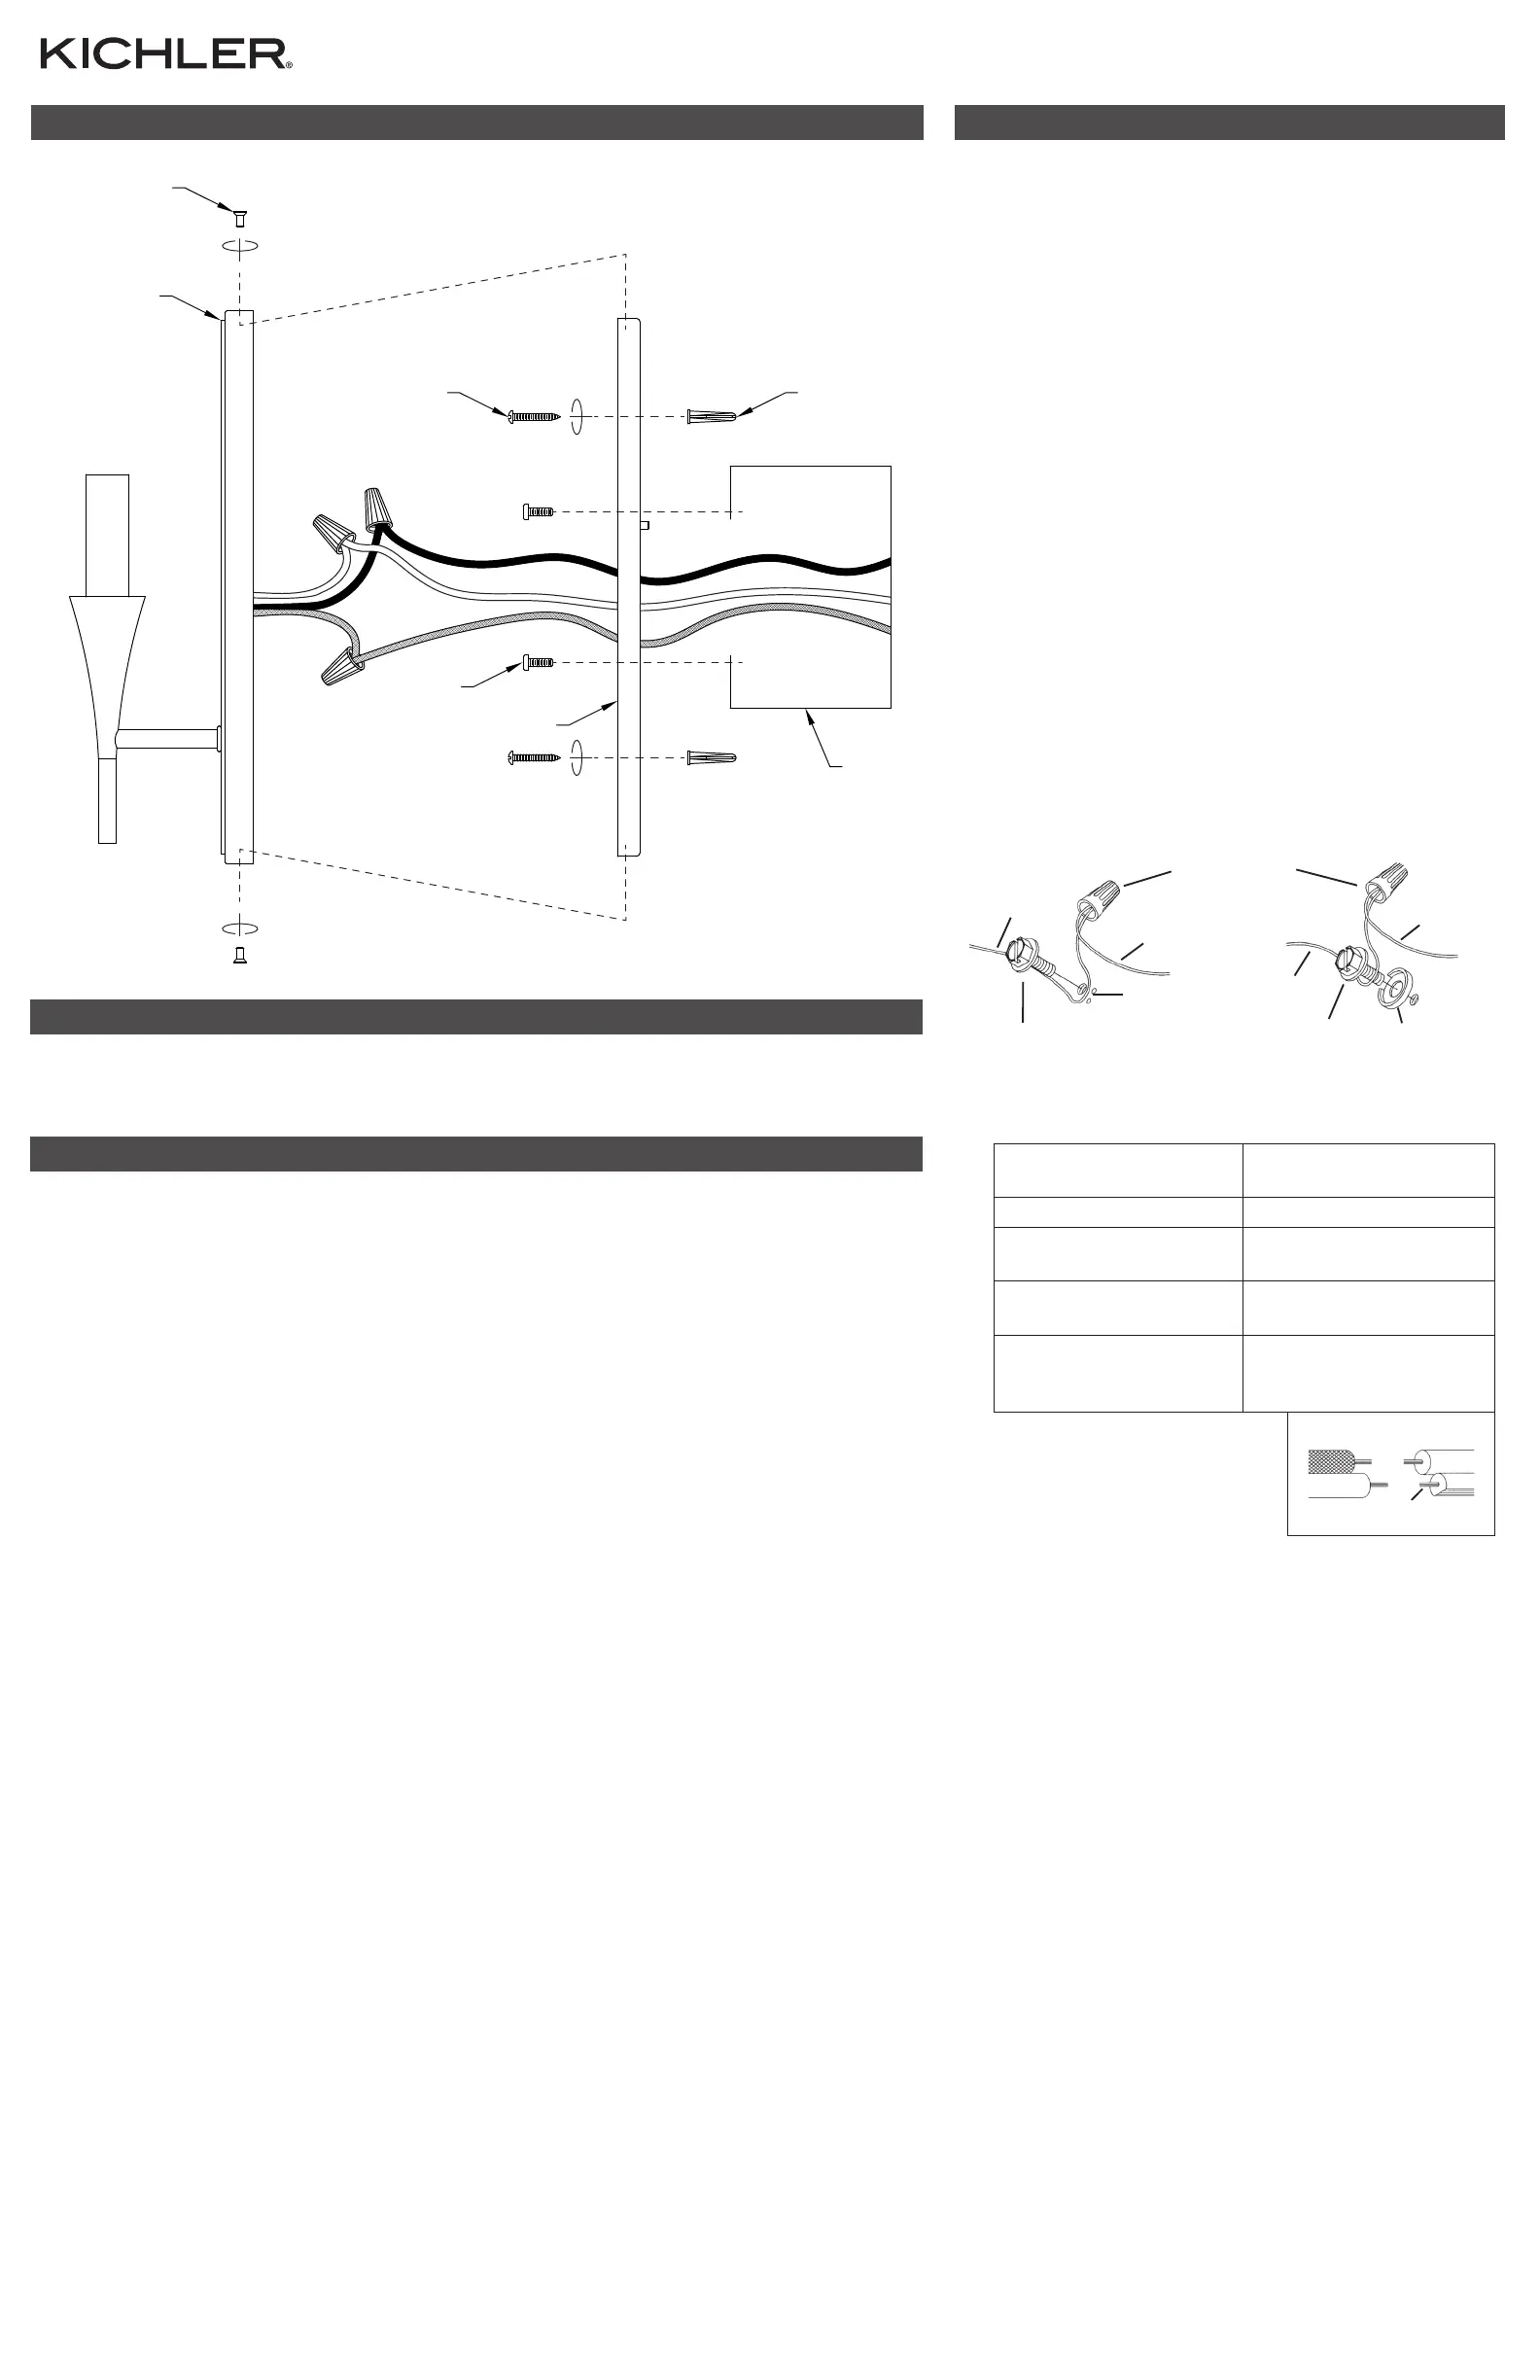
INSTALLATION INSTRUCTIONSFIXTURE DIAGRAM
IS-52694-US
PARTS LIST
[A] Mounting Screw (2)
[B] Canopy
[C] Wall Anchor Screw (2)
[D] Wall Anchor (2)
[E] Strap Mounting Screw (2)
[F] Mounting Strap
[G] Outlet Box (not supplied)
1. NOTE: Fixture should be installed with socket facing UP as shown.
Using the strap mounting screws[E], attach mounting strap[F] to outlet
box[G].
NOTE: Mounting strap should be installed with the flat side of the
mounting strap against the wall, and with the holes for the mounting
screws[A] at the 12 and 6 o’clock position as shown.
2. Using the mounting strap as a template, mark the positions for the
additional wall mounting locations through the holes near the top and the
bottom of the mounting strap.
3. Carefully remove strap mounting screws and mounting strap from outlet
box.
4. If additional wall mounting location is on a stud, use a 3/32” drill bit (not
included) to drill a pilot hole into wall.
If additional wall mounting location is not on a stud, use a 3/16” drill bit (not
included) to drill a hole for a wall anchor[D] into wall. Insert a wall anchor
into hole, and lightly tap wall anchor into mounting surface until flush.
5. Using the strap mounting screws[E], reattach mounting strap[F] to
outlet box[G]. Tighten to secure.
6. Secure mounting strap to wall by screwing the two (2) wall anchor
screws[C] into the additional wall mounting locations. Tighten to secure.
7. Grounding instructions: (See Illus. a or b).
a. On fixtures where mounting strap is provided with a hole and two
raised dimples, wrap ground wire from outlet box around green
ground screw, and thread into hole.
b. On fixtures where a cupped washer is provided, attach ground wire
from outlet box under cupped washer and green ground screw, and
thread into mounting strap.
If fixture is provided with ground wire, connect fixture ground wire to
outlet box ground wire with wire connector after following the above
steps. Never connect ground wire to black or white power supply wires.
8. Make wire connections. Reference chart below for correct connections
and wire accordingly.
Connect Black or Red
Supply Wire to:
Connect White Supply
Wire to:
BlackWhite
*Parallel cord (round &
smooth)
*Parallel cord (square &
ridged)
Clear, Brown, Gold or Black
without Tracer
Clear, Brown, Gold or Black
with Tracer
Insulated wire (other
than green) with copper
conductor
Insulated wire (other
than green) with silver
conductor
*Note: When parallel wire (SPT
1 & SPT 2) are used. The neutral
wire is square shaped or ridged
and the other wire will be round
in shape or smooth (See illus.)Neutral Wire
9. Push canopy[B] to wall, carefully aligning the mounting screw holes in the
top and bottom of the mounting strap with the mounting screw holes in
the top and bottom of the canopy.
NOTE: Make sure all wires are inside canopy and do not get pinched
between mounting strap and canopy or wall and canopy of fixture.
10. Screw two (2) mounting screws[A] into holes in canopy and mounting
strap to attach fixture to wall. One at the top and one at the bottom of the
canopy. Tighten to secure.
11. Insert recommended bulb(s) (not included).
GREEN GROUND
SCREW
CUPPED
WASHER
OUTLETBOX
GROUND
FIXTURE
GROUND
DIMPLES
WIRE CONNECTOR
OUTLETBOX
GROUND
GREEN GROUND
SCREW
FIXTURE
GROUND
a
b
© 2024 Kichler Lighting LLC. All rights reserved.
Produktspezifikationen
| Marke: | Kichler |
| Kategorie: | Beleuchtung |
| Modell: | Alvaro 52694PN |
Brauchst du Hilfe?
Wenn Sie Hilfe mit Kichler Alvaro 52694PN benötigen, stellen Sie unten eine Frage und andere Benutzer werden Ihnen antworten
Bedienungsanleitung Beleuchtung Kichler

31 März 2026
20 März 2026
20 März 2026
20 März 2026
18 März 2026
18 März 2026
11 März 2026
24 Februar 2026
23 Februar 2026
16 Februar 2026
Bedienungsanleitung Beleuchtung
Neueste Bedienungsanleitung für -Kategorien-
3 April 2026
3 April 2026
3 April 2026
3 April 2026
3 April 2026
3 April 2026
3 April 2026
3 April 2026
3 April 2026
3 April 2026