NightStick XPR-9862 Bedienungsanleitung
NightStick Beleuchtung XPR-9862
Lies die bedienungsanleitung für NightStick XPR-9862 (1 Seiten) kostenlos online; sie gehört zur Kategorie Beleuchtung. Dieses Handbuch wurde von 15 Personen als hilfreich bewertet und erhielt im Schnitt 4.9 Sterne aus 8 Bewertungen. Hast du eine Frage zu NightStick XPR-9862 oder möchtest du andere Nutzer dieses Produkts befragen? Stelle eine Frage
Seite 1/1
BAYCO • 640 South Sanden Blvd. • Wylie, TX 75098 • 1-800-233-2155 • 00+1+ 469-326-9400 • www.baycoproducts.com
INS-9862-BATT-12
Instructions for Installing
XPR-9862E Intrinsically Safe Flashlight Battery
Save this instruction
Please read these instructions before using your Nightstick. It includes important
safety and operation information. Be sure to charge the Nightstick fully before the
first use. A battery is fully charged when the charger light is green.
The Nightstick NSR-9862E flashlight is powered by a rechargeable Nickel Metal
Hydride (NiMH) battery pack indicated by a RED outer jacket. Do not use a battery
pack with a GREEN outer jacket which is meant for non-hazardous use.
SPECIAL INSTRUCTIONS FOR INTRINSICALLY SAFE XPR-9862E
WARNING: TO PREVENT THE IGNITION OF HAZARDOUS ATMOSPHERES,
DO NOT CHANGE THE BATTERIES IN DESIGNATED NON-HAZARDOUS
LOCATIONS.
WARNING: SUBSTITUTION OF COMPONENTS MAY IMPAIR INTRINSIC
SAFETY
AVERTISSEMENT: AFIN DE PREVENIR L'INFLAMMATION D'ATMOSPHERES
DANGEREUSES, NE CHANGER LES BATTERIES QUE DANS DES
EMPLACEMENTS DESIGNES NON DANGEREUX.
AVERTISSEMENT: LA SUBSTITUTION DE COMPOSANTS PEUT
COMPROMETTRE LA SECURITE INTRINSÈQUE.
For personal safety, always confirm the rating of any known hazardous or
potentially hazardous location where the light is planned to be used. These areas
include fuel areas such as below decks on boats, fuel or chemical transfer or
storage facilities and areas where the atmosphere contains chemicals or particles,
such as grain, dust, or metal powders.
Areas with potentially explosive atmospheres may not be posted. If you are
unsure of the environment contact the Safety Director or agency where the
environment in question is located. A listing of the rated classes, divisions,
groupings and zones of gasses, vapors and combustible materials is available in
the National Fire Protection Administration (NFPA) Classification of Flammable
Liquids and Combustible Materials section of the 2004 edition of the NFPA-70
manual. Available at www.nfpa.org
WARNING NEVER remove or replace the battery pack in any hazardous or
potentially hazardous area, or in any potentially flammable or explosive
environment.
WARNING NEVER locate the light charging adapter, the 12 VDC adapter plug or
the charging platform in any hazardous, potentially hazardous, potentially
flammable or explosive environment.
WARNING NEVER attempt to recharge the battery pack in any hazardous,
potentially hazardous, flammable or explosive environment.
Inspect the battery pack. Never use a battery pack that appears damaged. Only
remove the battery pack from the light outside of any hazardous environment.
Replacement or additional battery packs are available from Bayco.
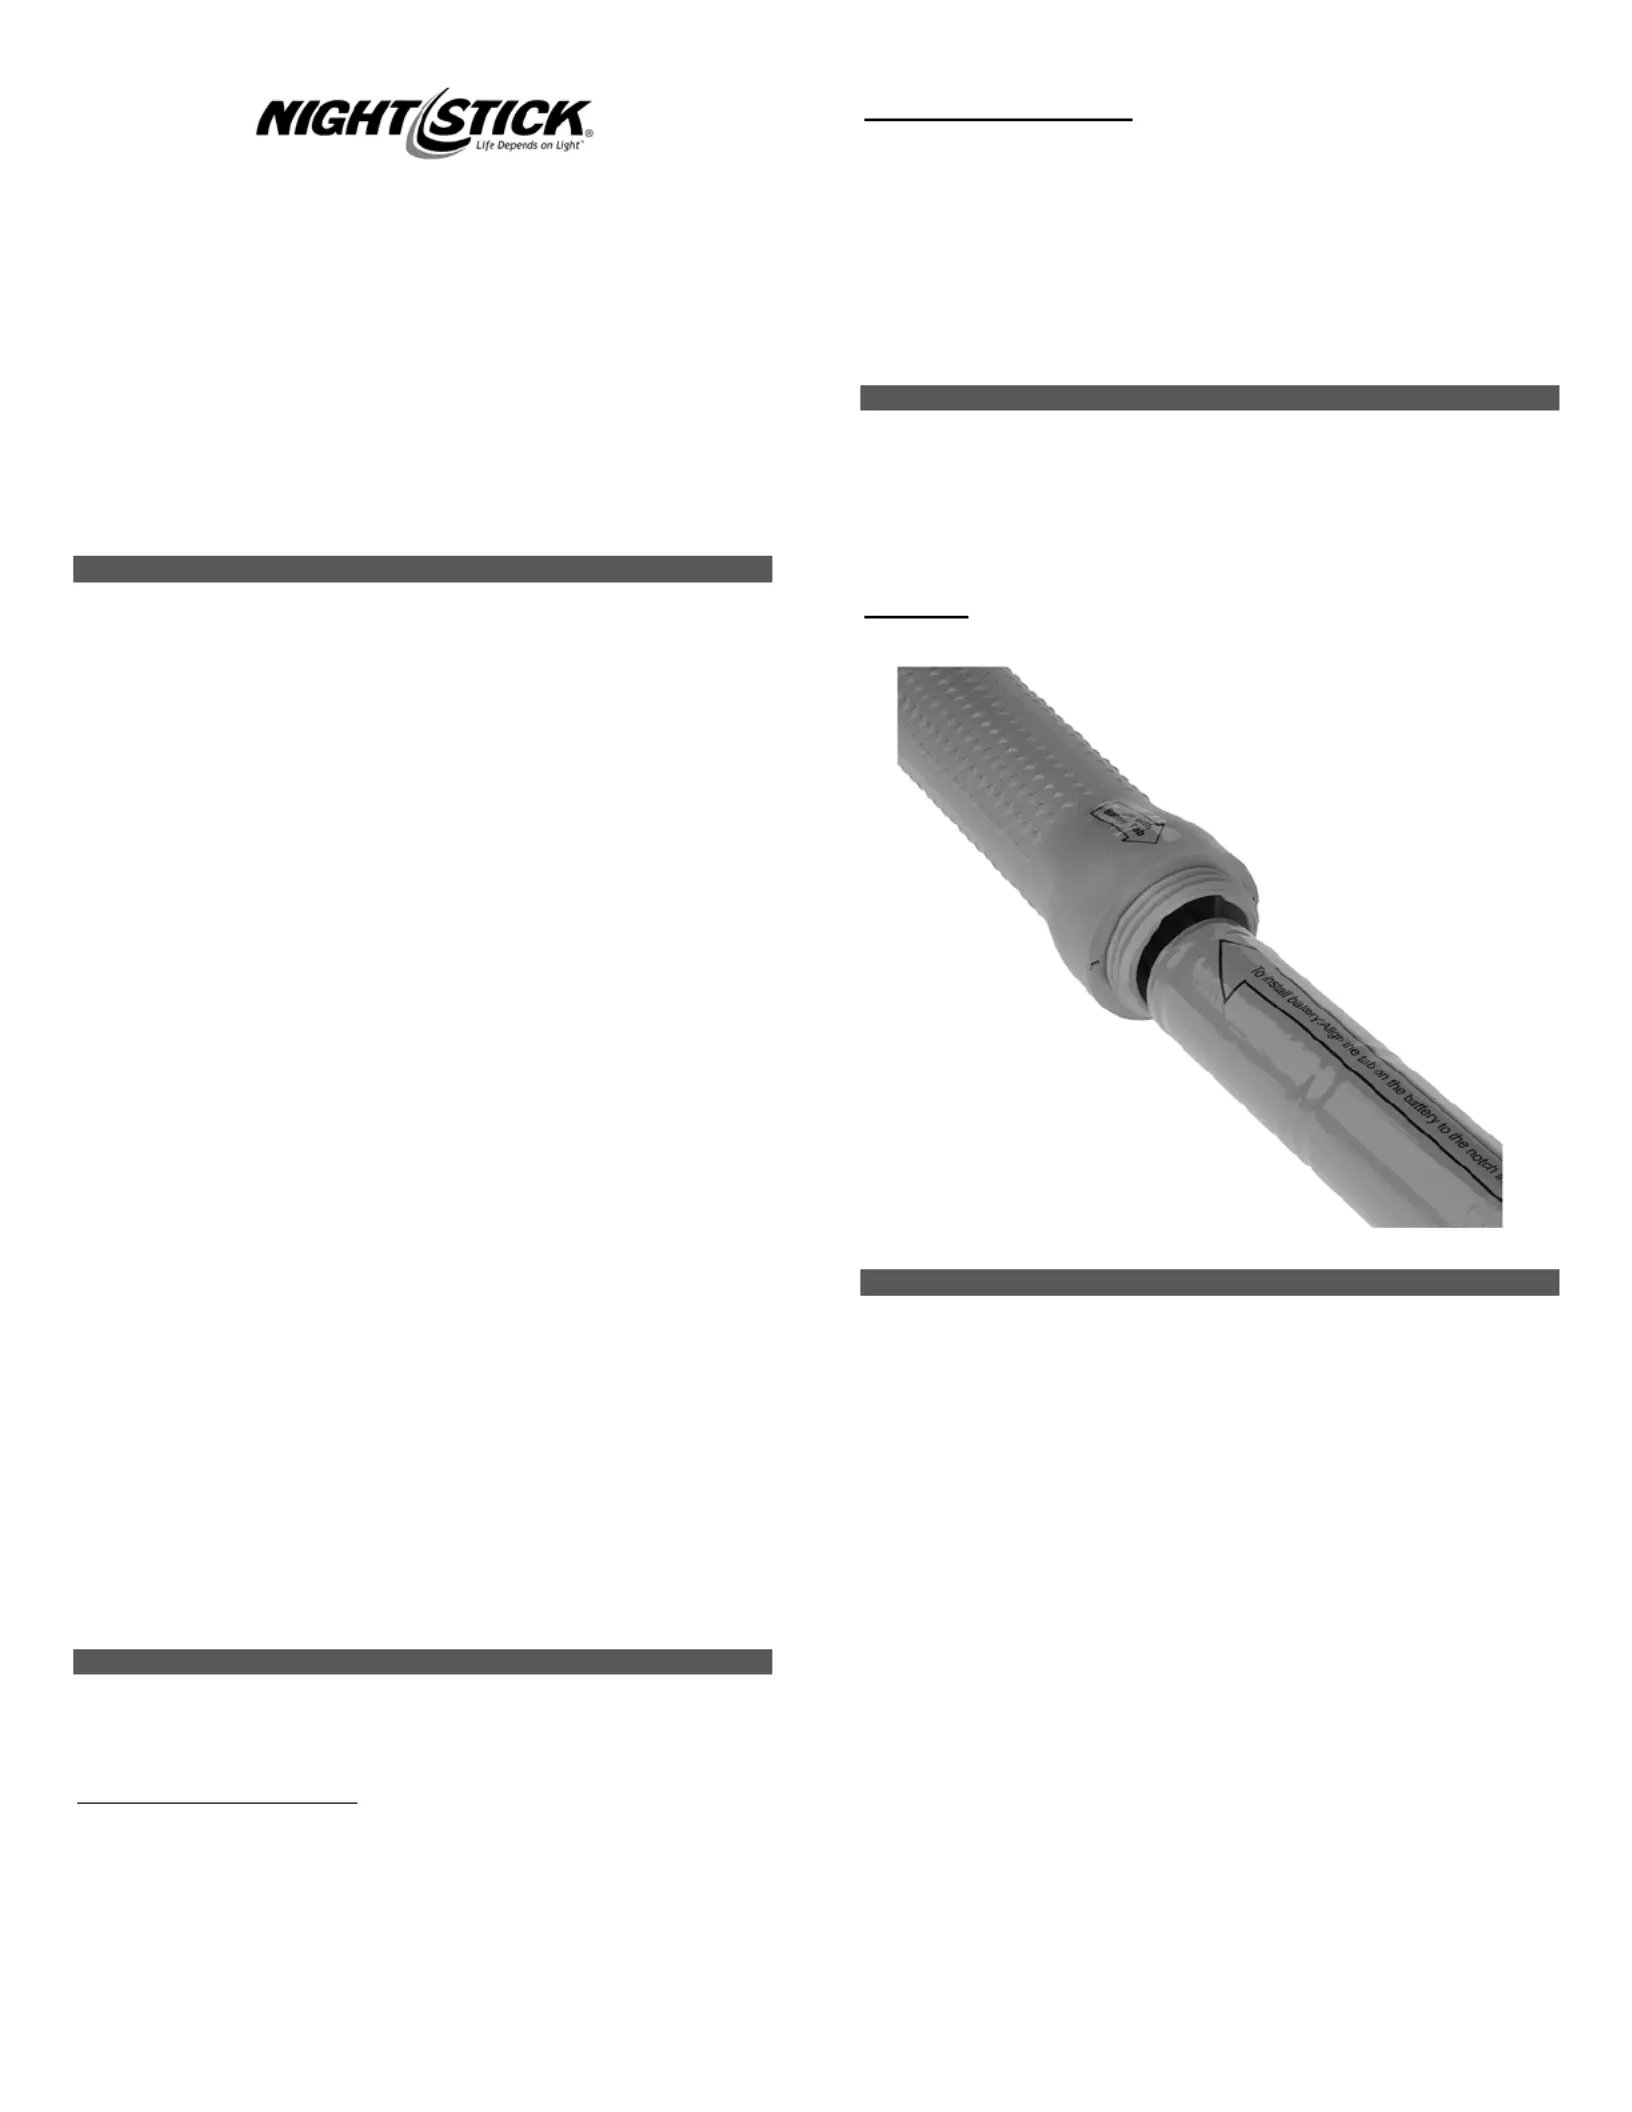
BATTERY INSTALLATION
The battery and flashlight body are keyed to prevent improper installation. Note that
a new flashlight is shipped with the battery correctly keyed but in the reverse
direction to prevent accidental turn-on during shipping.
New Flashlight Battery Installation
1.Remove the tail-cap and shake out the RED battery. Charge the battery per the
charging instruction.
2.After a full charge, align the arrow on the battery with the notch in the flashlight
body.
3.Slide the battery into the flashlight and replace the tail-cap. The flashlight is now
ready for use.
Replacement Battery Installation
1.Remove the tail-cap and shake out the old RED battery.
2.Take a fully charged replacement battery and align the arrow on the battery with
the notch in the flashlight body.
3.Slide the battery into the flashlight and replace the tail-cap. The flashlight is now
ready for use.
Always make sure the battery tab and the notch in the housing are aligned.
Never force the battery pack into the flashlight; this can cause the battery pack
to become lodged in the light housing.
CHARGING
Fully charge the Nightstick battery before the first use. If the battery is new or has
been unused for several months, several charge and discharge cycles may be
needed to reach full battery capacity. To reach maximum performance, run the light
to completely discharge the battery and then recharge. Each charge cycle will
extend the operation time until maximum capacity is achieved. The charge time for
maximum capacity is approximately 3 hours.
Regular Use
Use only the supplied Nightstick charger platform and AC or DC adapter.
TIPS TO EXTEND BATTERY LIFE
The Nightstick NiMH battery pack does not have a memory effect. Charging the
battery pack often helps extend its useful life.
A new Nightstick or one that has not been used for a long period of time may
not accept a full charge initially. This is normal and does not indicate a problem.
Fully discharge and then charge the unit several times to condition the battery
pack for full capacity.
Charge the unit after each use, whether the Nightstick is fully discharged or not.
Store the Nightstick at room temperature
Produktspezifikationen
| Marke: | NightStick |
| Kategorie: | Beleuchtung |
| Modell: | XPR-9862 |
Brauchst du Hilfe?
Wenn Sie Hilfe mit NightStick XPR-9862 benötigen, stellen Sie unten eine Frage und andere Benutzer werden Ihnen antworten
Bedienungsanleitung Beleuchtung NightStick

1 April 2026
1 April 2026
1 April 2026
1 April 2026
1 April 2026
1 April 2026
1 April 2026
1 April 2026
31 März 2026
31 März 2026
Bedienungsanleitung Beleuchtung
Neueste Bedienungsanleitung für -Kategorien-
3 April 2026
3 April 2026
3 April 2026
3 April 2026
3 April 2026
3 April 2026
3 April 2026
3 April 2026
3 April 2026
3 April 2026