Salus RT310iSPE Bedienungsanleitung
Salus Thermostat RT310iSPE
Lies die bedienungsanleitung für Salus RT310iSPE (3 Seiten) kostenlos online; sie gehört zur Kategorie Thermostat. Dieses Handbuch wurde von 29 Personen als hilfreich bewertet und erhielt im Schnitt 4.6 Sterne aus 9 Bewertungen. Hast du eine Frage zu Salus RT310iSPE oder möchtest du andere Nutzer dieses Produkts befragen? Stelle eine Frage
Seite 1/3
RT310iSPE Smartphone Controlled
Digital Thermostat
Quick Guide
06/2020
Connect the gateway to your router and SALUS power adaptor, after successful gateway
initialisation the LED will go solid green.
Schließen Sie das Gateway an Ihren Router und die Stromversorgung an. Nach erfolgreicher
Initialiserung wird die LED dauerhaft grün leuchten.
SRT00000000 - 00
1.2.
ENInstallation - Step 1
FR Installation – Etape 1
DE Installation – Schritt 1
SLO Namestitev - Korak 1
EN
Installation Step 2–
FR Installation – Etape 2
DE Installation – Schritt 2
SLO Namestitev - Korak 2
EN
Installation - Step 3
FR Installation – Etape 3
DE Installation – Schritt 3
SLO Namestitev - Korak 3
1
2
Introduction
The SALUS RT310i is a Smart phone controlled programmable thermostat. The RT310i thermostat will switch
your heating system on or o, as needed, in accordance with the temperature set by you, locally on the device
or remotely using the dedicated app.
The completed RT310iSPE series consists of a transmitter - RT310iTX thermostat, a ITG310 gateway and a Smart plug
SPE868. Go to www.salus-manuals.com for the full PDF version of the manual.
Product Compliance
This product complies with 2011/65/EU and Radio Equipment Directive (RED) 2014/53/EU. Full text of the EU Declaration of
Conformity on www.saluslegal.com.
868.0-868.6MHz; <13dBm
Safety Information
Use in accordance with the regulations. Indoor use only. Keep your equipment completely dry. Disconnect your
equipment before cleaning it with a dry towel.
Einleitung
Der SALUS RT310i ist ein Smartphone gesteuerter programmierbarer Thermostat. Dieser schaltet Ihrer Heizung an oder
aus je nach ihren Heizungseinstellungen, entweder lokal oder mittels der dazugehörigen APP. Der RT310iSPE besteht
aus einem Sender - dem RT310iTX, einem Gateway (ITG310) und einem Zwischenstecker SPE868 (Empfänger).
Auf www.salus-manuals.com erhalten Sie eine komplette Anleitung zu diesem Produkt.
Produktkomformität
Dieses Produkt erfüllt die wesentlichen Anforderungen der 2011/65/EU und die Radio Equipment Directive (RED) 2014/53/
EU. Den Vollständigen Text der EU Komformitätserklärung können Sie auf www.saluslegal.com einsehen.
868.0-868.6MHz; <13dBm
Sicherheitsinformationen
Produkt muss gemäß den gängigen Richtlinien verwendet werden. Nur in Innenräumen verwenden. Halten Sie ihr
Gerät trocken. Trennen Sie ihr gerät vom Strom ehe Sie es mit einem trockenen Tuch reinigen.
Introduction
Le SALUS RT310i est un thermostat programmable contrôlé par smartphone. Le thermostat RT310i éteindra ou
allumera votre système de chauage, selon les besoins, en fonction de la température que vous avez choisie, sur place
directement sur le dispositif, ou à distance en utilisant l'application dédiée. La série RT310iSPE complète se compose
d'un transmetteur (thermostat RT310iTX), d'un portail ITG310 et d'une prise intelligente SPE868. Rendez-vous sur le
site www.salus-manuals.com pour la version PDF complète du manuel.
Conformité du produit
Ce produit est conforme à la norme 2011/65/EU et à la Directive sur les équipements radio (RED) 2014/53/EU. Texte complet
de la déclaration de conformité de l'UE disponible sur le site www.saluslegal.com.
868.0-868.6MHz; <13dBm
Utilisation en matière de sécurité
Conforme aux réglementations. Usage intérieur uniquement. Maintenez votre appareil au sec. Débranchez votre
appareil avant de le nettoyer avec un chion sec.
Uvod
SALUS RT310i je programabilni termostat, ki omogoča nadzor s pametnega telefona. Termostat RT310i bo po potrebi
vklopil ali izklopil ogrevalni sistem v skladu s temperaturo, ki ste jo nastavili, na napravi ali na daljavo z namensko
aplikacijo. Serija RT310iSPE je sestavljena iz oddajnika - termostata RT310iTX, prehoda ITG310 in pametne vtičnice
SPE868. Za celotno različico priročnika v PDF formatu obiščite www.salus-manuals.com.
Skladnost izdelka
Izdelek je skladen z 2011/65/EU in Direktivo o radijski opremi (RED) 2014/53/EU. Celotno besedilo Izjave o skladnosti EU je
na voljo na spletni strani www.saluslegal.com.
868.0-868.6MHz; <13dBm
Varnostne informacije
Napravo uporabljajte v skladu s predpisi. Samo za notranjo uporabo. Oprema mora biti popolnoma suha. Pred čiščenjem s
suho krpo odklopite napravo iz napajanja.
ENDevice Settings
FR Réglages de l’appareil
DE Geräteeinstellung
SLO Nastavitve naprave
ENDE Button FunctionsTasten Funktionen
FR SLO Fonctions de bouttonFunkcije gumbov
The thermostat and the smart plug are pre-paired from the factory if purchased as a pack.
If not, follow thermostat pairing process.
i
Connectez la passerelle à votre routeur et à votre adaptateur de courant SALUS. Une fois la
passerelle initialisée, la LED s'allumera en vert fixe.
Povežite prehod na usmerjevalnik in napajalni adapter SALUS. Po uspešni vzpostavitvi prehoda
bo LED lučka svetila zeleno.
Once the icon appears on the LCD, the thermostat is on-line
and you can add it to the App.
i
Sobald das Symbol auf dem LCD erscheint ist das Thermostat
online und Sie können es in der App hinzufügen.
Une fois que l'icône apparait sur l'écran LCD, le thermostat est
en ligne et vous pouvez l'ajouter à l'application.
Ko se na LCD prikazovalniku pojavi ikona
je povezava s termosta-
tom vzpostavljena in ga lahko dodate v aplikaciji.
Der Thermostat und der Zwischenstecker sind ab Werk bereits miteinander verbunden wenn
diese als Paket gekauft wurden. Wenn nicht befolgen Sie die Anleitung des Thermostates.
Le thermostat et la prise intelligente sont déjà appariés en usine s'ils sont achetés par lot.
Si ce n'est pas le cas, suivez le processus d'appariement du thermostat.
Če sta termostat in pametna vtičnica kupljena v paketu sta predhodno seznanjena že v
tovarni. Če nista, sledite postopku seznanjanja termostata.
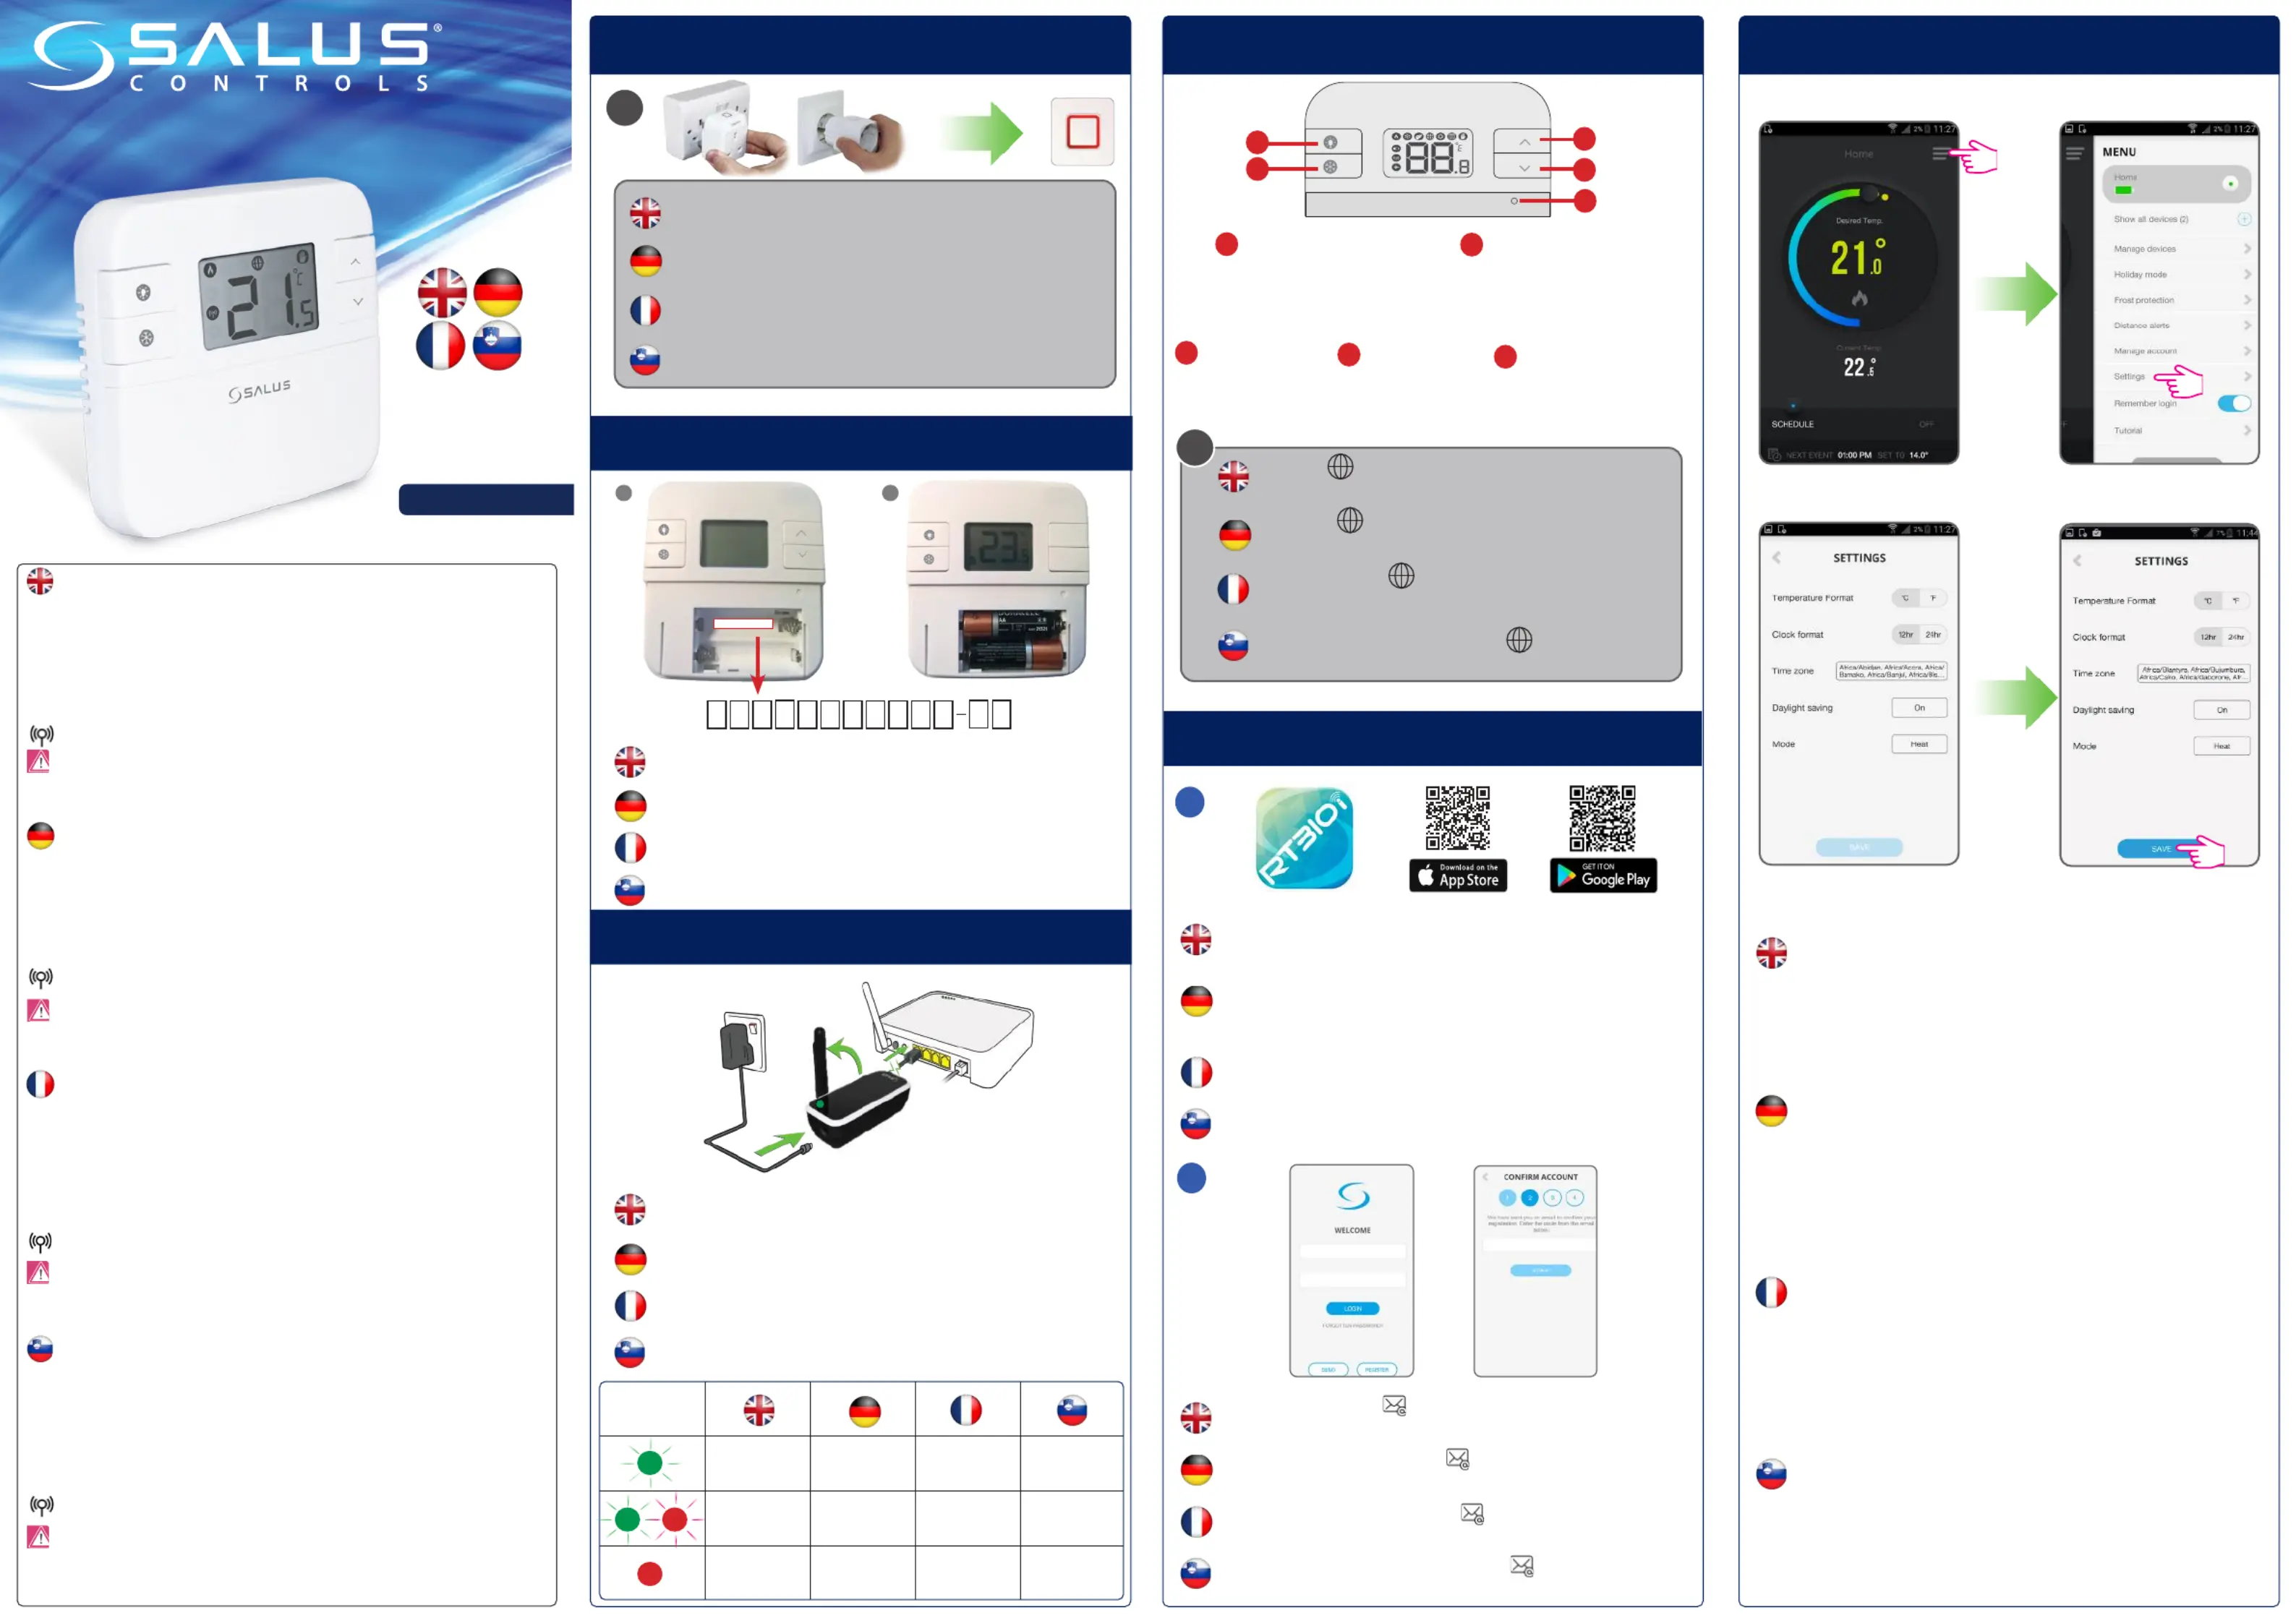
Choose the temperature and clock format. Set your time zone, daylight saving
settings and the mode (heat/cool). Time and date will be set automatically
once connected to the internet. Time zone needs to be set manually.
Heat Mode is used for controlling a heating appliance.
Cool Mode is used for controlling a cooling device.
Wählen Sie Temperatur und Uhrzeitformat. Stellen sie Ihre Zeitzone, Sommer/
Winterzeit und den Modus (Heizen/Kühlen) ein. Zeit und Datum stellen sich
automatisch ein, sobald eine Internetverbindung vorhanden ist. Zeitzonen
müssen manuell eingestellt werden. Heizmodus wird für die Steuerung
der Heizungsboiler verwendet, Kühlmodus wird für die Steuerung von
Kühlgeräten verwendet.
Choisir le format de température et d’horloge. Réglez votre fuseau horaire,
économie lumière du jour et le mode (Chauage/rafraichissement). Heure et
la date seront mises à jour dès la connection sur internet. Le fuseau horaire est
à paramétrer manuellement.
Le Mode Chauage est utilisé pour contrôler une chaudière.
Le Mode Raaichissement est utilisé avec une appareil de refroidissement.
Izberite obliko prikaza temperature in časa. Nastavite časovni pas, nastavitve
poletnega časa in način ogrevanje/hlajenje. Čas in datum se nastavita
samodejno, ko se naprava poveže z internetom. Časovni pas morate nastaviti
ročno. Ogrevalni način se uporablja za nadzor ogrevalnih naprav.
Način hlajenja se uporablja za nadzor hladilnih naprav.
Download the RT310i App, create an account and register your device.
Follow the on screen instructions to complete all the steps.
Laden Sie sich die RT310i App herunter, erstellen Sie ein Konto und
registrieren ihr Gerät. Folgen Sie den Bildschirmanweisungen um alle Schritte
abzuschliessen.
Téléchargez l’Aplli RT310i, créer un compte et enregistez votre appareil.
Suivre les instructions à l’écran pour exécuter toutes étapes.
Prenesite aplikacijo RT310i, ustvarite račun in registrirajte napravo. Sledite
navodilom na zaslonu in dokončajte vse korake.
ENDE RegistrationRegistrierung
FR EnregistrementSLO Registracija
TEST/PAIRING
1
1
2
2
3
3
4
4
5
5
EN Turn on the LCD backlight.
DE Schaltet die Hintergrundbeleuchtung ein
NL Zet het LCD backlight aan
SLO Vklopite osvetlitev LCD zaslona
EN Turn On/O the Frost Mode.
DE Frotschschutz An/Aus
NL Zet aan/uit vorst modus
SLO Vklopite/Izklopite zaščito
proti zmrzovanju
EN Increase button.
DE Temp. erhöhen
NL omhoog knop
SLO Gumb za povečanje
ENDecrease button.
DE Temp. senken
NL omlaag knop
SLO Gumb za zmanjšanje
EN Test Mode/ Pairing Mode
DE Testmodus / Verbindungsmodus
NL Test modus/ pairing modus
SLO Testni način / Način seznanjanja
Prejeli boste e-poštno sporočilo o potrditvi . Kliknite na povezavo v
e-poštnem sporočilu, da potrdite svoj račun.
You will receive an email of conrmation. Click the link on the email to
conrm your account.
Sie erhalten eine Aktivierungsmail welche einen Code zur Aktivierung
enthält, prüfen Sie bitte auch ihren Spamordner.
Vous recevrez un e-mail d'activation contenant un code d'activation.
Veuillez vérier dans votre dossier de courriers indésirables
Before inserting the batteries, please make a note of your SRT number and register your device
on the app.
Bevor Sie die Batterien einlegen notieren Sie sich bitte die SRT Nummer und registrieren Sie Ihr
Gerät auf der App
Avant d’insérer les piles, merci de noter le numéro de série (SRT) et d’enregistrer votre appareil
sur l’Appli.
Preden vstavite baterije si zapišite SRT številko in registrirajte napravo v aplikaciji.
SRT
Gateway receiving
command
Internet signal
interrupted
No Internet
connection
Keine Internet-
verbindung
Pas de connexion
Internet
Ni internetne
povezave
Internetsignal
unterbrochen
Signal Internet
interrompu
Internetni signal je
prekinjen
Gateway erhält
Befehl
Passerelle recevant
une commande
Prehod prejema ukaz
Produktspezifikationen
| Marke: | Salus |
| Kategorie: | Thermostat |
| Modell: | RT310iSPE |
Brauchst du Hilfe?
Wenn Sie Hilfe mit Salus RT310iSPE benötigen, stellen Sie unten eine Frage und andere Benutzer werden Ihnen antworten
Bedienungsanleitung Thermostat Salus

1 August 2025
31 Juli 2025
31 Juli 2025
31 Juli 2025
31 Juli 2025
25 Juli 2025
24 Juli 2025
23 Juli 2025
23 Juli 2025
23 Juli 2025
Bedienungsanleitung Thermostat
Neueste Bedienungsanleitung für -Kategorien-
27 März 2026
26 März 2026
26 März 2026
26 März 2026
14 März 2026
13 März 2026
12 März 2026
12 März 2026
19 Januar 2026
14 Januar 2026