SilverStone XE04-SP3 Bedienungsanleitung
SilverStone PC Kühlventilator XE04-SP3
Lies die bedienungsanleitung für SilverStone XE04-SP3 (1 Seiten) kostenlos online; sie gehört zur Kategorie PC Kühlventilator. Dieses Handbuch wurde von 16 Personen als hilfreich bewertet und erhielt im Schnitt 4.6 Sterne aus 9 Bewertungen. Hast du eine Frage zu SilverStone XE04-SP3 oder möchtest du andere Nutzer dieses Produkts befragen? Stelle eine Frage
Seite 1/1
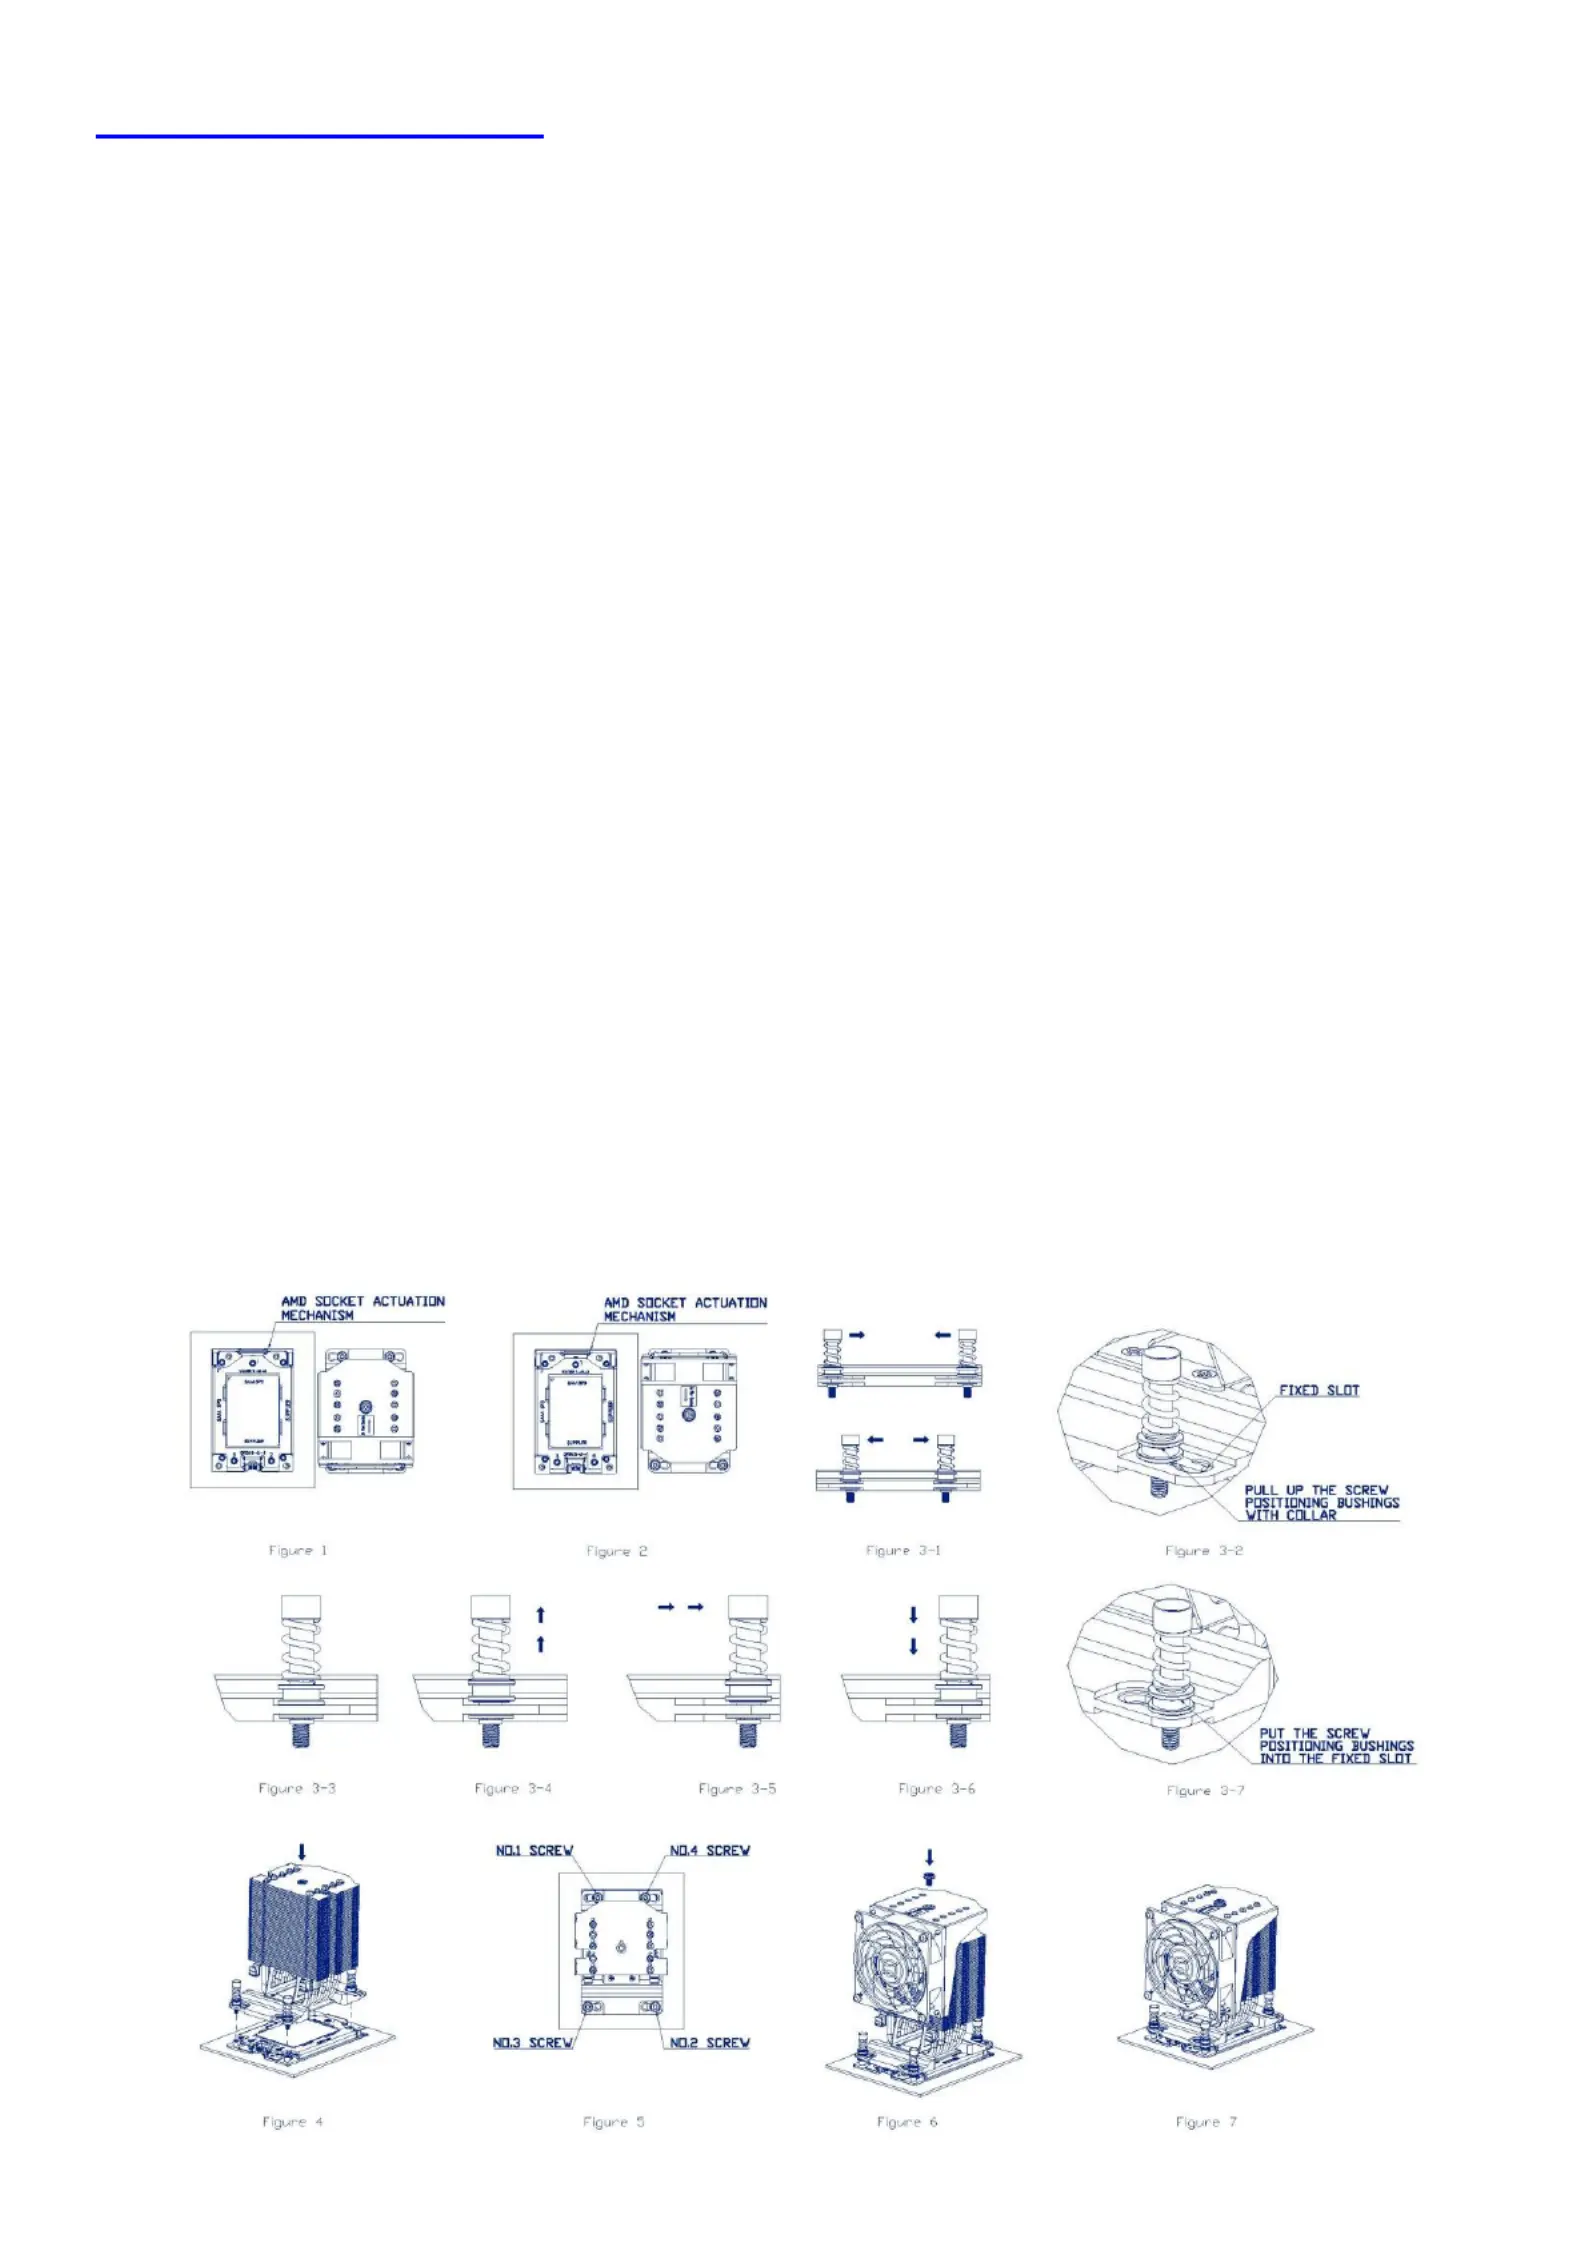
Installation Procedure
1. Take out 04-SP3 from its packing box. Before installing the heat sink, please check that heat sinkXE
must be properly oriented to the system cooling air ow direction (Figure 1 & Figure 2).
2. With the desired heat sink air ow direction, adjust the heat sink mounting screw positions so that they
can be aligned with the associated nut standos for heat sink attachment on the socket stiener frame
(Figure 3-1~3-7).
3. Remove the protection cover of thermal interface material (TIM) or thermal grease. The required amount
of TIM has been pre-applied on the bottom of the heat sink. Inspect pre-applied TIM for any damage.
4. Place the heat sink directly on top of the CPU (Figure 4) so that the four heat sink mounting screws are
aligned with and seated on the four heat sink mounting studs or nut standos on the socket stiener
frame. The heat sink must be proper orient to the system cooling air flow direction. Please note that lyed
the heat sink cooling fan should not be attached to the heat sink body when tightening the four heat sink
mounting screws.
5. Use a screwdriver with Torx T20 bit and adjust the screwdriver torque setting to .1 kgf-cm (.0 lbf-in). 1614
Before turning on the screwdriver, make sure that the screwdriver bit is fully engaged in the cavity of the
heat sink mounting screw head. Keep heat sink mounting screw vertical during installations.
6. Tighten the two diagonal heat sink mounting screwsi.e. the #1 and #2 screws (Figure 51 to 2 turns , )
until they are just snug. Do not fully tighten! Then do the same with the remaining two diagonal heat sink
mounting screws.
7. Follow the diagonal installation pattern on all four heat sink mounting screws to ensure that the bottom of
the heat sink is properly seated on the CPU and to prevent the heat sink from tilting. Finish by fully
tightening all the four heat sink mounting screws.
8.and Install the heat sink cooling fan holder assembly on the heat sink body then tighten the single and
locking screw on top of the fan holder (Figure 6 Figure 7). &
9. Connect 04-SP3 cooling fan connector to the fan header labeled for CPU on the motherboard.XE
Produktspezifikationen
| Marke: | SilverStone |
| Kategorie: | PC Kühlventilator |
| Modell: | XE04-SP3 |
| Breite: | 93 mm |
| Tiefe: | 119 mm |
| Gewicht: | 750 g |
| Produktfarbe: | Schwarz, Silber |
| Höhe: | 126 mm |
| Material: | Kupfer |
| Typ: | Luftkühlung |
| Menge pro Packung: | 1 Stück(e) |
| Verpackungsart: | Box |
| Nennstrom: | 0.385 A |
| Geräuschpegel Lüfter (max.): | 38 dB |
| Maximaler Luftstrom: | 54 cfm |
| Empfohlene Platzierung: | Prozessor |
| Thermal Design Power (TDP): | 250 W |
| Anzahl Lüfter: | 1 Lüfter |
| Ventilator-Anschluss: | 4-polig |
| Ventilatoren Geschwindigkeit (min): | 1300 RPM |
| Ventilatoren Geschwindigkeit (max): | 3800 RPM |
| Unterstützte Prozessorsteckplätze: | SP6, Socket SP3, Socket TR4 |
| Mittlere Zeit bis zum Ausfall (MTTF) des Lüfters: | 100000 h |
| Maximum Luftdruck: | 6.8 mmH2O |
| Unterstützung der Pulsweitenmodulation: | Ja |
| Abmessungen Gebläse (B x T x H): | 92 x 25 x 92 mm |
| Lagertyp: | Doppelkugellager |
| Nennspannung: | 12 V |
| Lamellenmaterial: | Aluminium |
| Anzahl Wärmerohre: | 5 |
| Durchmesser Wärmerohre: | 6 mm |
Brauchst du Hilfe?
Wenn Sie Hilfe mit SilverStone XE04-SP3 benötigen, stellen Sie unten eine Frage und andere Benutzer werden Ihnen antworten
Bedienungsanleitung PC Kühlventilator SilverStone

19 März 2026
12 März 2026
28 Februar 2026
25 Februar 2026
23 Februar 2026
22 Februar 2026
21 Februar 2026
17 Februar 2026
16 Februar 2026
2 Februar 2026
Bedienungsanleitung PC Kühlventilator
Neueste Bedienungsanleitung für -Kategorien-
30 März 2026
27 März 2026
25 März 2026
24 März 2026
21 März 2026
16 März 2026
15 März 2026
15 März 2026
15 März 2026