Sony ADP-FSK1 Bedienungsanleitung
Sony Sonstiges Kamerazubehör ADP-FSK1
Lies die bedienungsanleitung für Sony ADP-FSK1 (2 Seiten) kostenlos online; sie gehört zur Kategorie Sonstiges Kamerazubehör. Dieses Handbuch wurde von 15 Personen als hilfreich bewertet und erhielt im Schnitt 4.9 Sterne aus 8 Bewertungen. Hast du eine Frage zu Sony ADP-FSK1 oder möchtest du andere Nutzer dieses Produkts befragen? Stelle eine Frage
Seite 1/2
本書のカメライラストは、
DSC-QX10
を使用しております。
下記の注意事項を守らない
と、事故により
死亡
や
大
けが
の原因となります。
製品及び同梱物を、乳幼児の手の届く範囲に放置しな
いでください。
幼児の手の届かない場所に置き、口に入れないよう注
意する。万一、飲み込んだ場合は、ただちに医師に相談
してください。
使用上のご注意
使いかたについては、カメラの取扱説明書もご確認ください。
カメラに本機を取り付けてご使用の際は、落下防止のためス
トラップを使用してください。
本機を使用の際は三脚を使用できません。
三脚機能付きシューティンググリップ
GP-VPT1
は取り付け
できません。
タブレットアタッチメント
SPA-TA1
は取り付けできません。
カメラアタッチメントケース
SPA-ACX1
、
SPA-ACX2
、
SPA-ACX3
、
SPA-ACX4
は取り付けできません。
カメラを横位置で撮影する際は、カメラの上下を確認してか
ら撮影してください。上下反転して撮影された場合、画像は
反転して本体に記録されます。
スマートフォン取り付け時のご注意
カメラとスマートフォンアタッチメントは付属していませ
ん。
取り付けるとき、スマートフォンのボタンを挟まないようご
注意ください。
本機を装着時にスマートフォンの
液晶画面を強く押すと、破
損
する恐れがありますのでご注意ください。
ご使用前に本機がしっかり装着されていることをご確認くだ
さい。
スマートフォンと本機の間に砂やほこりなどのゴミが入る
と、スマートフォンに傷がつく恐れがあります。
スマートフォンを本機に装着し、カメラを取り付けた状態で
振り回したり、強い衝撃を与えないようご注意ください。
スマートフォンを本機を装着し、カメラを取り付けた状態で、
カメラまたはスマートフォンだけを持たないでください。落
下する恐れがあります。
本機を
195
度に開いた場合、取り付けるカメラによってはカ
メラを回転できないことがあります。
フラッシュ搭載カメラをご使用の場合は、フラッシュ発光部
が接触しないようにスマートフォンの角度を調整してくださ
い。傷がついたり、破損する恐れがあります。
チルトアダプター
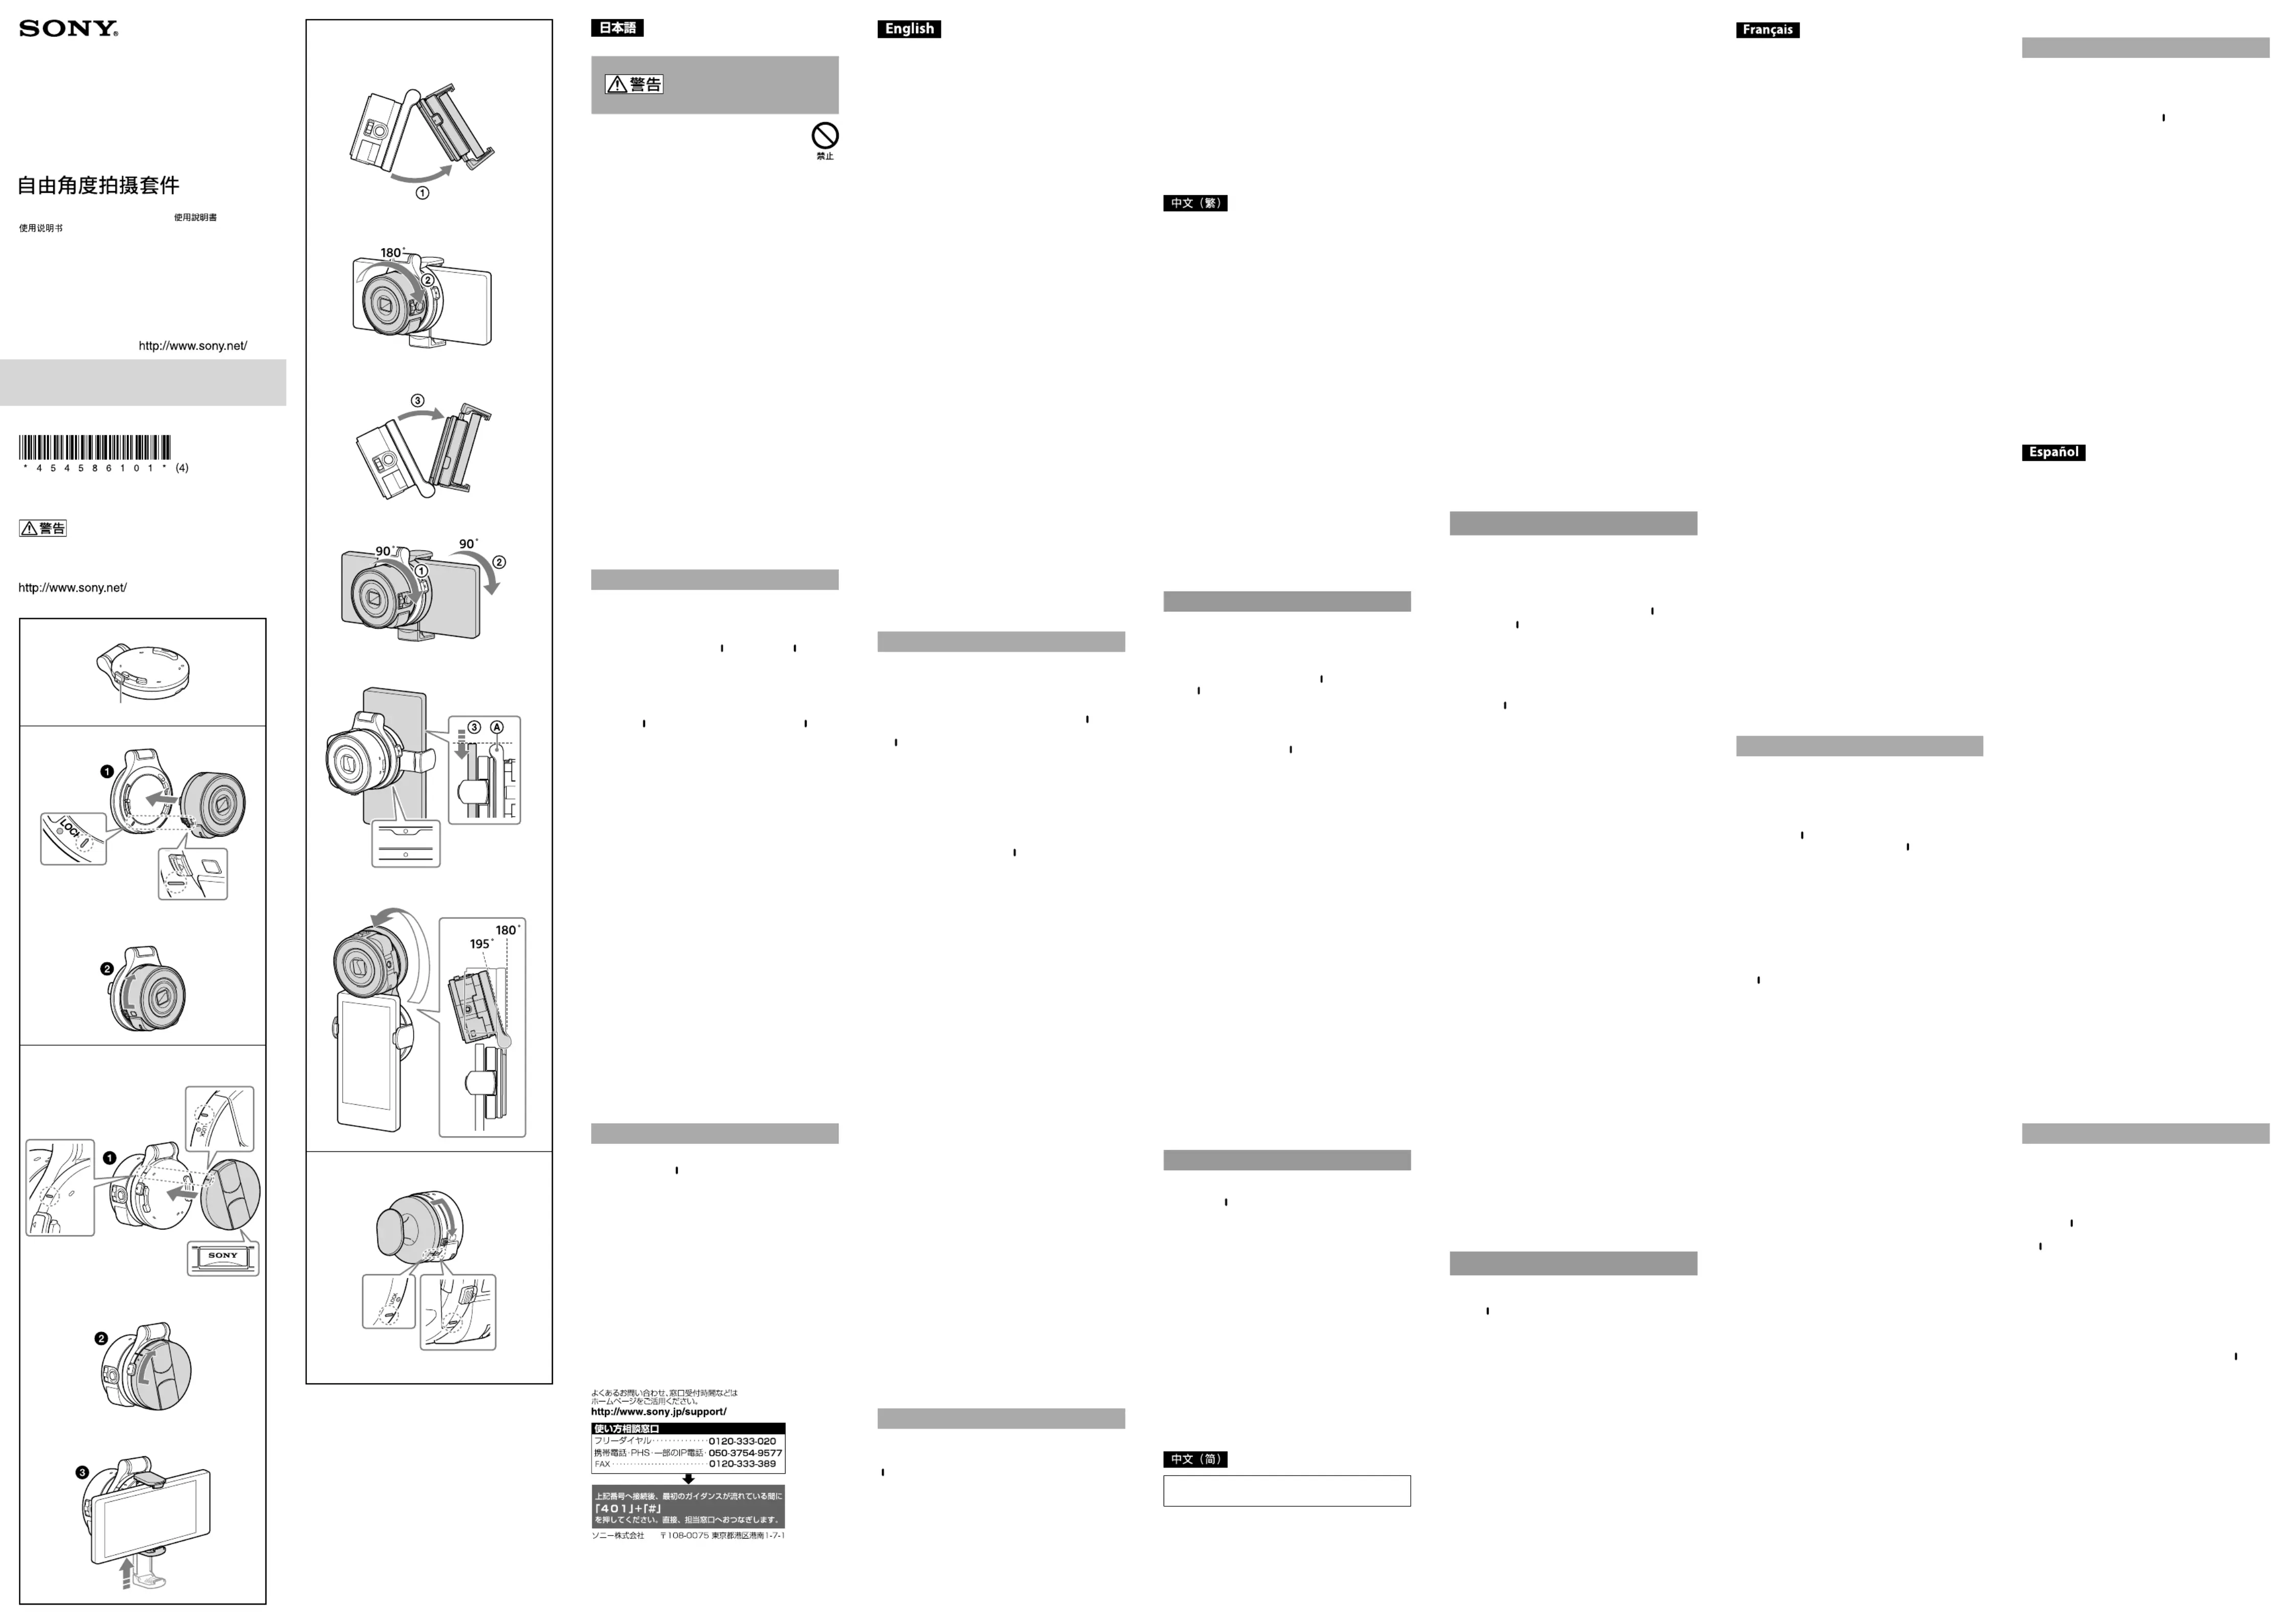
各部の名前
1
取りはずしレバー
カメラを取り付ける
本機の
SONY
ロゴがある面の「」とカメラ側面の「」をあわせ
て溝にはめる。
「カチッ」というまで「
LOCK
」の方向へカメラを回す。
*
カメラが本機の溝に正しくはまっているか確認してくだ
さい。
本機とスマートフォンを取り付ける
本機側の「」とスマートフォンアタッチメント側の「」をあわ
せて溝にはめる。
「カチッ」というまで「
LOCK
」の方向へスマートフォンア
タッチメントを回す。
アタッチメントを下に広げて、スマートフォンを取り付け
る。
本機の使いかた
手順とでカメラとスマートフォンを取り付けた状態か
ら、以下の操作をします。
本機を開くとローアングル()、カメラを時計まわりに
180
度回し()、本機を開くとハイアングル()で撮影できま
す。
*
操作するときは、カメラとスマートフォンをしっかり持っ
てください。
カメラを縦位置に構えて自分撮りをするには、本機のカメラ
側を時計回りに
90
度回して、本機側面の「」を表示させ
()、スマートフォン側を時計回りに
90
度回し()、「」を
あわせます。スマートフォンの上端を本機の()と揃うま
でスライドさせます()。
カメラを横位置にして自分撮りをするには、本機のカメラ
側の「」、スマートフォン側の「」をあわせます。
本機を
180
度または
195
度に開いて撮影します。
ちょっと一言
本機の「」どうし、「」どうしをあわせると、カメラとスマー
トフォンの縦横の向きがあい、画像をスマートフォンの画面
いっぱいに表示することができます
PlayMemories Mobile™
の「ミラーモード」をお使いいただ
くことにより画面表示が左右反転し、より自分撮りがしやす
くなります。
カメラ、スマートフォンアタッチメント
を取りはずす
カメラの場合はカメラの取りはずしレバーを、スマートフォン
アタッチメントの場合は本機の取りはずしレバーをスライド
しながら、取り付けのときと逆方向へ回して取りはずす。
グリップ
カメラを取り付ける/取りはずす
カメラとグリップの「」をあわせて溝にはめ、「カチッ」というま
で「
LOCK
」の方向へカメラを回す。取りはずすときは、カメラ
の取りはずしレバーをスライドしながら、取り付けのときと逆
方向へ回して取りはずす。
主な仕様
チルトアダプター
外形寸法(約):
65 mm x 78 mm x 17.5 mm
(幅
/
高さ
/
奥行き)(突起部を除く)
質量(約):
54 g
グリップ
外形寸法(約):
61.5 mm x 38 mm
(
最大径
/
奥行き)
質量(約):
30 g
同梱物:
グリップ(
1
)、チルトアダプター(
1
)、印刷物一
式
仕様および外観は、改良のため予告なく変更することがありま
すが、ご了承ください。
PlayMemories Mobile
はソニー株式会社の商標です。
Notice for the customers in the countries applying
EU Directives
Manufacturer: Sony Corporation, 1-7-1 Konan
Minato-ku Tokyo, 108-0075 Japan
For EU product compliance: Sony Deutschland GmbH,
Hedelfinger Strasse 61, 70327 Stuttgart, Germany
The illustrations of the camera in this manual show
the DSC-QX10.
Notes on Use
For details on use, also refer to the instruction
manual supplied with your camera.
When using this adaptor attached to your camera,
use the strap to prevent dropping the camera.
Tripod cannot be used when using the adaptor.
Shooting Grip with Mini Tripod GP-VPT1 cannot be
attached.
Tablet Attachment SPA-TA1 cannot be attached.
Camera Attachment Case SPA-ACX1, SPA-ACX2,
SPA-ACX3, SPA-ACX4 cannot be attached.
When the camera is positioned horizontally, make
sure which side the camera top and bottom is
before shooting. If you shoot an image upside
down, the image is recorded to the camera
vertically upside down.
Notes on attaching to a smartphone
A camera and smartphone attachment are not
supplied with this adaptor.
Make sure no buttons are caught when the
smartphone is attached.
If you press the LCD screen of the smartphone
strongly when this adaptor is attached, the
smartphone and this adaptor may be damaged.
Make sure that this adaptor is firmly attached to
the smartphone before use.
If any sand or dirt gets between the smartphone
and this adaptor, the smartphone may be
damaged.
When the smartphone is attached to this adaptor
and the camera is attached, do not swing them
around or subject them to a strong impact.
Do not grab the camera and smartphone when the
smartphone is equipped with the adaptor and the
camera is attached. They may slip off the adaptor.
Depending on the camera you attach, it is not
possible to rotate the camera when the adaptor is
opened at an angle of 195 degrees.
If you use the camera with the flash, you should
adjust the angle of smartphone to avoid hitting
the flash. Otherwise, flash may be damaged.
Tilt adaptor
Identifying the Parts
1 Removal lever
Attaching the camera
Put the camera into the slot aligning the “” on the
side of the adaptor with the SONY logo with the
“
” on the camera.
Rotate the camera to the “LOCK” position until it
clicks.
* Make sure the camera is put into the slot of the
adaptor properly.
Attaching the adaptor to your
smartphone
Put the smartphone attachment into the slot of
the adaptor, aligning the “
”.
Rotate the smartphone attachment to the “LOCK”
position until it clicks.
Extend the clamp downward and attach a
smartphone.
Using this adaptor
Perform the following operations after completing
steps and to attach the camera and
smartphone to the adaptor.
You can shoot images by: () tilting the adaptor
to a low camera angle, and () rotating the
camera 180 degrees in a clockwise direction, ()
tilting the adaptor to a high camera angle.
* Hold the camera and smartphone tightly during
the operation.
To take a self-portrait in the vertical position: ()
rotate the adaptor on the camera 90 degrees to
the “” on the adaptor, and () rotate the
adaptor on the smartphone 90 degrees to align
the “” on the adaptor, () slide the smartphone
until its top edge and the adaptor are aligned as
indicated in Figure “”.
To take self-portraits with the camera in the
vertical position, rotate the adaptor on the
camera until “” is displayed and rotate the
adaptor on the smartphone to align “”.
Tilt the adaptor 180 degrees or 195 degrees to
shoot images.
Tips
By aligning the index marks “”and ” and “” or “
“” on the adaptor, the camera and the
smartphone orientation is matched and the image
can be displayed on the entire smartphone screen.
Using “Mirror Mode” on PlayMemories Mobile™,
the image on the screen changes to a mirrored
image, making it easier to take a self-portrait.
Removing the camera/
smartphone attachment
To remove the camera slide and hold the removal
lever on the camera and rotate the camera to the
opposite direction from when it was attached. To
remove the smartphone attachment, slide and hold
the removal lever on the adaptor and rotate the
smartphone attachment to the opposite direction
from when it was attached.
Grip
Attaching/Removing the camera
Put the grip into the slot of the camera, aligning the
“
”, and rotate the camera to the “LOCK” position
until it clicks. To remove the camera, slide and hold
the removal lever on the camera and rotate the
attachment in the opposite direction from when it
was attached.
Specifications
Tilt Adaptor
Dimensions 65 mm x 78 mm x 17.5 mm
(Approx.):(25/8 in. x 31/8 in. x 23/32 in.)
(w/h/d) (excluding projections)
Mass:Approx. 54 g (1.9 oz)
Grip
Dimensions
(Approx.):
61.5 mm x 38 mm
(21/2 in. x 11/2 in.)
(φ/d)
Mass:Approx. 30 g (1.1 oz)
Included items :Grip (1), Tilt Adaptor (1), Set of
printed documentation
PlayMemories Mobile is a trademark of Sony
Corporation.
Design and specifications are subject to change
without notice.
本⼿冊中的相機圖例為DSC-QX10。
使⽤注意事項
如需使⽤上的詳細資訊,另請參閱相機隨附的使⽤說
明書。
使⽤裝有相機的轉接器時,請使⽤繫帶以免相機掉
落。
使⽤轉接器時,不能使⽤三腳架。
不能安裝⼩型三腳架拍攝握把GP-VPT1。
不能安裝平板附件SPA-TA1。
不能安裝相機附件盒SPA-ACX1、SPA-ACX2、
SPA-ACX3、SPA-ACX4。
⽔平放置相機時,請在拍攝前確定相機的頂部和底
部。如果顛倒拍攝影像,影像會以垂直顛倒的⽅式錄
製到相機。
安裝⾄智慧型⼿機的注意事項
此轉接器並未隨附相機和智慧型⼿機附件。
安裝智慧型⼿機時請確認沒有卡到任何按鈕。
當已安裝此轉接器時,若⽤⼒按壓智慧型⼿機的液晶
螢幕,則智慧型⼿機和此轉接器可能受損。
使⽤前應確定此轉接器已確實安裝⾄智慧型⼿機。
若智慧型⼿機與此轉接器之間存有任何沙粒或灰塵,
則智慧型⼿機可能受損。
當智慧型⼿機安裝⾄此轉接器並且已安裝相機時,請
勿搖晃整組裝置或讓其受到強烈衝擊。
當智慧型⼿機配備轉接器並且已安裝相機時,請勿抓
握相機和智慧型⼿機。否則它們可能會從轉接器上滑
落。
視您安裝的相機⽽定,將轉接器打開⾄195度時,可
能無法旋轉相機。
如果您將相機與閃光燈⼀起使⽤,應調整智慧型⼿機
的⾓度,以免撞擊閃光燈。否則閃光燈可能會受損。
多⾓度轉接器
零件識別
1 移除桿
安裝相機
使轉接器上有SONY記號⼀側的“”對⿑相機上
的“
”,將相機放⼊插槽。
將相機旋轉⾄“LOCK”位置,直到發出喀嗒聲。
* 確定相機已正確放⼊轉接器的插槽內。
將轉接器安裝⾄智慧型⼿機
將智慧型⼿機附件對⿑“”放⼊轉接器的插槽內。
將智慧型⼿機附件旋轉⾄“LOCK”位置,直到發出
喀嗒聲。
將夾⼦向下拉並安裝智慧型⼿機。
使⽤此轉接器
完成步驟和將相機和智慧型⼿機安裝⾄轉接器
後,執⾏以下操作。
您可以透過以下⽅式拍攝影像:()將轉接器傾
斜到低相機⾓度,然後()將相機朝順時鐘⽅向
旋轉180度,接著()將轉接器傾斜到⾼相機⾓
度。
* 操作期間請緊握相機和智慧型⼿機。
若要以垂直位置⾃拍肖像:()將相機上的轉接
器旋轉90度⾄轉接器上的“”,然後()將智
慧型⼿機上的轉接器旋轉90度以對⿑轉接器上
的“”,接著()滑動智慧型⼿機,直到頂端
和轉接器如圖“”所⽰對⿑。
若要以垂直位置使⽤相機⾃拍肖像,請旋轉相機
上的轉接器,直到顯⽰“”,然後旋轉智慧型
⼿機上的轉接器以對⿑“”。
將轉接器傾斜180度或195度以拍攝影像。
秘訣
透過對⿑轉接器上的指⽰記號“”和“”
或“”和“”,使相機和智慧型⼿機的⽅向⼀
致,並且影像可以顯⽰在整個智慧型⼿機螢幕上。
在PlayMemories Mobile上使⽤“鏡像模式”,螢幕™
上的影像將變成鏡像,以便⾃拍肖像。
拆下相機/智慧型⼿機附件
若要拆下相機,請滑動並按住相機上的移除桿,然後將
相機朝安裝時的相反⽅向旋轉。若要拆下智慧型⼿機附
件,請滑動並按住轉接器上的移除桿,然後將智慧型⼿
機附件朝安裝時的相反⽅向旋轉。
握把
安裝/拆下相機
將握把對⿑“”放⼊相機的插槽內,然後將相機旋轉
⾄“LOCK”位置,直到發出喀嗒聲。若要拆下相機,請
滑動並按住相機上的移除桿,然後將附件朝安裝時的相
反⽅向旋轉。
規格
多⾓度轉接器
尺⼨(約):
65 mm 78 mm 17.5 mm××
(寬/⾼/深)(不包含突出部件)
質量:約54 g
握把
尺⼨(約):
61.5 mm 38 mm×
(φ/深)
質量:約30 g
所含物品:握把(1)、多⾓度轉接器(1)、
成套印刷⽂件
PlayMemories Mobile是Sony Corporation的商標。
設計和規格若有變更,恕不另⾏通知。
这些使⽤说明书中的插图可能与实际产品有
差异。
为避免造成环境污染,请将废弃产品按照当地
法规进⾏处置。
保留备⽤。
本说明书中相机的图⽰采⽤DSC-QX10。
使⽤须知
有关使⽤的详细信息,另请参阅相机随附的
使⽤说明书。
在使⽤安装到相机的此适配器时,请使⽤腕
带以防相机摔落。
使⽤适配器时,不能使⽤三脚架。
不能安装⼩型三脚架拍摄⼿柄GP-VPT1。
不能安装镜头相机卡⼝夹SPA-TA1。
不能安装相机附件盒SPA-ACX1、SPA-ACX2、
SPA-ACX3、SPA-ACX4。
当相机⽔平放置时,请在拍摄前确定相机的
顶部和底部在哪⼀边。如果颠倒拍摄图像,
图像会以垂直颠倒的⽅式录制到相机。
安装⾄智能⼿机须知
此适配器不随附相机和智能⼿机附件。
安装智能⼿机时,确保不会夹住任何按钮。
在装有此适配器的情况下,如果⽤⼒按压智
能⼿机的液晶屏,可能会损坏智能⼿机和此
适配器。
使⽤前,请确保此适配器已牢牢安装在智能
⼿机上。
如果智能⼿机和此适配器之间有沙⼦或污
垢,可能会损坏智能⼿机。
将智能⼿机装到此适配器且安装相机后,切
勿晃动或使它们遭受强烈撞击。
当智能⼿机安装了适配器并且安装了相机
时,切勿握住相机和智能⼿机。否则可能会
从适配器上滑落。
根据安装的相机⽽定,以195度的⾓度打开适
配器时,可能⽆法转动相机。
如果在相机上使⽤闪光灯,则应调节智能⼿
机的⾓度,以免碰撞闪光灯。否则,可能会
损坏闪光灯。
多⾓度适配器
部件识别
1 拆卸杆
安装相机
让带有SONY标识的适配器侧⾯的“”和相
机上的“
”对齐,将相机放⼊插槽。
将相机转到“LOCK”位置,直⾄其咔哒⼀
声。
* 确保相机正确放⼊适配器的插槽。
将适配器安装⾄智能⼿机
对齐“”,将智能⼿机附件安装到适配器
的插槽中。
将智能⼿机附件转到“LOCK”位置,直⾄
其咔哒⼀声。
向下展开夹⼦,并安装智能⼿机。
使⽤此适配器
在完成步骤和步骤将相机和智能⼿机安装
到适配器上后,执⾏以下操作。
可以通过以下⽅式拍摄图像:()将适
配器向低相机⾓度倾斜,并()以顺时
针⽅向180度转动相机,()将适配器向
⾼相机⾓度倾斜。
* 操作期间握紧相机和智能⼿机。
以垂直⽅向⾃拍:()将相机上的适配
器90度转动⾄适配器上的“”,并
()90度转动智能⼿机上的适配器以对
齐适配器上的“”,()滑动智能⼿
机,直⾄其顶端和适配器如图“”所⽰
对齐。
若要以垂直⽅向⽤相机进⾏⾃拍,请转动
相机上的适配器直⾄显⽰“”,然后转
动智能⼿机上的适配器以对齐“”。
将适配器倾斜180度或195度拍摄图像。
提⽰
通过将适配器上的指⽰标记“”和“”
或“”和“”对齐,相机和智能⼿机的
⽅向可保持⼀致,并且图像可以显⽰在整个
智能⼿机屏幕上。
通过PlayMemories Mobile上的“镜像模™
式”,屏幕上的图像将改变为镜像,让⾃拍
变得更加简单。
拆下相机/智能⼿机附件
若要拆下相机,请滑动并握住相机上的拆卸
杆,按照与安装相反的⽅向转动相机。若要拆
下智能⼿机附件,请滑动并握住适配器上的拆
卸杆,按照与安装相反的⽅向转动智能⼿机附
件。
握把
安装/拆下相机
对齐“”,将握把放⼊相机的插槽,然后将相
机转动⾄“LOCK”位置,直⾄其咔哒⼀声。若
要拆下相机,请滑动并握住相机上的拆卸杆,
按照与安装相反的⽅向转动附件。
规格
多⾓度适配器
尺⼨(约):
65 mm 78 mm 17.5 mm××
(宽/⾼/深)(不包括突出部
分)
质量:约54 g
握把
尺⼨(约):
61.5 mm 38 mm×
(φ/深)
质量:约30 g
所含物品:握把(1)、多⾓度适配器
(1)、成套印刷⽂档
PlayMemories Mobile是Sony Corporation的
商标。
设计和规格若有变更,恕不另⾏通知。
Avis aux consommateurs des pays appliquant les
Directives UE
Fabricant: Sony Corporation, 1-7-1 Konan Minato-ku
Tokyo, 108-0075 Japon
Pour toute question relative à la conformité des
produits dans l’UE: Sony Deutschland GmbH,
Hedelfinger Strasse 61, 70327 Stuttgart, Allemagne
L’appareil photo illustré dans ce manuel est le
DSC-QX10.
Remarques sur l’utilisation
Pour des détails sur l’utilisation, reportez-vous
également au mode d’emploi fourni avec l’appareil
photo.
Lorsque vous fixez cet adaptateur à l’appareil
photo, utilisez la lanière pour l’empêcher de
tomber.
Un trépied ne peut pas être utilisé conjointement
avec l’adaptateur.
Il n’est pas possible de fixer la poignée de prise de
vue avec mini-trépied GP-VPT1.
Il n’est pas possible de fixer l’accessoire pour
tablette SPA-TA1.
Il n’est pas possible de fixer la housse d’accessoire
pour appareil photo SPA-ACX1, SPA-ACX2,
SPA-ACX3, SPA-ACX4.
Quand vous tenez l’appareil photo
horizontalement, vérifiez si le dessus est bien
orienté vers le haut avant de prendre une photo.
Si vous prenez une photo tête en bas, l’image est
enregistrée verticalement, tête en bas, sur
l’appareil photo.
Remarques sur la fixation à un smartphone
Aucun appareil photo et aucun support pour
smartphone ne sont fournis avec cet adaptateur.
Assurez-vous qu’aucune touche n’est entravée
lorsque le smartphone est fixé.
Si vous appuyez fort sur l’écran LCD du
smartphone lorsque cet adaptateur est en place,
vous risquez d’endommager tant le smartphone
que l’adaptateur.
Assurez-vous que cet adaptateur est solidement
fixé au smartphone avant utilisation.
Si du sable ou de la saleté pénètre entre
l’adaptateur et le smartphone, celui-ci risque d’être
endommagé.
Lorsque le smartphone et l’appareil photo sont
fixés à cet adaptateur, ne les balancez pas et ne les
soumettez pas à un choc violent.
Évitez tout mouvement vif lorsque le smartphone
est équipé de l’adaptateur auquel l’appareil photo
est fixé. Ils risquent de se détacher de l’adaptateur.
Selon l’appareil photo que vous fixez, il peut
s’avérer impossible de le faire pivoter quand
l’adaptateur est ouvert à 195degrés.
Si vous utilisez l’appareil photo avec le flash, vous
devez ajuster l’angle du smartphone pour ne pas
heurter le flash. Sinon, vous risquez
d’endommager le flash.
Adaptateur inclinable
Identification des éléments
1 Levier de retrait
Fixation de l’appareil photo
Placez l’appareil photo dans la rainure en alignant
le repère «
» situé sur le côté de l’adaptateur
avec le logo SONY sur le repère «
» de l’appareil
photo.
Tournez l’appareil photo vers la position «LOCK»
jusqu’à ce que vous entendiez un déclic.
* Assurez-vous que l’appareil photo est bien en
place dans la rainure de l’adaptateur.
Fixation de l’adaptateur au
smartphone
Placez le support pour smartphone dans la
rainure de l’adaptateur en alignant les repères
«
».
Tournez le support pour smartphone vers la
position «LOCK» jusqu’à ce que vous entendiez
un déclic.
Déployez la patte vers le bas et fixez un
smartphone.
Utilisation de cet adaptateur
Exécutez les opérations suivantes après avoir fixé
l’appareil photo et la smartphone à l’adaptateur en
suivant les étapes . et
Vous pouvez prendre des photos en: ()
inclinant l’adaptateur en contre-plongée et ()
en faisant pivoter l’appareil photo de 180degrés
dans le sens des aiguilles d’une montre, () en
inclinant l’adaptateur en plongée.
* Tenez convenablement l’appareil photo et le
smartphone pendant l’utilisation.
Pour réaliser un autoportrait en position
verticale: () tournez l’adaptateur de 90degrés
sur l’appareil photo vers le repère «» de
l’adaptateur et () tournez l’adaptateur de
90degrés sur le smartphone afin d’aligner le
repère «» de l’adaptateur, () faites glisser le
smartphone jusqu’à ce que son bord supérieur et
l’adaptateur soient alignés de la manière illustrée
à la Figure «».
Pour réaliser des autoportraits avec l’appareil
photo en position verticale, tournez
l’adaptateur sur l’appareil photo jusqu’à ce que
«» s’affiche et tournez l’adaptateur sur le
smartphone de façon à aligner «».
Inclinez l’adaptateur de 180degrés ou de
195degrés pour la prise de vue.
Conseils
En alignant les repères «» et «» ou «» et
«» sur l’adaptateur, vous pouvez orienter
l’appareil photo et le smartphone dans le même
sens et l’image peut être affichée sur la totalité de
l’écran du smartphone.
Le «Mode miroir» de PlayMemories Mobile™
permet d’inverser l’image affichée, ce qui facilite la
réalisation de l’autoportrait.
Retrait du support pour appareil
photo/smartphone
Pour retirer l’appareil photo, faites glisser son levier
de retrait et, en le maintenant en place, tournez
l’appareil dans le sens contraire à celui utilisé pour le
mettre en place. Pour retirer le support pour
smartphone, faites glisser le levier de retrait de
l’adaptateur et, en le maintenant en place, tournez
le smartphone dans le sens contraire à celui utilisé
pour le mettre en place.
Poignée
Fixation/retrait de l’appareil
photo
Placez la poignée dans la rainure de l’appareil
photo, en alignant le repère «
», et tournez
l’appareil vers la position «LOCK» jusqu’à ce que
vous entendiez un déclic. Pour retirer l’appareil
photo, faites glisser son levier de retrait et, en le
maintenant en place, tournez le support dans le
sens contraire à celui utilisé pour le mettre en place.
Spécifications
Adaptateur
inclinable
Dimensions 65 mm x 78 mm x 17,5 mm
(Environ):(25/8 po. x 31/8 po. x 23/32 po.)
(l/h/d) (hors parties saillantes)
Poids:Environ 54 g (1,9 on)
Poignée
Dimensions
(Environ):
61,5 mm x 38 mm
(21/2 po. x 11/2 po.) (φ/d)
Poids:Environ 30 g (1,1 on)
Éléments fournis:Poignée (1), Adaptateur inclinable
(1), Jeu de documentation
imprimée
PlayMemories Mobile est une marque commerciale
de Sony Corporation.
La conception et les spécifications peuvent être
modifiées sans préavis.
Aviso para los clientes de países en los que se
aplican las directivas de la UE
Fabricante: Sony Corporation, 1-7-1 Konan Minato-ku
Tokyo, 108-0075 Japón
Para la conformidad del producto en la UE: Sony
Deutschland GmbH, Hedelfinger Strasse 61, 70327
Stuttgart, Alemania
Las ilustraciones de la cámara de este manual
muestran la DSC-QX10.
Notas sobre la utilización
Con respecto a los detalles sobre la utilización,
consulte el manual de instrucciones suministrado
con su cámara.
Cuando utilice este adaptador conectado a la
cámara, use la correa para evitar que se caiga la
cámara.
No se puede utilizar el trípode cuando se utiliza el
adaptador.
No es posible acoplar una empuñadura de toma
con el minitrípode GP-VPT1.
No es posible fijar el acoplamiento de la tableta
SPA-TA1.
No es posible fijar la funda para acoplamiento de
la cámara SPA-ACX1, SPA-ACX2, SPA-ACX3,
SPA-ACX4.
Cuando la cámara se coloca en posición horizontal,
verifique cuál es el lado superior y cuál el inferior
de la cámara antes de realizar la toma. Si toma una
imagen al revés, la imagen se graba en la cámara
en posición vertical invertida.
Notas sobre la fijación a un smartphone
Este adaptador no incluye ninguna cámara ni
acoplamiento del smartphone.
Asegúrese de que no quede ningún botón
atrapado cuando se acople el smartphone.
Si presiona con fuerza la pantalla LCD del
smartphone cuando esté fijado este adaptador, el
smartphone y este adaptador pueden dañarse.
Cerciórese de que este adaptador esté firmemente
fijado al smartphone antes de utilizarlo.
Si entra polvo o suciedad entre el smartphone y
este adaptador, el smartphone puede dañarse.
Cuando el smartphone esté fijado a este
adaptador y fije la cámara, no los balancee ni los
someta a golpes fuertes.
No zarandee la cámara y el smartphone si tiene un
smartphone con adaptador y la cámara está
acoplada a él, p1-ya que ambos podrían resbalarse
del acoplamiento.
En función de la cámara que acople, no será
posible girarla cuando el adaptador esté abierto
en un ángulo de 195 grados.
Si utiliza la cámara con flash, debería ajustar el
ángulo del smartphone para evitar golpear el
flash. De lo contrario, se podría dañar el flash.
Adaptador inclinable
Identificación de las partes
1 Palanca de extracción
Fijación de la cámara
Coloque la cámara en la ranura alineando la
marca “
” que se encuentra en el lateral del
adaptador con el logotipo de SONY con la marca
“
” en la cámara.
Gire la cámara hacia la posición “LOCK” hasta que
haga clic.
* Asegúrese de que la cámara se encuentra en la
ranura del adaptador correctamente.
Fijación del adaptador a su
smartphone
Coloque el acoplamiento del smartphone en la
ranura del adaptador, alineando la marca “
”.
Gire el acoplamiento del smartphone hacia la
posición “LOCK” hasta que haga clic.
Extienda la abrazadera hacia abajo y acople un
smartphone.
Uso de este adaptador
Realice las siguientes operaciones después de
realizar los pasos y para acoplar la cámara y el
smartphone al adaptador.
Puede tomar imágenes si: () inclina el
adaptador a un ángulo bajo de cámara y () gira
la cámara 180 grados en la dirección de las
agujas del reloj, () inclina el adaptador a un
ángulo elevado de cámara.
* Sostenga con fuerza la cámara y el smartphone
durante la operación.
1
4-545-861-(4)01
フリーアングル
シューティングキット
Free Angle Shooting Kit
Kit de prise de vue à
angle libre
取扱説明書/Operating instructions//
/Mode d’emploi/Manual de instrucciones/
Bedienungsanleitung/Gebruiksaanwijzing/
Bruksanvisning/Istruzioni per l’uso/Manual de
instruções
ADP-FSK1
©2014 Sony Corporation Printed in China
お買い上げいただきありがとうございます。
この取扱説明書には、事故を防ぐための重要な注
意事項と製品の取り扱いかたを示しています。
この取扱説明書をよくお読みのうえ、製品を安全にお使いくだ
さい。お読みになったあとは、いつでも見られるところに必ず
保管してください。
Produktspezifikationen
| Marke: | Sony |
| Kategorie: | Sonstiges Kamerazubehör |
| Modell: | ADP-FSK1 |
Brauchst du Hilfe?
Wenn Sie Hilfe mit Sony ADP-FSK1 benötigen, stellen Sie unten eine Frage und andere Benutzer werden Ihnen antworten
Bedienungsanleitung Sonstiges Kamerazubehör Sony

25 März 2026
4 August 2025
3 August 2025
3 August 2025
3 August 2025
3 August 2025
3 August 2025
3 August 2025
3 August 2025
3 August 2025
Bedienungsanleitung Sonstiges Kamerazubehör
Neueste Bedienungsanleitung für -Kategorien-
16 Februar 2026
6 Februar 2026
27 November 2025
22 November 2025
1 Oktober 2025
22 September 2025
17 September 2025
9 September 2025
8 September 2025
28 August 2025