StarTech.com 4K70IC-EXTEND-HDMI Bedienungsanleitung
StarTech.com Audio-/Video-Extender 4K70IC-EXTEND-HDMI
Lies die bedienungsanleitung für StarTech.com 4K70IC-EXTEND-HDMI (32 Seiten) kostenlos online; sie gehört zur Kategorie Audio-/Video-Extender. Dieses Handbuch wurde von 24 Personen als hilfreich bewertet und erhielt im Schnitt 4.8 Sterne aus 2 Bewertungen. Hast du eine Frage zu StarTech.com 4K70IC-EXTEND-HDMI oder möchtest du andere Nutzer dieses Produkts befragen? Stelle eine Frage
Seite 1/32
Quick-Start Guide
To view manuals, FAQs, videos, drivers, downloads, technical drawings, and more, visit www.startech.com/support.
Manual Revision: August 10, 2022 8:43 AM
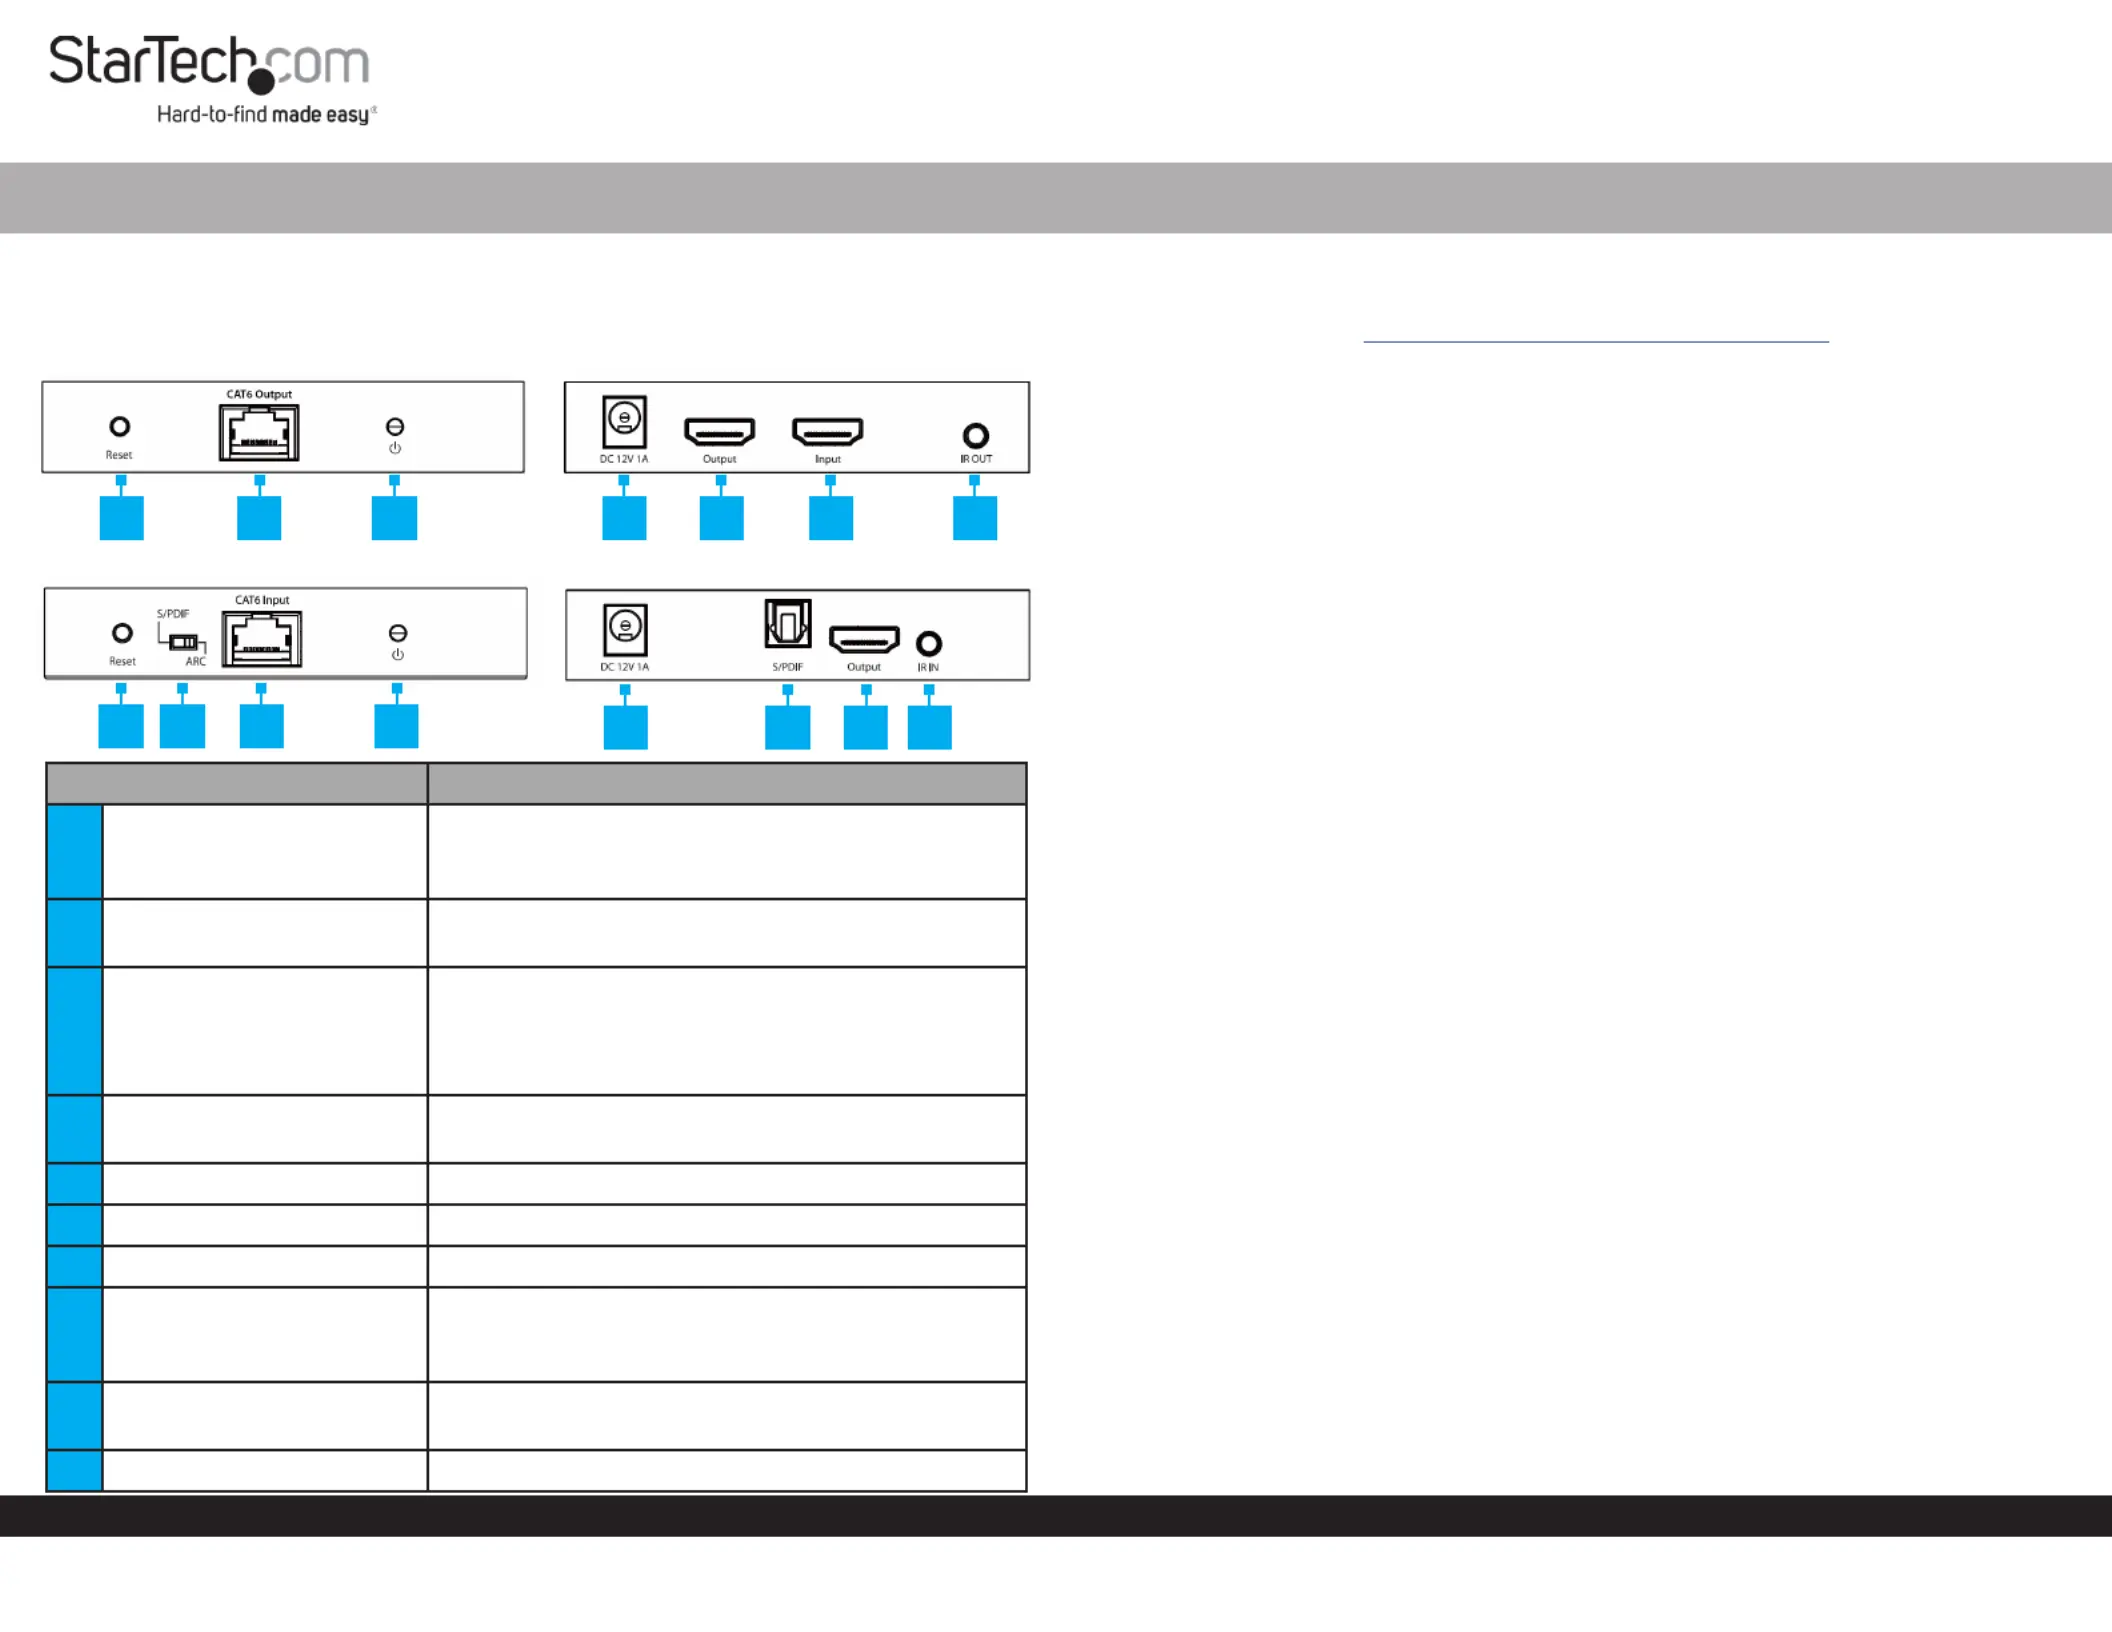
Product ID
4K70IC-EXTEND-HDMI
Transmitter
Receiver
PortFunction
1Reset Button
• Transmitter and Receiver: Reboots the unit
which will cause a renegotiation of connected
devices
2RJ45 Port
• Connect the and together, TransmitterReceiver
using a (sold separately)CAT6/6a Ethernet Cable
3Power Indicator
• Flashing Blue: Power connected, but no HDMI
input signal is detected
• Solid Blue: Power connected, and a HDMI input
signal is detected
4DC 12V Port
• Power the or using the TransmitterReceiver
included Power Adapter
5HDMI Output Port• Connect to an HDMI Display
6HDMI Input Port• Connect to an HDMI Source Device
7IR Output Port• Connect the to the IR Blaster Transmitter
8Audio Input Selector
• Switch audio input source between Receiver’s
the , or Transmitter’sHDMI Input PortReceiver’s
HDMI Output Port
9Optical Audio Output
• Connect to an on a S/PDIF InputAudio Device
(i.e. A/V Receiver)
10IR Input Port• Connect the to the IR Receiver Receiver
HDMI over CAT6/6A Extender - 4K 60Hz - 230ft (70m)
Product Information
For the latest product information, technical specications, and declarations of
conformance, please visit: Iwww.StarTech.com/4K70IC-EXTEND-HDM
Package Contents
• Local HDMI Transmitter Unit x 1
• Remote HDMI Receiver Unit x 1
• IR Blaster x 1
• IR Receiver x 1
• Rubber Feet x 8
• Mounting Kit x 1
• Power Adapter x 1
• Quick-Start Guide x 1
Installation
(Optional) Mounting Kit
Note: Before mounting the make sure that the surface you are HDMI Extender
mounting to is strong enough to support the weight of the . It is HDMI Extender
recommended that you mount the on a wall stud to provide the HDMI Extender
correct support.
1. Determine the for the .Mounting SurfaceHDMI Extender
2. Place the on each side of the . Align the Mounting BracketsHDMI ExtenderHoles
in the with the on the sides of the Mounting BracketsHolesHDMI Extender’s
Transmitter Receiverand .
3. Insert two through each and into the . ScrewsMounting BracketHDMI Extender
4. Tighten each using a .ScrewPhillips Head Screwdriver
5. Mount the to the desired using the appropriate HDMI ExtenderMounting Surface
Mounting Hardware (e.g. Wood Screws).
Installing the HDMI Transmitter and Receiver
1. On the , use the to set which audio output the TransmitterAudio Output Selector
setup requires.
Note: If changing the audio output after initial installation, a power cycle may be
required.
2. Position the near the .TransmitterHDMI Source Device
3. Connect an (not included) from the to the HDMI CableHDMI Source DeviceHDMI
Input PortTransmitter on the .
4. (Optional) Connect an (not included) from the on HDMI CableHDMI Output Port
the , toa.Transmitter Local HDMI Display
1234567
1823
49510
Produktspezifikationen
| Marke: | StarTech.com |
| Kategorie: | Audio-/Video-Extender |
| Modell: | 4K70IC-EXTEND-HDMI |
| Breite: | 99 mm |
| Tiefe: | 106 mm |
| Gewicht: | 210 g |
| AC-Netzadapter: | Ja |
| Produktfarbe: | Schwarz |
| Übertragungstechnik: | Kabelgebunden |
| Höhe: | 26 mm |
| Material: | Metall |
| AC Eingangsspannung: | 100 - 240 V |
| Gleichstrom-Anschluss (DC): | Ja |
| Betriebstemperatur: | -20 - 60 °C |
| Relative Luftfeuchtigkeit in Betrieb: | 0 - 90 % |
| Verpackungsbreite: | 240 mm |
| Verpackungstiefe: | 176 mm |
| Verpackungshöhe: | 80 mm |
| Paketgewicht: | 900 g |
| Schnellstartübersicht: | Ja |
| Stromverbrauch (Standardbetrieb): | 0.1 W |
| Typ: | AV-Sender & -Empfänger |
| Plug & Play: | Ja |
| LED-Anzeigen: | Ja |
| Temperaturbereich bei Lagerung: | -30 - 70 °C |
| Montageset: | Ja |
| Audio Kanäle: | 7.1 Kanäle |
| HDCP: | Ja |
| Unterstützte Grafik-Auflösungen: | 1280 x 720 (HD 720), 1920 x 1080 (HD 1080), 1920 x 1200 (WUXGA), 2560 x 1600 (WQXGA), 3840 x 2160 |
| Optischer Audio-Digitalausgang: | 1 |
| Rack-Einbau: | Nein |
| Stromstecker-Typ: | Typ M |
| Anzahl Produkte pro Versandkarton: | 10 Stück(e) |
| Länge des Versandkartons: | 270 mm |
| Breite des Versandkartons: | 380 mm |
| Höhe des Versandkartons: | 420 mm |
| Maximale Bildwiederholrate: | 60 Hz |
| High Dynamic Range Video (HDR) Unterstützung: | Ja |
| Ausgangsstrom: | 1 A |
| Externes Netzteil: | Ja |
| Maximale Auflösung: | 3840 x 2160 Pixel |
| HDMI-Version: | 2.0 |
| Nachhaltigkeitskonformität: | Ja |
| Nachhaltigkeitszertifikate: | CE, RoHS |
| Eingangsstrom: | 0.3 A |
| Anzahl der HDMI-Ausgänge: | 2 |
| Maximal mögliche Übertragungsstrecke: | 70 m |
| unterstütze Kabeltypen: | Cat5e, Cat6 |
| Gummifüße: | Ja |
| Fernbedienung (IR) output: | 1 |
| HDMI-In: | 1 |
| HDCP-Version: | 2.2 |
| Verkettung: | Ja |
| Fernbedienung (IR) input: | 1 |
| RJ-45-Eingangsanschlüsse: | 1 |
| RJ-45-Ausgangsanschlüsse: | 1 |
| Schutz vor elektrostatischer Entladung (ESD): | Ja |
| Betriebsspannung (Sender): | 12 V |
| Elektrostatischer Entladunsschutz (ESD): | 8 kV |
| IR-Blaster enthalten: | Ja |
| IR-Receiver enthalten: | Ja |
Brauchst du Hilfe?
Wenn Sie Hilfe mit StarTech.com 4K70IC-EXTEND-HDMI benötigen, stellen Sie unten eine Frage und andere Benutzer werden Ihnen antworten
Bedienungsanleitung Audio-/Video-Extender StarTech.com

14 März 2026
11 März 2026
19 Oktober 2025
19 September 2025
19 September 2025
19 August 2025
18 August 2025
23 Mai 2024
14 Mai 2024
Bedienungsanleitung Audio-/Video-Extender
Neueste Bedienungsanleitung für -Kategorien-
2 April 2026
30 März 2026
28 März 2026
28 März 2026
3 Februar 2026
9 Januar 2026
6 Januar 2026
3 Januar 2026
2 Januar 2026
2 Januar 2026