CTA Digital PAD-PARAFDC Bedienungsanleitung
CTA Digital Nicht kategorisiert PAD-PARAFDC
Lies die bedienungsanleitung für CTA Digital PAD-PARAFDC (3 Seiten) kostenlos online; sie gehört zur Kategorie Nicht kategorisiert. Dieses Handbuch wurde von 24 Personen als hilfreich bewertet und erhielt im Schnitt 4.2 Sterne aus 2 Bewertungen. Hast du eine Frage zu CTA Digital PAD-PARAFDC oder möchtest du andere Nutzer dieses Produkts befragen? Stelle eine Frage
Seite 1/3
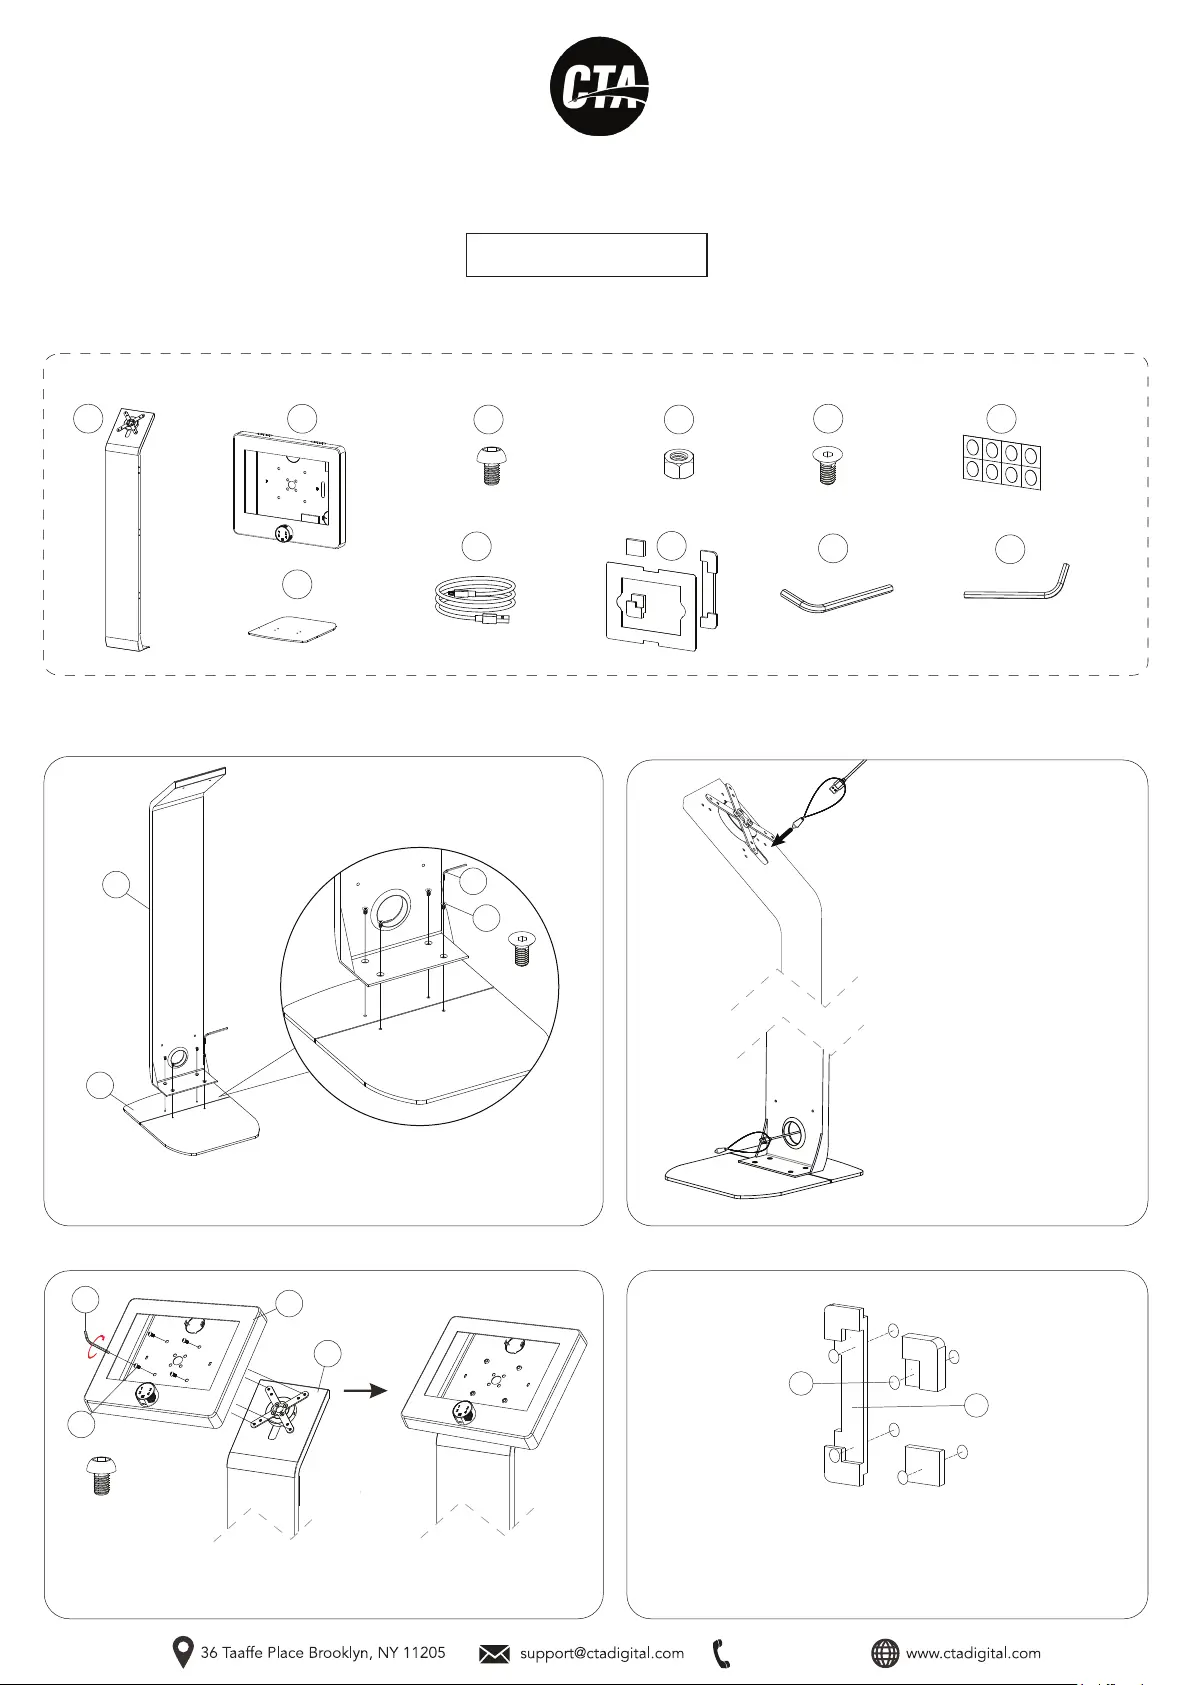
Premium Locking Floor Stand Kiosk w/
Digital Password Combination Security Enclosure
PAD-PARAFDC
INSTRUCTION - MANUAL
CONTENTS:
INSTALLATION:
1. Assembling floorstand base :
A
J
x1
M5 Allen Key
3. Attaching enclosure to VESA plate :
1A. Allign the holes on the sntad (A) with holes on the base (B) and turn
in screws (F) with provided allen tool (K) until securely tightened. Shown
above.
2B. When the cable reaches the
bottom of the stand, pull through
the hole at the stand back and
remove the weighted pendant
as shown.
2A. To route a charge cable
through the stand, attach the
weighted pendant to your
charge cable, then pass through
the cutout at the top of the
stand.
3A. Align enclosure (C) VESA holes to VESA plate holes in stand (A) and
from the front of enclosure turn in screws (D) into the threaded VESA
holes with provided allen tool (J) until securely thigtened. Shown above.
C
x1
E
x4
M5 NutM5 x 10
D
x4
M5 x 10
x4
B
x1
x1
K
x1
M6 Allen Key
x1
I
M6 p1-x4
F
x4
M6
2. Cable routing :
C
A
J
A
B
F
K
D
G
I
4. Setting up the foam adapters :
4A. Identify the double sided adhesives (G). Peel away the backing on
both sides. Adhesive four of them behind the foam pieces (I) as
illustrated. They are to adhese the foam to the enclosure. Peel away
the back on the next four and place them on top of the foam pieces as
illustrated. These are to attach the foam to the tablets and ensure
security.
x1
H
x1
G
888-733-4448
Produktspezifikationen
| Marke: | CTA Digital |
| Kategorie: | Nicht kategorisiert |
| Modell: | PAD-PARAFDC |
| Breite: | 307.34 mm |
| Tiefe: | 259.08 mm |
| Gewicht: | 15512 g |
| Produktfarbe: | Schwarz |
| Höhe: | 50.8 mm |
| Material: | Stahl |
| Befestigungstyp: | Flur |
| Kabellänge: | 0.45 m |
| Markenkompatibilität: | Apple |
| Maximale Bildschirmgröße: | 11 " |
| Breite der Standhalterung: | 406.4 mm |
| Tiefe der Standhalterung: | 342.9 mm |
| Schloss Art: | Schlüssel |
| Minimum Bildschirmgröße: | 9.7 " |
| Verbessertes Kabelmanagement: | Ja |
| Höhe der Standhalterung: | 1270 mm |
Brauchst du Hilfe?
Wenn Sie Hilfe mit CTA Digital PAD-PARAFDC benötigen, stellen Sie unten eine Frage und andere Benutzer werden Ihnen antworten
Bedienungsanleitung Nicht kategorisiert CTA Digital

31 März 2026
31 März 2026
28 März 2026
25 März 2026
24 März 2026
24 März 2026
24 März 2026
23 März 2026
23 März 2026
23 März 2026
Bedienungsanleitung Nicht kategorisiert
Neueste Bedienungsanleitung für -Kategorien-
3 April 2026
3 April 2026
3 April 2026
3 April 2026
3 April 2026
3 April 2026
3 April 2026
3 April 2026
3 April 2026
3 April 2026