Golden Lighting Galveston 4855-6 Bedienungsanleitung
Golden Lighting Beleuchtung Galveston 4855-6
Lies die bedienungsanleitung für Golden Lighting Galveston 4855-6 (1 Seiten) kostenlos online; sie gehört zur Kategorie Beleuchtung. Dieses Handbuch wurde von 9 Personen als hilfreich bewertet und erhielt im Schnitt 4.3 Sterne aus 5 Bewertungen. Hast du eine Frage zu Golden Lighting Galveston 4855-6 oder möchtest du andere Nutzer dieses Produkts befragen? Stelle eine Frage
Seite 1/1
Assembly Instructions: (Galveston)4855-6
IMPORTANT:
•ALL INSTALLATION WORK SHOULD BE DONE BY ACCREDITED PROFESSIONAL.
•SHUT OFF POWER SUPPLY AT FUSE OR CIRCUIT BREAKER!
•USE ONLY THE SPECIFIED BULBS. DO NOT EXCEED THE MAXIMUM WATTAGE!
1. PREPARING FOR INSTALLATION
Remove all of the contents from the carton. See
the important notes above. Shut off the power at
the circuit breaker and completely remove the old
xturefromtheceiling,includingtheoldmounting
strap.
Fromthepartsbagremovethemountingstrap
assembly. One end of nipple (F) should be attached
tomountingstrap(A)withwasherandhexnut(C,D)
in place. The other end should have canopy loop (H)
attached.Attachmountingstrap(A)tothejunction
boxusingmountingscrews(B)andascrewdriver.
Tightensecurely.Unscrewcanopyloopcollar(I)from
canopy loop (H). Pass canopy (G) over the mounted
canopylooptotesttheheight.Approximatelyhalf
ofthecanopyloop’sexteriorthreadsshouldbe
exposed,andthecanopyloopcollarshouldt
snuglyontothecanopyloop.Removecanopy(G)
andadjusttheheightofnipple(F)andcanopyloop
(H)untilthedesiredheightisreached.
CLEANING TIPS
Treat the xture gently! Regular cleaning will reduce the need for deep cleaning. For regular cleaning, turn off the light and wipe down the
xture with a clean lint-free cotton or microber cloth. Never spray cleaner directly onto the xture.
For Customer Service, contact
the place of purchase to arrange
for replacement parts.
BLACK
(Hot)
WHITE
(Neutral)
GREEN
(Ground)
HOUSE WIRES
SMOOTH
(Or Black)
FIXTURE WIRES
RIBBED
(Or White)
BARE COPPER
(Or Green)
UP - INSTALLATION
PLEASE NOTE:
Thisxturemaybe
mounted with the
socketsandglass
facingupordown.
Please decide how you
wouldlikethexture
tobehungandfollow
thecorresponding
instructions.
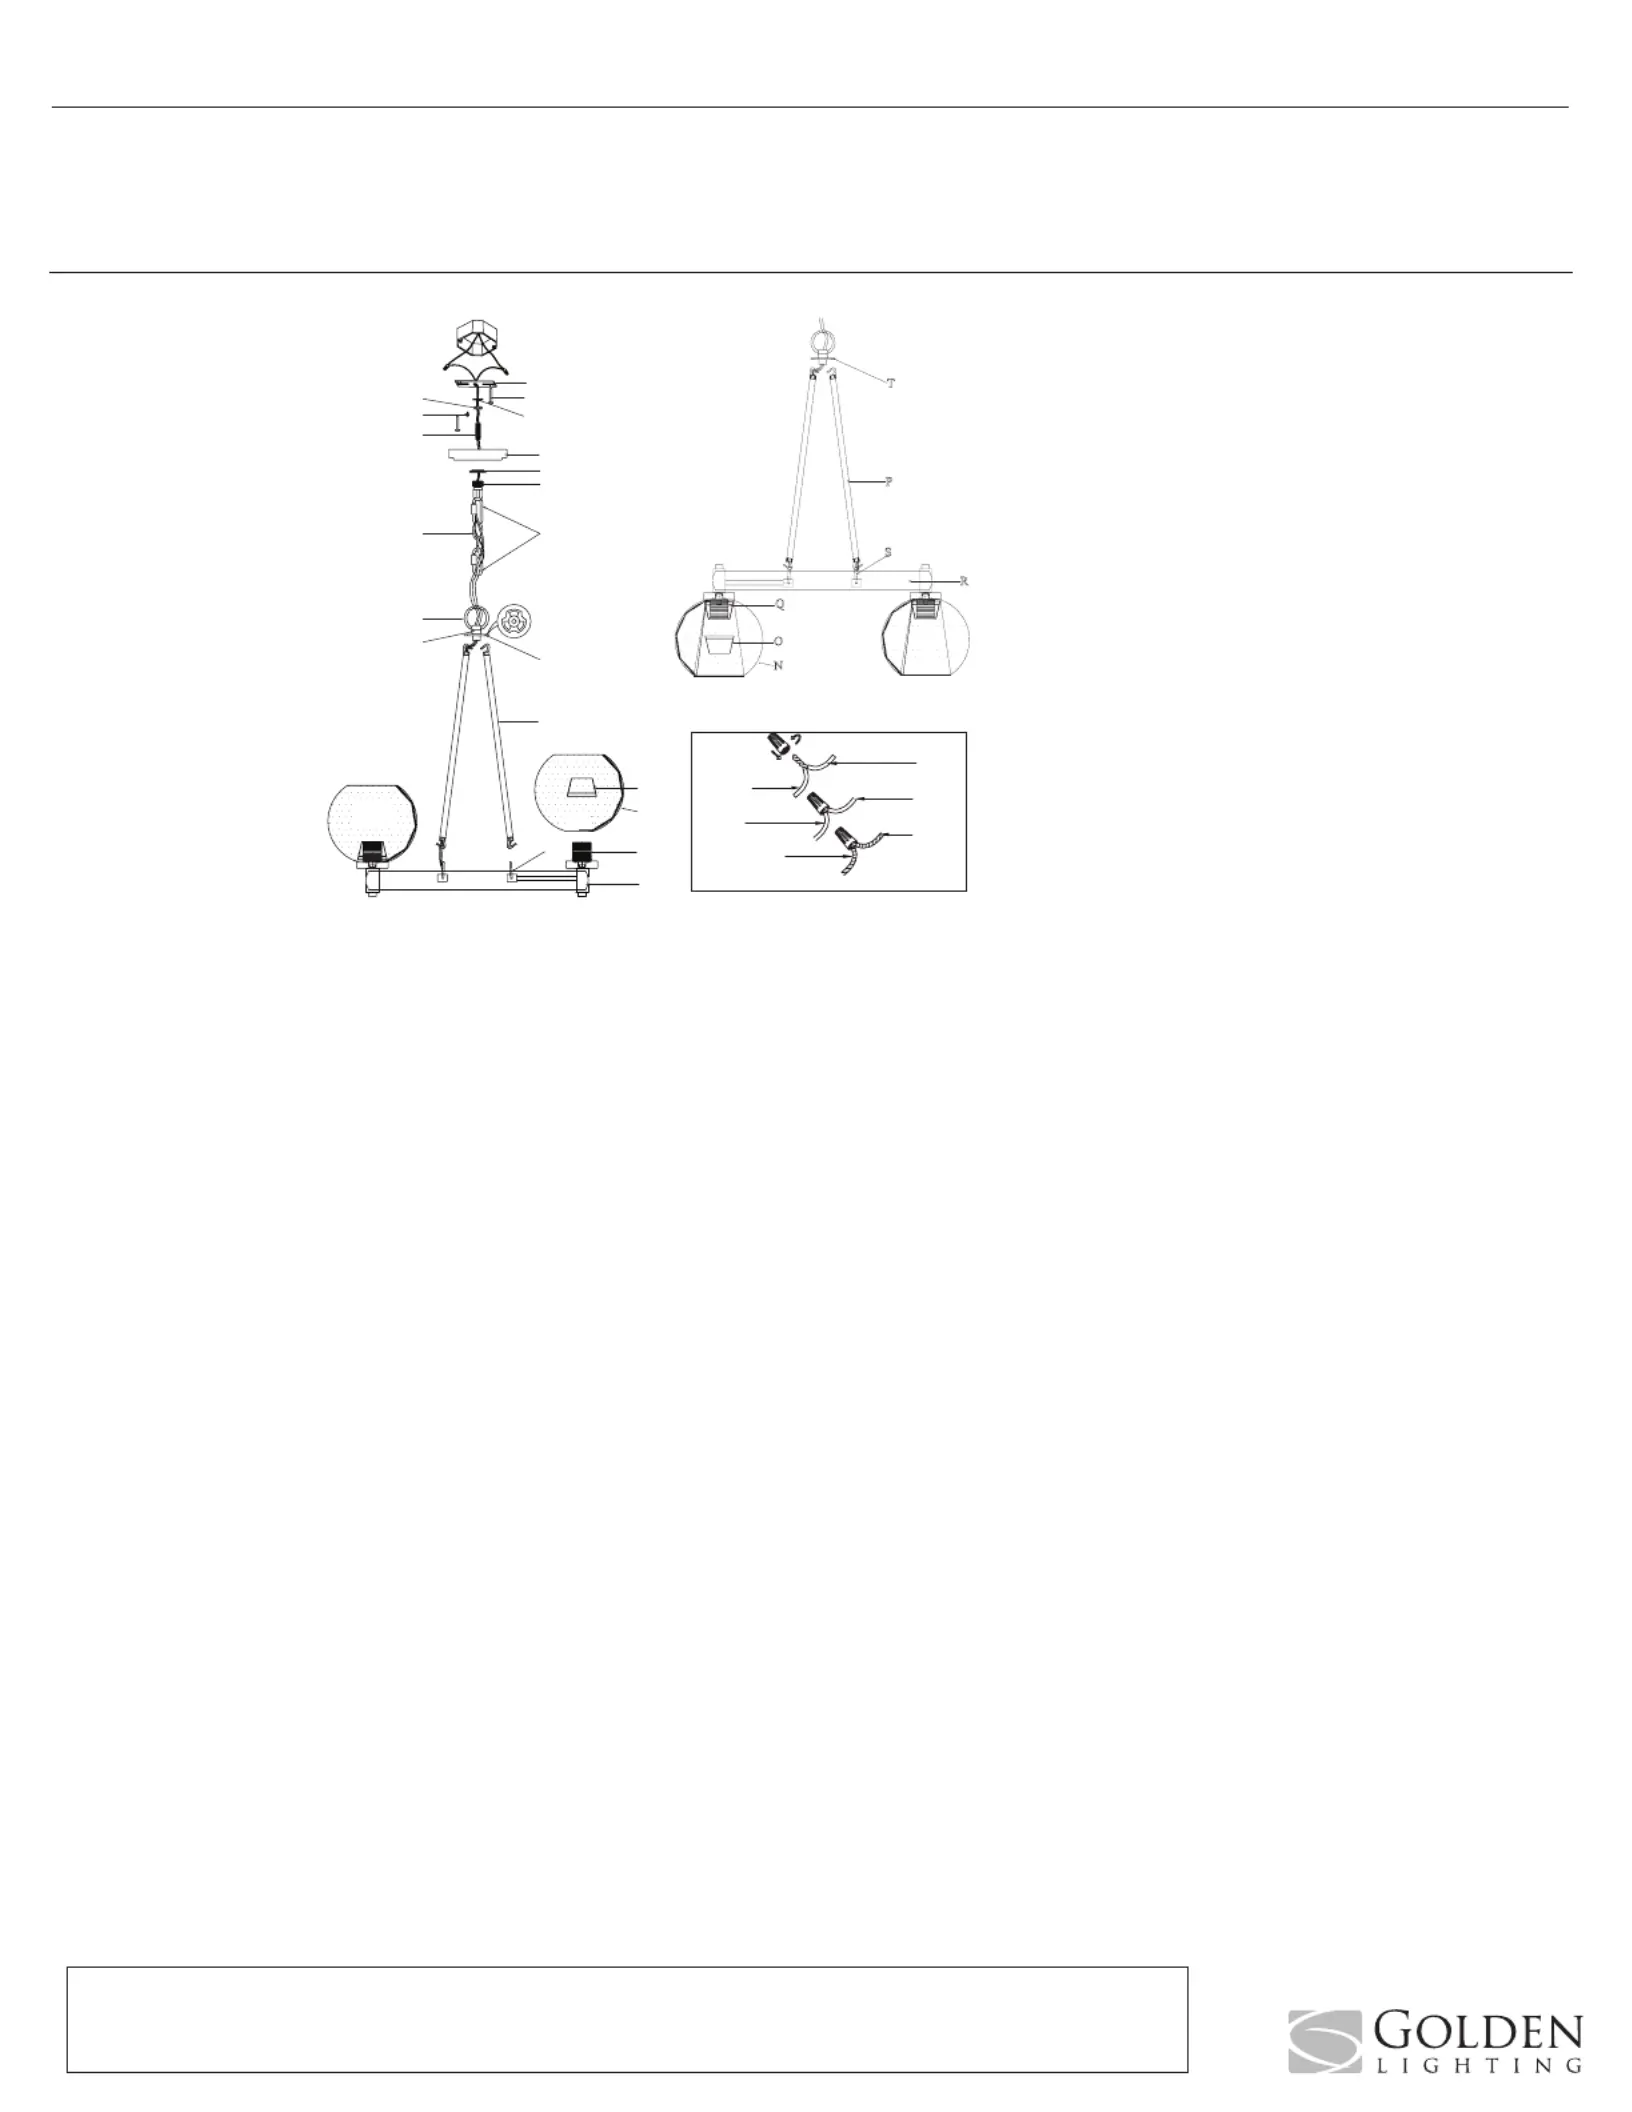
2. ASSEMBLING THE FIXTURE
Determinewhetheryouwouldlikethesocketsandglasstobemountedfacingupordown.
Ifyouwouldliketheglasstoface,turnxtureframe(R)sothatrings(S)sitclosetothetopoftheframeandthesocketsarepointedup.up
Gently placethextureonaatsurface.
Ifyouwouldliketheglasstoface,turnxtureframe(R)sothatrings(S)sitclosetothebottomoftheframeandthesocketsarepointeddown
down.Oneofrods(P)hasthexture’swriesrunningthroughit.Youwillalsoneedtoadjustthexture’swirestocreateenoughslackto
maneuvertherodthroughtheframetochangetheorientation.placethextureonaatsurface.Gently
Toploop(L)maybeonthexture’swires,butnotthreadedontothexture’sframeatpost(M)ofplate(T).Ifitisnotconnected,pullthexture’s
wiresthroughtoploop(L)beforetwistingtoploop(L)ontopost(M).Bymeasuring,determinethecorrectnumberofchainlinksneededfor
properhangingheight.Ifnecessary,useapairofplierstoopenandremoveanyexcesschain.Attachchainconnectors(K)toeachendof
chain(J)beforeattachingoneendofthechainconnector/chaintotoploop(L).Closethechainconnector.Connecttheotherchainconnector
(K) to canopy loop (H).
Haveanassistantholdthetoploopassembly.Attachoneendofrods(P)torings(S)ofthextureframe.Thenattachthefreeendofrods(P)
to plate (M).
Feedthexture’swiresupthroughtoploop(L)thenthroughchain(J)(everythreelinksorso).Slidecanopyloopcollar(I)andcanopy(G)onto
thechain/wire.
3. CONNECTING THE WIRES
Haveanassistantsupporttheweightofthexturewhilecompletingthewiring.Cutawayexcesswire.Threadthexture’swiresthrough
canopyloop(H)andnipple(F).Attachthexture’swirestothepowersupplywiresfromthejunctionbox.Connectblacktoblack(orsmooth);
whitetowhite(orribbed);groundtoground(greenorcopper).Twisttheendsofthewirepairstogether,andthentwistonawireconnector.
Makesurealltwistsareinthesamedirection.Ifthereisnogroundwire(greenorcopper)comingfromthejunctionbox,locategroundscrew
(E)onmountingstrap(A)andwrapthexture’sgroundwirearoundthegreengroundscrew(E).Useascrewdrivertosecuregroundscrew(E)
ontothemountingbracket.Tuckallwiresneatlyintothejunctionbox.
4. FINISHING THE INSTALLATION
Pushcanopy(G)uptotheceilingandslidecanopyloopcollar(I)upbeneaththecanopy.Tightlythreadcanopyloopcollar(I)ontocanopyloop
(H) to secure canopy (G) in place.
Slideglassshades(N)oversockets(Q)andsecureinplacewithsocketrings(O).Installlightbulbs(notprovided)inaccordancewiththe
xture’sspecications.Donotexceedthemaximumrecommendedwattage.
Yourinstallationisnowcomplete.Turnonthepowerandtestthexture.
A
B
C
G
H
I
J
K
L
M
O
P
Q
R
S
T
N
D
E
F
DOWN - INSTALLATION
S
P
T
O
N
Q
R
Produktspezifikationen
| Marke: | Golden Lighting |
| Kategorie: | Beleuchtung |
| Modell: | Galveston 4855-6 |
Brauchst du Hilfe?
Wenn Sie Hilfe mit Golden Lighting Galveston 4855-6 benötigen, stellen Sie unten eine Frage und andere Benutzer werden Ihnen antworten
Bedienungsanleitung Beleuchtung Golden Lighting

5 November 2025
4 November 2025
4 November 2025
4 November 2025
4 November 2025
4 November 2025
4 November 2025
3 November 2025
3 November 2025
3 November 2025
Bedienungsanleitung Beleuchtung
Neueste Bedienungsanleitung für -Kategorien-
1 April 2026
1 April 2026
1 April 2026
1 April 2026
1 April 2026
1 April 2026
1 April 2026
1 April 2026
1 April 2026
1 April 2026