Golden Lighting Marco 6068-5 Bedienungsanleitung
Golden Lighting Beleuchtung Marco 6068-5
Lies die bedienungsanleitung für Golden Lighting Marco 6068-5 (1 Seiten) kostenlos online; sie gehört zur Kategorie Beleuchtung. Dieses Handbuch wurde von 8 Personen als hilfreich bewertet und erhielt im Schnitt 4.8 Sterne aus 3 Bewertungen. Hast du eine Frage zu Golden Lighting Marco 6068-5 oder möchtest du andere Nutzer dieses Produkts befragen? Stelle eine Frage
Seite 1/1
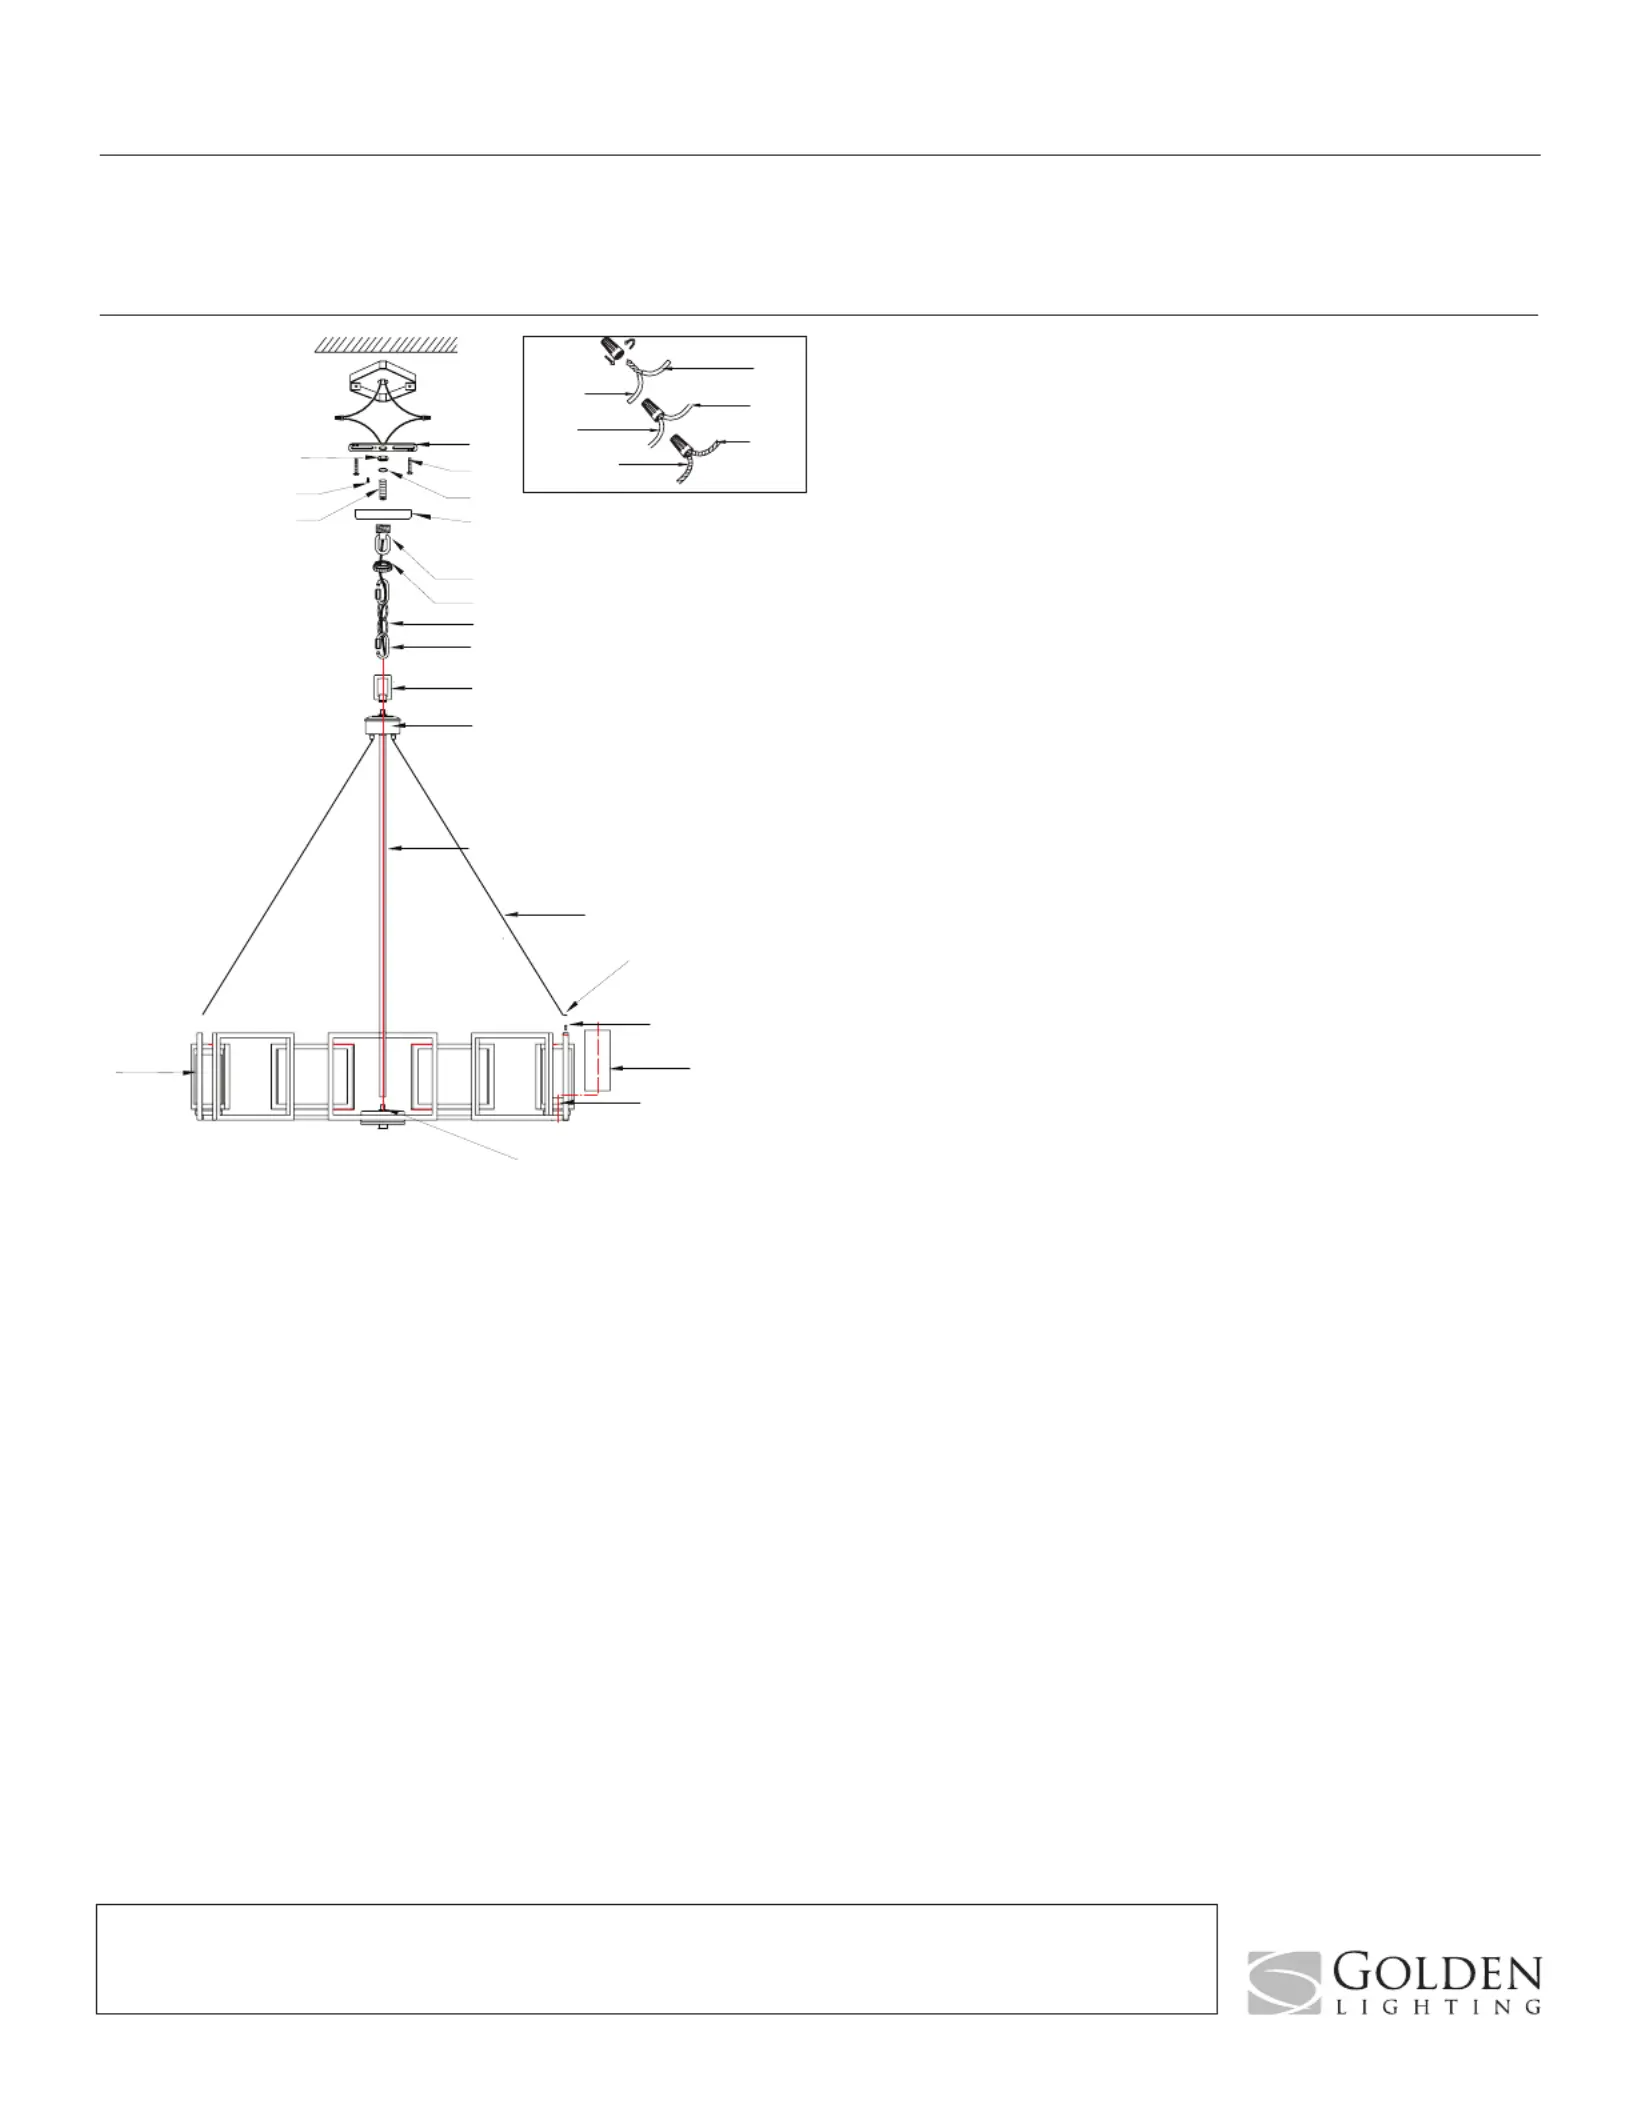
Assembly Instructions: (Marco)6068-5/8
IMPORTANT:
•ALL INSTALLATION WORK SHOULD BE DONE BY ACCREDITED PROFESSIONAL.
•SHUT OFF POWER SUPPLY AT FUSE OR CIRCUIT BREAKER!
•USE ONLY THE SPECIFIED BULBS. DO NOT EXCEED THE MAXIMUM WATTAGE!
PREPARING FOR INSTALLATION
Carefully remove all of the contents from the carton. See the
important notes above. Shut off the power at the circuit breaker
andcompletelyremovetheoldxturefromtheceiling,including
theoldmountingstrap.
Fromthepartsbag,removethemountingstrapassembly.One
endofnipple(F)shouldbeattachedtomountingstrap(A)with
washerandhexnut(C&D)inplace.Theotherendshouldhave
canopy loop (H) attached.
Attachmountingstrap(A)tothejunctionboxusingmounting
screws(B)andascrewdriver.Tightensecurely.Unscrewcanopy
loop collar (I) from canopy loop (H). Pass canopy (G) over the
mountedcanopylooptotesttheheight.Approximatelyhalf
ofthecanopyloop’sexteriorthreadsshouldbeexposed,and
thecanopyloopcollarshouldtsnuglyontothecanopyloop.
Removecanopy(G)andadjusttheheightofnipple(F)and
canopyloop(H)untilthedesiredheightisreached.Removethe
canopy loop collar and canopy and place to the side.
ASSEMBLING THE FIXTURE
Placethebodyofthextureontoaatsurface.Threadcenter
column(N)tocenterpost(S)untiltight.Insertsteelwireropes
(O)topostholes(R)atthetopofsquareframe(P).Adjustthe
wires until frame (P) is level. Depress the cylinder lock at the top
cap to release the steel wire ropes (O)
Toploop(L)isonthexture’swires,butarenotattachedtotop
cap(M).Tightentoploop(L)ontothethreadsatthetopoftop
cap (M). Pull the wires until taut.
Bymeasuring,determinethecorrectlengthofchainneededfor
properhangingheight.Ifnecessary,useapairofplierstoopen
andremoveanyexcesschain.Attachoneofchainconnectors
(K)tochain(J).Passthexture’swiresthroughtoploop(L).
Pull the wires until taut. Attach one end of chain connector (K)
totoploop(L)andclosechainconnector(K).Feedthexture’s
wiresupthroughthechain(everythreelinksorso),pullingthe
wires until taut. Use the free chain connector (K) to attach chain
(J) to canopy loop (H). Slide canopy loop collar (H) then canopy
(G) down onto the chain/wires. Pull the wires until taut. Trim the
wirestothedesiredlengthplus8to10inches.
CONNECTING THE WIRES
Haveanassistantsupportthexture’sweightwhilecompleting
thewiring.Attachthexture’swirestothepowersupplywires
fromthejunctionbox.Connectblacktoblack(orsmooth);
whitetowhite(orribbed);groundtoground(greenorcopper).
Twisttheendsofthewirepairstogether,thentwistonawire
connector. Make sure all twists are in the same direction. If there
isnogroundwire(greenorcopper)comingfromthejunction
box,locategroundscrew(E)onmountingstrap(A)andwrapthe
xture’sgroundwirearoundthegreengroundscrew(E).Usea
screwdrivertosecuregroundscrew(E)ontomountingstrap(A).
Tuckallwiresneatlyintothejunctionbox.
FINISHING THE INSTALLATION
Pushcanopy(G)uptotheceilingandslidecanopyloopcollar(I)
upbeneaththecanopy.Tightlythreadcanopyloopcollar(I)onto
canopy loop (H) to secure canopy (G) in place.
Slideglass(T)overthesockets.
Installcandlesleeves(U),thenglass(T)beforeinstallingthe
lightbulbs(notincluded)inaccordancewiththexture’s
specications.Donotexceedthemaximumrecommended
wattage.
Your installation is now complete. Turn on the power and test
thexture.
CLEANING TIPS
Treat the xture gently! Regular cleaning will reduce the need for deep cleaning. For regular cleaning, turn off the light and wipe down the
xture with a clean lint-free cotton or microber cloth. Never spray cleaner directly onto the xture.
For Customer Service, contact
the place of purchase to arrange
for replacement parts.
BLACK
(Hot)
WHITE
(Neutral)
GREEN
(Ground)
HOUSE WIRES
SMOOTH
(Or Black)
FIXTURE WIRES
RIBBED
(Or White)
BARE COPPER
(Or Green)
A
B
C
G
E
D
F
H
I
J
K
L
M
N
0
Q
R
T
U
S
P
Produktspezifikationen
| Marke: | Golden Lighting |
| Kategorie: | Beleuchtung |
| Modell: | Marco 6068-5 |
Brauchst du Hilfe?
Wenn Sie Hilfe mit Golden Lighting Marco 6068-5 benötigen, stellen Sie unten eine Frage und andere Benutzer werden Ihnen antworten
Bedienungsanleitung Beleuchtung Golden Lighting

5 November 2025
4 November 2025
4 November 2025
4 November 2025
4 November 2025
4 November 2025
4 November 2025
3 November 2025
3 November 2025
3 November 2025
Bedienungsanleitung Beleuchtung
Neueste Bedienungsanleitung für -Kategorien-
1 April 2026
1 April 2026
1 April 2026
1 April 2026
1 April 2026
1 April 2026
1 April 2026
1 April 2026
1 April 2026
1 April 2026