Philips Viva Collection HD3126 Bedienungsanleitung
Philips
Reiskocher
Viva Collection HD3126
Lies die bedienungsanleitung für Philips Viva Collection HD3126 (2 Seiten) kostenlos online; sie gehört zur Kategorie Reiskocher. Dieses Handbuch wurde von 3 Personen als hilfreich bewertet und erhielt im Schnitt 4.8 Sterne aus 2 Bewertungen. Hast du eine Frage zu Philips Viva Collection HD3126 oder möchtest du andere Nutzer dieses Produkts befragen? Stelle eine Frage
Seite 1/2

English
1 Your rice cooker
Congratulations on your purchase, and welcome to
Philips!
To fully benet from the support that Philips oers,
register your product at www.philips.com/welcome.
2 Important
Read this important information leaet carefully
before you use the rice cooker and save it for future
reference.
Danger
• The appliance must not
be immersed.
Warning
• This appliance shall not
be used by children
from 0 year to 8 years.
• This appliance can
be used by children
aged from 8 years
and above if they are
continuously supervised
and they have been
given supervision or
instruction concerning
use of the appliance
in a safe way and
understand the hazards
involved.
• This appliance is not
intended for use by
persons (including
children) with reduced
physical sensory or
mental capabilities,
or lack of experience
and knowledge,
unless they have been
given supervision or
instruction concerning
use of the appliance by
a person responsible for
their safety.
• Children should be
supervised to ensure
that they do not play
with the appliance.
• Keep the appliance and
its cord out of reach of
children aged less than
8 years.
• Cleaning and user
maintenance shall not
be made by children.
• This appliance should
be positioned in a
stable situation with
the handles (if any)
positioned to avoid
spillage of the hot
liquids.
• This appliance is
intended to be used in
household and similar
applications such as:
• sta kitchen areas
in shops, oces
and other working
environments;
• farm houses;
• by clients in hotels,
motels and other
residential type
environments;
• bed and breakfast type
environments.
• If the supply cord
is damaged, it must
be replaced by the
manufacturer, its service
agent or similarly
qualied persons in
order to avoid a hazard.
• The appliance is
not intended to be
operated by means
of an external timer
or a separate remote-
control system.
• WARNING: Make sure
to avoid spillage on
the power connector
to avoid a potential
hazard.
• WARNING: Always
follow the instructions
and use the appliance
properly to avoid
potential injury.
• CAUTION: Surface of
the heating element is
subject to residual heat
after use.
• Check if the voltage
indicated on the
appliance corresponds
to the local power
voltage before you
connect it.
• Only connect the
appliance to a
grounded power outlet.
Always make sure that
the plug is inserted
rmly into the power
outlet.
• Do not use the
appliance if the plug,
the power cord, the
inner pot, the sealing
ring, or the main body is
damaged.
• Do not let the power
cord hang over the edge
of the table or worktop
on which the appliance
stands.
• Make sure the
heating element, the
temperature sensor,
and the outside of the
inner pot are clean and
dry before you put the
plug in the power outlet.
• Do not plug in the
appliance or press any
of the buttons on the
control panel with wet
hands.
Caution
• Never use any
accessories or
parts from other
manufacturers or
that Philips does
not specically
recommend. If you use
such accessories or
parts, your guarantee
becomes invalid.
1
2
3
5
4
6
12
www.philips.com/welcome
User manual
www.philips.com/welcome
Warranty
7
13
14 15
9
10
11
l
m
n
j
k
h
o
p
q
i
b
d
e
c
a
f
g
8
• Do not expose the
appliance to high
temperatures, nor place
it on a working or still
hot stove or cooker.
• Do not expose the
appliance to direct
sunlight.
• Place the appliance on
a stable, horizontal, and
level surface.
• Always put the inner pot
in the appliance before
you put the plug in the
power outlet and switch
it on.
• Do not place the inner
pot directly over an
open re to cook rice.
• Do not use the inner pot
if it is deformed.
• The accessible surfaces
may become hot
when the appliance is
operating. Take extra
caution when touching
the appliance.
• Beware of hot steam
coming out of the steam
vent during cooking or
out of the appliance
when you open the
lid. Keep hands and
face away from the
appliance to avoid the
steam.
• Do not lift and move
the appliance while it is
operating.
EN User manual
ZH-T 使用手冊
ID Buku Petunjuk Pengguna
HD3126
• Do not exceed the
maximum water level
indicated in the inner
pot to prevent overow
which might cause
potential hazard.
• Do not place the
cooking utensils inside
the pot while cooking,
keeping warm or
reheating rice.
• Only use the cooking
utensils provided. Avoid
using sharp utensils.
• To avoid scratches, it
is not recommended
to cook ingredients
with crustaceans and
shellsh. Remove the
hard shells before
cooking.
• Do not insert metallic
objects or alien
substances into the
steam vent.
• Do not place a magnetic
substance on the lid. Do
not use the appliance
near a magnetic
substance.
• Always let the appliance
cool down before you
clean or move it.
• Always clean the
appliance after use. Do
not clean the appliance
in a dishwasher.
• Always unplug the
appliance if not used for
a longer period.
• If the appliance is
used improperly or
for professional or
semiprofessional
purposes, or if it is not
used according to the
instructions in this user
manual, the guarantee
becomes invalid and
Philips refuses liability
for any damage caused.
Electromagnetic elds (EMF)
This Philips appliance complies with all applicable
standards and regulations regarding exposure to
electromagnetic elds.
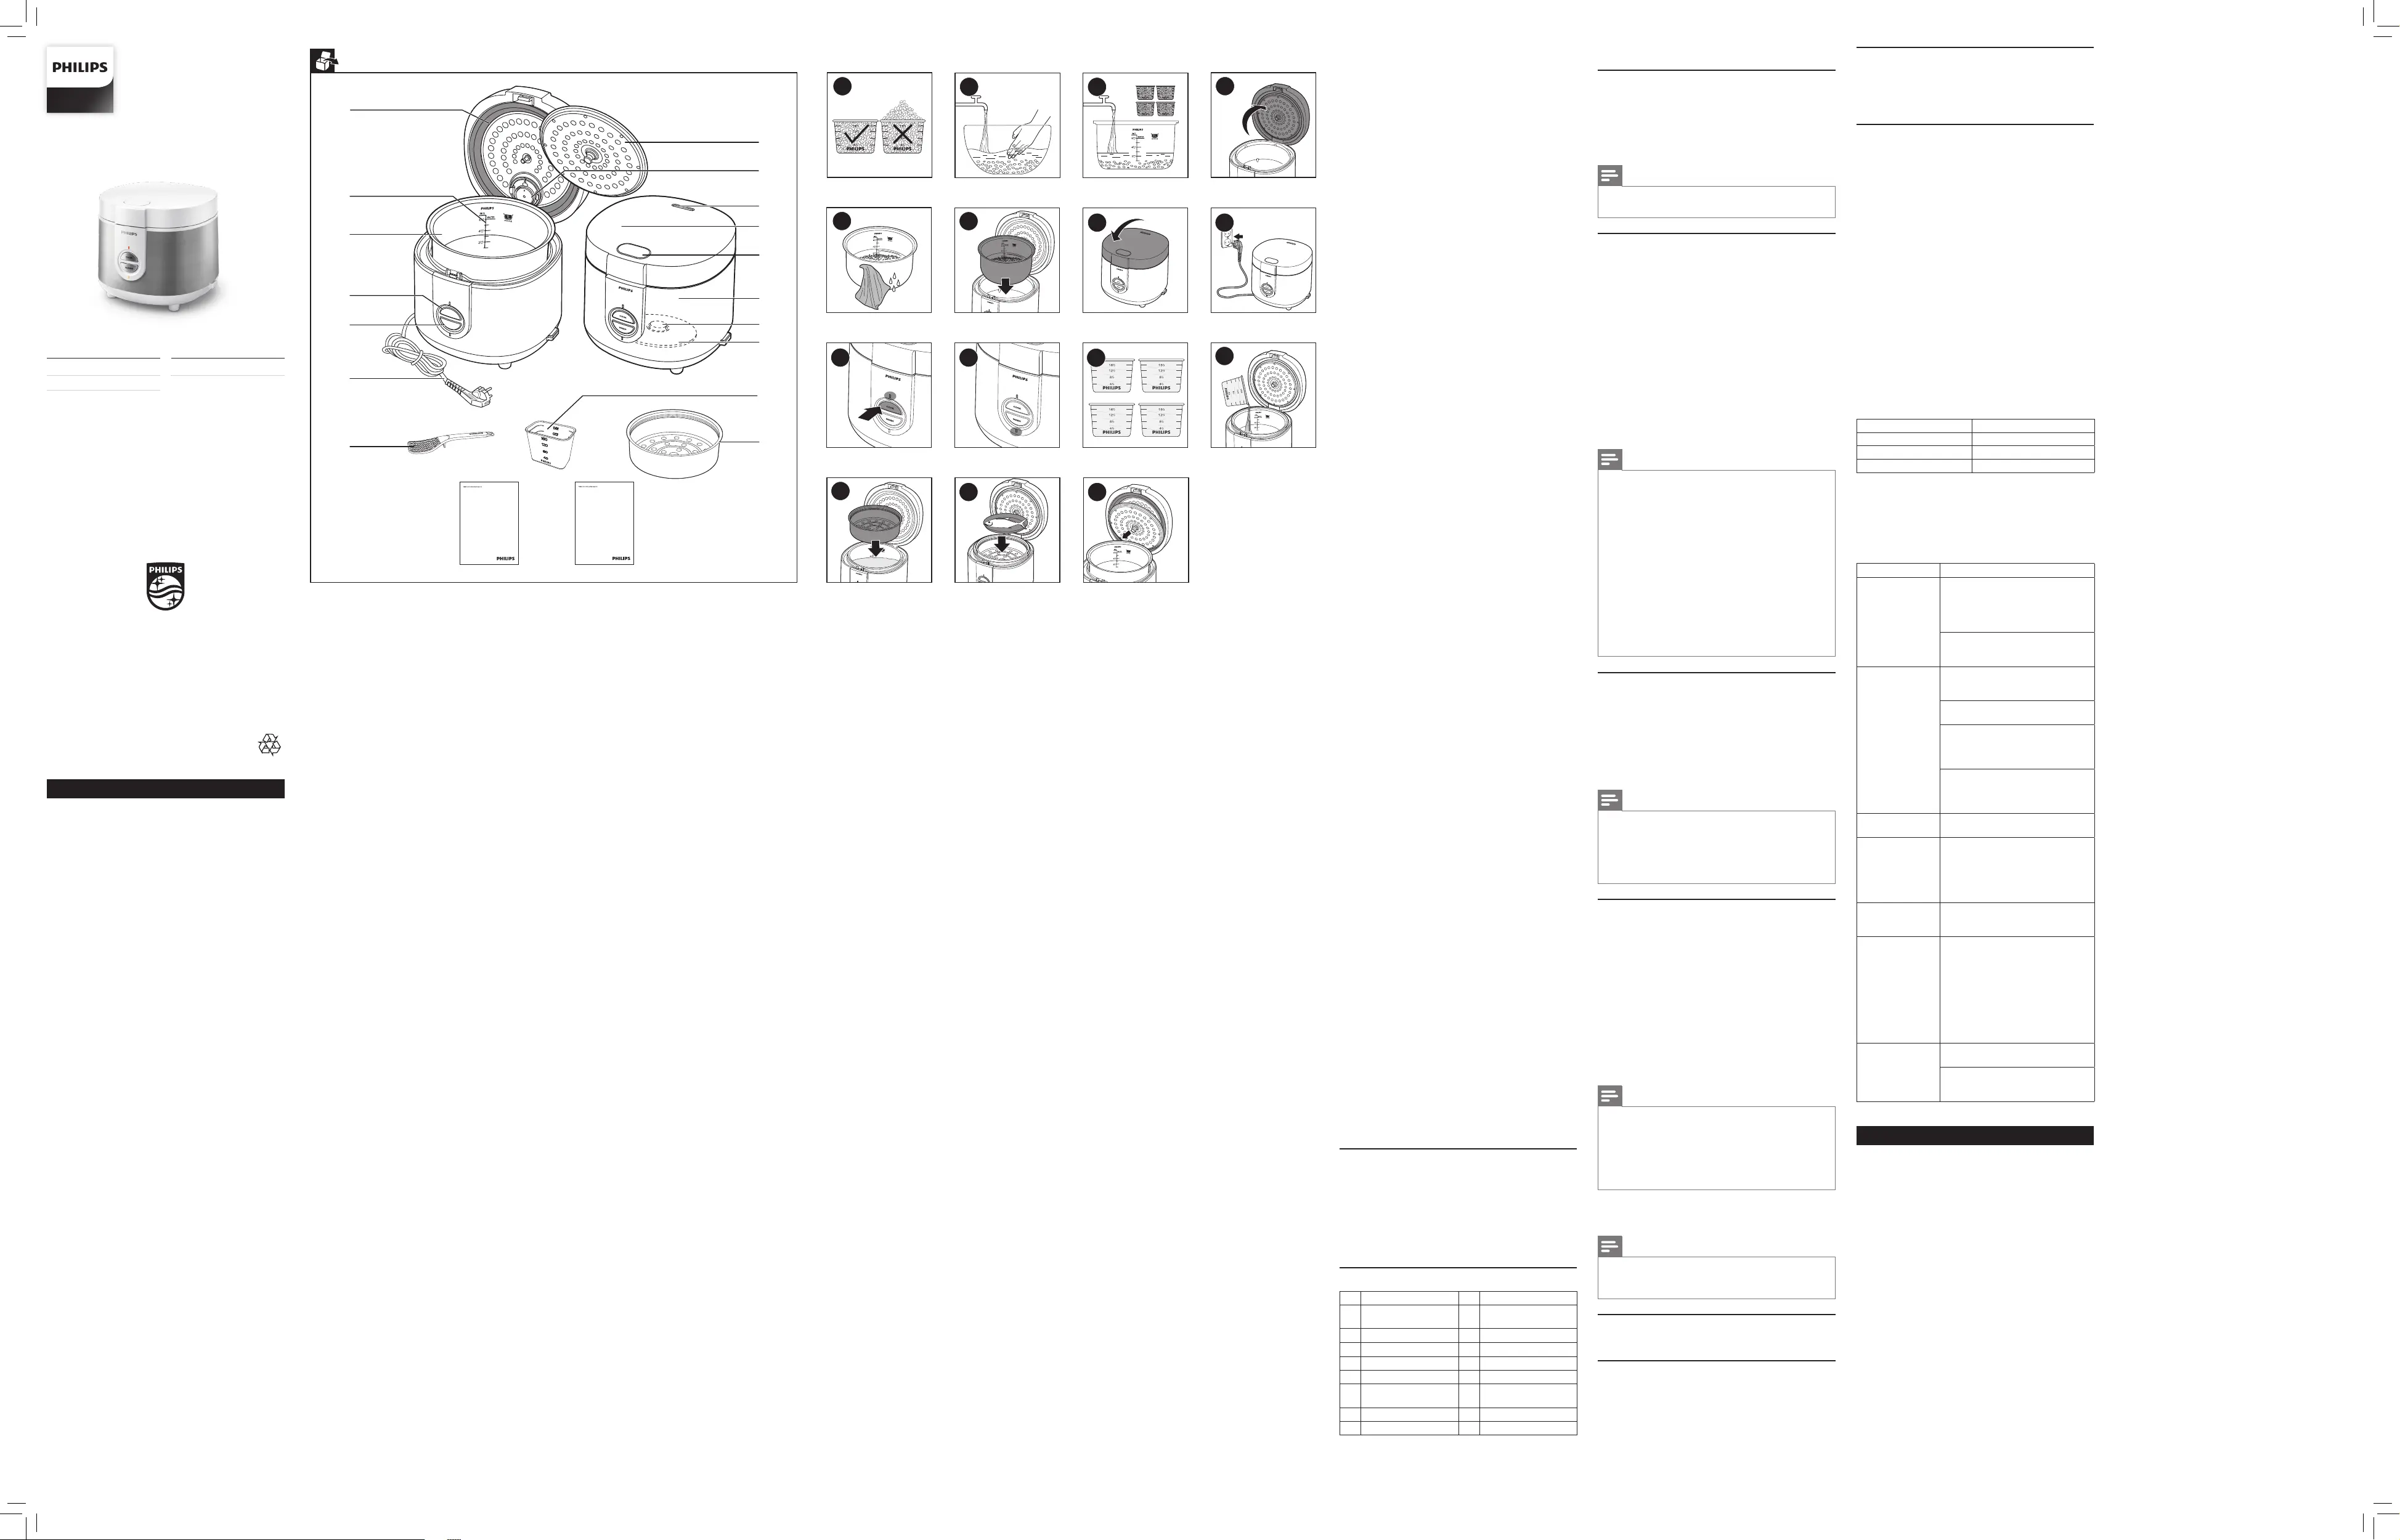
3 What’s in the box
Rice cooker main unit Rice scoop
Measuring cup Steam basket
User manual Warranty card
Overview
a
Sealing ring
j
Heating element
b
Water level
indications
k
Magnetic switch
c
Inner pot
l
Main body
d
Cook button
m
Lid release button
e
Keep-warm button
n
Top lid
f
Power cord
o
Steam vent cap
g
Rice scoop
p
Detachable steam
valve
h
Steam basket
q
Detachable inner lid
i
Measuring cup
© 2021 Philips Domestic Appliances
Holding B.V.
All rights reserved.
6608 000 07745
4 Using the rice cooker
Before rst use
1 Take out all the accessories from the inner pot.
Remove the packaging material of the inner pot.
2 Before rst use, boil water and clean the rice cooker.
3 Clean the parts of the rice cooker thoroughly before
using the rice cooker for the rst time (see chapter
‘Cleaning’).
Note
• Make sure all parts are completely dry before you
start using the rice cooker.
Preparations before use
Before using the rice cooker, you need to follow the
preparation:
1 Measure the rice using the measuring cup provided
(Fig. 1).
2 Wash the rice thoroughly (Fig. 2).
3 Put the pre-washed rice in the inner pot.
4 Add water to the level indicated on the scale inside
the inner pot that corresponds to the number of
cups of rice used (Fig. 3). Then smooth the rice
surface.
5 Press the lid release button to open the lid (Fig. 4).
6 Wipe the outside of the inner pot dry (Fig. 5), then
put the inner pot in the rice cooker (Fig. 6). Check if
the inner pot is in proper contact with the heating
element.
7 Close the lid of the rice cooker (Fig. 7), put the plug in
the power socket (Fig. 8).
Note
• Each cup of uncooked rice normally gives 2 bowls of
cooked rice. Do not exceed the quantities indicated
on the inside of the inner pot.
• The level marked inside the inner pot is just an
indication. You can always adjust the water level for
dierent types of rice and your own preference. If the
voltage is unstable at the area you live, it is possible
that the rice cooker overows.
• Besides following the water level indications, you can
also add rice and water at 1:1-1.2 ratio for rice cooking.
Do not exceed the quantities indicated on the inside
of the inner pot.
• Use a separate container to wash the rice to avoid
damaging the non-stick coating of the inner pot.
• Make sure that the outside of the inner pot is dry
and clean, and that there is no foreign residue on the
heating element or the magnetic switch.
Cooking Rice
1 Follow the steps in “Preparations before use”.
2 Press the cook button (Cook), and the cook indicator
lights up (Fig. 9).
3 When the cooking is nished, the cooking indicator
will be o.
4 The rice cooker switches to the keep warm mode
automatically, and the keep warm (Warm) indicator
lights up (Fig. 10).
Note
• Do not exceed the volume indicated nor exceed the
maximum water level indicated in the inner pot, as
this may cause the rice cooker to overow.
• Do not open the lid right after the rice cooker enters
the keep-warm mode and ensure that rice is in keep-
warm mode for 15 minutes if you cook much rice.
Steaming
1 Measure a few cups of water with the measuring cup
(Fig. 11).
2 Pour the water into the inner pot (Fig. 12).
3 Put the steam basket into the inner pot (Fig. 13).
4 Put the food into the steam basket (Fig. 14).
5 Close the lid of the rice cooker, put the plug in the
power socket.
6 Press the cook button (Cook), and the cook indicator
lights up (Fig. 9).
7 When the steaming is nished, pull up the control
lever.
8 The rice cooker switches to the keep warm mode,
and the keep warm (Warm) indicator lights up
(Fig. 10).
Note
• Use a kitchen glove or a cloth, as the plate and steam
basket will be very hot.
• You can cook rice while steaming food. Do not
exceed the volume indicated nor immerse the steam
basket in the water, as this may cause the rice cooker
to overow.
• You can adjust the water level as needed.
5 Cleaning and Maintenance
Note
• Unplug the rice cooker before starting to clean it.
• Wait until the rice cooker has cooled down
suciently before cleaning it.
Disassembling the inner lid
• Pull the detachable inner lid outwards to remove it
from the top lid (Fig 15).
Interior
Inside of the lid and the main body:
• Wipe with wrung out and damp cloth.
• Make sure to remove all the food residues stuck to
the rice cooker.
Heating element:
• Wipe with wrung out and damp cloth.
• Remove food residues with wrung out and damp
cloth or toothpicks.
Exterior
Surface of the lid and outside of the main body:
• Wipe with a cloth damped with soap water.
• Only use soft and dry cloth to wipe the control panel.
• Make sure to remove all the food residues around
the control buttons.
Accessories
Rice scoop, inner pot, steam basket, detachable steam
valve, detachable inner lid:
• Soak in hot water and clean with sponge.
6 Recycling
Do not throw away the product with the normal
household waste at the end of its life, but hand it in at an
ocial collection point for recycling. By doing this, you
help to preserve the environment.
Follow your country’s rules for the separate collection of
electrical and electronic products. Correct disposal helps
prevent negative consequences for the environment and
human health.
7 Guarantee and service
If you need service or information, or if you have a
problem, visit the Philips website at
www.philips.com or contact the Philips Customer Care
Center in your country. You can nd its phone number in
the worldwide guarantee leaet. If there is no Customer
Care Center in your country, go to your local Philips dealer.
8 Specifications
Model Number HD3126
Rated power output 400W
Rated capacity 3.0L
Rice capacity 1.0L
9 Troubleshooting
If you encounter problems when using this rice cooker,
check the following points before requesting service.
If you cannot solve the problem, contact the Philips
Consumer Care Center in your country.
Problem Solution
The lights on the
buttons does not
go on.
There is a connection problem.
Check if the power cord is
connected to the cooker properly
and if the plug is inserted rmly into
the power outlet.
The light is defective. Take the
appliance to your Philips dealer or a
service center authorized by Philips.
The rice is not
cooked.
There is not enough water. Add
water according to the scale on the
inside of the inner pot.
You did not press down the control
key.
Make sure that there is no foreign
residue on the heating element and
the outside of the inner pot before
switching the rice cooker on.
The heating element is damaged, or
the inner pot is deformed. Take the
cooker to your Philips dealer or a
service center authorized by Philips.
The rice is not well
cooked.
Add more water.
The cooker does
not switch to
keep warm mode
automatically in
"Rice Cooking"
mode.
The temperature control is
defective. Take the appliance to
your Philips dealer or a service
center authorized by Philips.
The rice is
scorched.
You have not rinsed the rice
properly. Rinse the rice until water
runs clear.
Water spills out
of the rice cooker
during cooking.
• Make sure that you add water
to the level indicated on the
scale inside the inner pot that
corresponds to the number of
cups of rice used.
• Make sure the water does not
exceed the next level on the
scale, as this may cause the
appliance to overow during
cooking.
Rice smells bad
after cooking
Clean the inner pot with some
washing detergent and warm water.
After cooking, make sure the steam
vent cap, inner lid and inner pot is
cleaned thoroughly.
Indonesia
1 Penanak nasi Anda
Selamat atas pembelian Anda dan selamat datang di
Philips!
Untuk memanfaatkan sepenuhnya dukungan
yang ditawarkan Philips, daftarkan produk Anda di
www.philips.com/welcome.
2 Penting
Baca buklet informasi penting ini dengan cermat
sebelum Anda menggunakan penanak nasi dan
simpanlah untuk referensi nanti.
Bahaya
• Alat tidak boleh
direndam.
Peringatan
• Alat ini tidak boleh
digunakan oleh anak-
anak berusia 0 sampai
8 tahun.
• Alat ini dapat digunakan
oleh anak-anak berusia
8 tahun ke atas jika
mereka terus diawasi
dan diberi pengawasan
atau petunjuk mengenai
cara penggunaan
alat yang aman dan
jika mereka telah
mamahami bahayanya.
• Alat ini tidak
dimaksudkan untuk
digunakan oleh orang
(termasuk anak-
anak) dengan cacat
sik, indera atau
kecakapan mental yang
kurang, atau kurang
pengalaman dan
pengetahuan, kecuali
jika mereka diberikan
pengawasan atau
petunjuk mengenai
penggunaan alat
oleh orang yang
bertanggungjawab bagi
keselamatan mereka.
• Anak kecil harus diawasi
untuk memastikan
mereka tidak bermain-
main dengan alat ini.
• Jauhkan alat dan
kabelnya dari jangkauan
anak-anak yang berusia
kurang dari 8 tahun.
• Pembersihan dan
perawatan tidak boleh
dilakukan oleh anak-
anak.
• Alat ini sebaiknya
diletakkan di tempat
yang stabil dan
pegangannya (bila ada)
diposisikan sedemikian
rupa agar cairan panas
di dalamnya tidak
tumpah.
• Alat ini dimaksudkan
untuk digunakan di
rumah tangga dan
pemakaian yang serupa
seperti:
• area dapur staf di toko,
kantor, dan lingkungan
kerja lainnya;
• rumah ladang;
• oleh klien di hotel,
motel, dan lingkungan
berjenis tempat tinggal
lainnya;
• lingkungan yang
menyediakan tempat
tidur dan sarapan.
• Jika kabel listrik rusak,
maka harus diganti oleh
produsen, agen servis,

atau personel dengan
kualikasi setara untuk
menghindari bahaya.
• Alat ini tidak ditujukan
untuk dioperasikan
dengan menggunakan
timer eksternal atau
sistem remote-control
yang terpisah.
• PERINGATAN:
Pastikan tidak ada
tumpahan yang
mengenai konektor
daya untuk mencegah
kemungkinan bahaya.
• PERINGATAN: Selalu
ikuti petunjuk dan
gunakan alat dengan
benar untuk mencegah
kemungkinan bahaya.
• PERHATIAN: Permukaan
elemen pemanas bisa
menyimpan sisa panas
setelah penggunaan.
• Periksa apakah voltase
pada alat sesuai
dengan voltase listrik di
rumah Anda sebelum
menghubungkan alat.
• Hanya hubungkan alat
ke stopkontak yang
telah dihubungkan ke
arde. Selalu pastikan
steker dipasang dengan
benar pada stopkontak
listrik.
• Jangan menggunakan
alat ini jika steker, kabel
listrik, panci bagian
dalam, gelang penyegel,
atau badan utama
rusak.
• Jangan biarkan kabel
listrik menggantung
di tepi meja atau di
tempat alat berada.
• Pastikan elemen
pemanas, sensor suhu,
dan sisi luar dari panci
bagian dalam, bersih
dan kering sebelum
memasang steker ke
stopkontak listrik.
• Jangan
menghubungkan steker
pada alat atau menekan
tombol apa pun pada
panel kontrol saat
tangan basah.
Perhatian
• Jangan sekali-kali
menggunakan aksesori
atau komponen apa
pun dari produsen
lain atau yang tidak
secara khusus
direkomendasikan
oleh Philips. Jika Anda
menggunakan aksesori
atau komponen
tersebut, garansi Anda
menjadi batal.
• Jangan biarkan alat
ini terkena suhu
yang tinggi atau
menempatkannya di
atas kompor atau alat
memasak lainnya yang
sedang bekerja atau
masih panas.
• Jangan biarkan alat
terkena sinar matahari
langsung.
• Letakkan alat pada
permukaan yang stabil,
datar dan rata.
• Selalu masukkan panci
bagian dalam pada
alat sebelum Anda
menghubungkan ke
stopkontak listrik dan
menghidupkannya.
• Jangan menempatkan
panci bagian dalam
secara langsung di
atas nyala api untuk
memasak nasi.
• Jangan menggunakan
panci bagian dalam jika
sudah berubah bentuk.
• Permukaan alat akan
menjadi panas pada
saat dioperasikan. Beri
perhatian ekstra saat
menyentuh alat.
•
Berhati-hatilah terhadap
uap panas yang keluar
dari lubang uap sewaktu
memasak atau yang
keluar dari alat sewaktu
tutupnya dibuka.
Jauhkan tangan dan
wajah Anda dari alat
untuk menghindari uap.
• Jangan mengangkat
dan memindahkan alat
selagi dioperasikan.
• Jangan masukkan
air melebihi ukuran
maksimum yang
ditunjukkan pada panci
bagian dalam guna
mencegah luapan
cairan berlebih yang
dapat menimbulkan
bahaya.
• Jangan menaruh
perabot masak di
panci bagian dalam
selagi memasak,
menghangatkan atau
memanaskan nasi.
• Gunakan hanya
perabot memasak yang
disediakan. Hindari
menggunakan perabot
yang tajam.
• Untuk mencegah
tergores, tidak
disarankan memasak
bahan yang bercampur
dengan krustasea
(udang-udangan) dan
kerang. Singkirkan kulit
yang keras sebelum
memasak.
• Jangan memasukkan
barang logam atau
benda asing ke dalam
lubang uap.
• Jangan meletakkan
benda bermagnet
pada penutup. Jangan
menggunakan alat
di dekat benda
bermagnet.
• Selalu biarkan alat
menjadi dingin terlebih
dahulu sebelum
membersihkan atau
memindahkannya.
• Selalu bersihkan
setiap kali selesai
menggunakan alat.
Jangan membersihkan
alat dengan mesin cuci
piring.
• Selalu cabut steker
dari alat apabila tidak
digunakan dalam waktu
yang lama.
• Jika alat digunakan
dengan cara yang tidak
semestinya atau untuk
tujuan profesional atau
semi-profesional, atau
tidak digunakan sesuai
instruksi dalam petunjuk
penggunaan ini, garansi
akan dianggap tidak
berlaku dan Philips
tidak bertanggung
jawab atas kerusakan
yang ditimbulkan.
Medan elektromagnet (EMF)
Alat Philips ini mematuhi semua standar dan peraturan
yang berlaku terkait paparan terhadap medan
elektromagnet.
3 Ada apa di dalam kotak
Unit utama penanak nasi Sendok nasi
Gelas takar Keranjang kukus
Petunjuk pengguna Kartu garansi
Ikhtisar
a
Gelang penyegel
j
Elemen pemanas
b
Indikator ukuran air
k
Saklar magnetik
c
Panci bagian dalam
l
Kabel alat
d
Tombol memasak
m
Tombol pembuka tutup
e
Tombol tetap-hangat
n
Tutup atas
f
Kabel listrik
o
Ventilasi uap
g
Sendok nasi
p
Katup uap lepas-
pasang
h
Keranjang kukus
q
Tutup bagian dalam
lepas-pasang
i
Gelas ukur
4 Menggunakan penanak nasi
Sebelum menggunakan alat pertama
kali.
1 Lepaskan semua aksesori dari panci bagian dalam.
Lepaskan bahan kemasan panci bagian dalam.
2 Sebelum digunakan pertama kali, bersihkan Rice
cooker dengan air mendidih.
3 Bersihkan semua bagian penanak nasi secara
menyeluruh sebelum menggunakannya untuk
pertama kali (lihat bab ‘Membersihkan’).
Catatan
• Pastikan semua bagian benar-benar kering sebelum
Anda mulai menggunakan penanak nasi.
Persiapan sebelum menggunakan
Sebelum menggunakan penanak nasi, Anda perlu
mengikuti persiapan berikut:
1 Takar beras menggunakan gelas takar yang
disediakan (Gbr. 1).
2 Cuci beras sampai bersih (Gbr. 2).
3 Masukkan beras yang sudah dicuci sebelumnya ke
panci bagian dalam.
4 Tambahkan air sampai ke tingkat ukuran yang
ditunjukkan di bagian dalam panci sesuai jumlah
gelas takar beras yang digunakan (Gbr. 3). Lalu
ratakan permukaan beras.
5 Tekan tombol pembuka tutup untuk membuka
tutupnya (Gbr. 4).
6 Seka sampai kering bagian luar panci yang akan
dimasukkan (Gbr. 5), lalu masukkan panci ke dalam
penanak nasi (Gbr. 6). Pastikan panci bagian dalam
telah bersentuhan dengan elemen pemanas secara
tepat.
7 Rapatkan tutup penanak nasi (Gbr. 7), hubungkan
steker ke soket daya (Gbr. 8).
Catatan
• Setiap gelas takar yang berisi beras yang belum
dimasak biasanya dapat menghasilkan 2 mangkuk
nasi. Jangan melebihi jumlah yang ditunjukkan pada
panci bagian dalam.
• Ukuran yang ditunjukkan di panci bagian
dalam hanya sebagai indikasi saja. Anda dapat
menyesuaikan ketinggian air untuk jenis beras
yang berbeda dan preferensi Anda. Jika voltase
tidak stabil di daerah tempat Anda tinggal, ada
kemungkinan penanak nasi akan meluap.
• Selain mengikuti indikasi batas air, Anda juga dapat
menambahkan beras dan air dengan rasio 1:1-1,2
saat memasak nasi. Jangan melebihi jumlah yang
ditunjukkan pada panci bagian dalam.
• Gunakan wadah lain untuk mencuci beras agar tidak
merusak lapisan anti lengket pada panci bagian
dalam.
• Pastikan bagian luar panci bagian dalam sudah
kering dan bersih, dan tidak ada benda apa pun
pada elemen pemanas atau sakelar magnetik.
Memasak Nasi
1 Ikuti langkah-langkah di bagian “Persiapan sebelum
menggunakan”.
2 Tekan tombol memasak (Cook), dan lampu indikator
memasak akan menyala (Gbr. 9).
3 Setelah selesai memasak, indikator memasak akan
padam.
4 Penanak nasi akan secara otomatis akan beralih ke
mode tetap hangat, dan lampu indikator tetap-
hangat (Warm) akan menyala (Gbr. 10).
Catatan
• Jangan melebihi volume yang ditunjukkan atau
melebihi ukuran air maksimum yang ditunjukkan di
panci bagian dalam, karena ini dapat menyebabkan
penanak nasi meluap.
• Jangan langsung membuka tutup penanak nasi
begitu alat beralih ke mode tetap-hangat dan
pastikan nasi berada di mode tetap-hangat selama
15 menit bila memasak nasi dalam jumlah besar.
Mengukus
1 Takar beberapa gelas air dengan gelas takar (Gbr. 11).
2 Tuangkan air ke dalam panci (Gbr. 12).
3 Taruh keranjang kukus ke dalam panci (Gbr. 13).
4 Taruh makanan ke dalam keranjang kukus (Gbr. 14).
5 Tutuplah tutup penanak nasi, lalu pasang steker ke
soket daya.
6 Tekan tombol memasak (Cook), dan lampu indikator
memasak akan menyala (Gbr. 9).
7 Ketika pengukusan selesai, tarik tuas kontrol ke atas.
8 Penanak nasi akan beralih ke mode tetap hangat,
dan lampu indikator tetap-hangat (Warm) akan
menyala (Gbr. 10).
Catatan
• Gunakan sarung tangan dapur atau kain, karena
piring dan keranjang kukusan sangat panas.
• Anda dapat memasak nasi sambil mengukus
makanan. Jangan melebihi volume yang ditunjukkan
atau merendam keranjang kukus di dalam air, karena
ini dapat menyebabkan penanak nasi mengeluarkan
cairan berlebih.
• Anda dapat menyesuaikan ketinggian air sesuai
kebutuhan.
5 Pembersihan dan Perawatan
Catatan
• Cabut steker penanak nasi sebelum
membersihkannya.
• Tunggu sampai penanak nasi sudah cukup dingin
sebelum membersihkannya.
Melepaskan tutup bagian dalam
• Tarik tutup bagian dalam lepas-pasang hingga
terlepas dari tutup atas (Gbr 15).
Bagian dalam
Bagian dalam tutup dan badan utama:
• Seka menggunakan kain yang sudah diperas dan
lembap.
• Pastikan untuk membersihkan semua sisa makanan
yang menempel pada penanak nasi.
Elemen pemanas:
• Seka menggunakan kain yang sudah diperas dan
lembap.
• Bersihkan sisa makanan dengan kain yang sudah
diperas dan lembab atau tusuk gigi.
Bagian luar
Permukaan tutup dan bagian luar badan utama:
• Seka dengan kain yang dibasahi air sabun.
• Gunakan hanya kain lembut dan kering untuk
menyeka panel kontrol.
• Pastikan untuk membersihkan semua sisa makanan
di sekeliling tombol kontrol.
Aksesori
Sendok nasi, panci bagian dalam, keranjang kukus, katup
uap lepas-pasang, tutup bagian dalam lepas-pasang:
• Rendam di dalam air panas dan bersihkan dengan
spons.
6 Daur Ulang
Jangan membuang alat bersama limbah rumah
tangga biasa jika alat sudah tidak bisa dipakai lagi,
tetapi serahkan ke titik pengumpulan atau daur ulang
resmi. Dengan melakukan hal ini, Anda ikut membantu
melestarikan lingkungan.
Patuhi peraturan mengenai pengumpulan produk-produk
elektrik dan elektronik di negara Anda . Pembuangan
produk secara benar akan membantu mencegah dampak
negatif terhadap lingkungan dan kesehatan manusia.
7 Garansi dan servis
Jika Anda memerlukan layanan atau informasi, kunjungi
situs web Philips di www.philips.com atau hubungi Pusat
Layanan Pelanggan Philips di negara Anda. Anda bisa
menemukan nomor telepon Philips di kartu garansi
internasional. Jika di negara Anda tidak terdapat Pusat
Layanan Pelanggan, kunjungi dealer Philips setempat.
8 Spesifikasi
Nomor Model HD3126
Keluaran daya terukur 400 W
Kapasitas terukur 3,0 L
Kapasitas nasi 1,0 L
9 Pemecahan masalah
Jika Anda menemukan masalah saat menggunakan
penanak nasi ini, periksa poin berikut sebelum meminta
servis. Jika masalah tidak dapat teratasi, hubungi Pusat
Layanan Pelanggan Philips di negara Anda.
Masalah Solusi
Lampu pada
tombol tidak
menyala.
Ada masalah sambungan. Periksa
apakah kabel listrik sudah
tersambung dengan benar ke
penanak dan apakah steker
sudah dipasang dengan benar ke
stopkontak listrik.
Lampu rusak. Bawalah alat ke dealer
Philips Anda atau ke pusat layanan
resmi Philips.
Nasi tidak
matang.
Air tidak mencukupi. Tambahkan
air sesuai dengan skala pada panci
bagian dalam.
Anda tidak menekan tombol kontrol
ke bawah.
Pastikan tidak ada endapan asing
pada elemen pemanas dan di
luar panci bagian dalam sebelum
menghidupkan penanak nasi.
Elemen pemanas rusak, atau panci
bagian dalam sudah berubah
bentuk. Bawalah penanak ke dealer
Philips Anda atau ke pusat layanan
resmi Philips.
Nasi tidak
matang.
Tambahkan air secukupnya.
Penanak nasi
tidak beralih
ke mode tetap
hangat secara
otomatis di mode
"Memasak Nasi".
Kontrol suhu rusak. Bawalah alat ke
dealer Philips Anda atau ke pusat
layanan resmi Philips.
Nasi gosong.
Anda belum mencuci beras dengan
benar. Cuci beras hingga air bekas
cucian habis.
Air tumpah
dari penanak
nasi selama
memasak.
• Pastikan Anda menambah air
hingga ukuran yang ditunjukkan
pada skala di panci bagian dalam
sesuai dengan jumlah gelas takar
beras yang dipakai.
• Pastikan air tidak melebihi ukuran
berikutnya pada skala karena
ini akan menyebabkan luapan
selama memasak.
Nasi berbau tidak
enak setelah
memasak.
Bersihkan panci bagian dalam
menggunakan deterjen cuci dan air
hangat.
Setelah memasak, pastikan tutup
lubang uap, tutup bagian dalam
dan panci bagian dalam dibersihkan
sepenuhnya.
繁體中文
1 您的電飯煲
感謝您購買
Philips
產品,歡迎來到
Philips
世界!
要享受
Philips
為您提供的全面支援,請在
www.Philips.com/welcome
網站註冊您的產品。
2 重要事項
使用電飯煲前,請先閱讀本重要資訊手冊,並妥善保管
以供日後參考。
危險事項
• 不可將本產品浸泡。
警告
• 此產品不可供
0
至
8
歲的
兒童使用。
• 此產品可供
8
歲及以上兒
童使用,如該等人仕在使
用時受持續監督、已就使
用本產品給予監督或有關
安全使用本產品的指導及
明白本產品的使用所涉及
的危險。
• 本產品並不適合身體感覺
或心智能力低下人仕(包
括兒童),或缺乏知識及
經驗人仕使用,除非該人
仕已接受其他負責其安全
之人仕就使用本產品的監
督或指導。
• 兒童應受監督以確保他們
不會以本產品玩耍。
• 請勿讓未滿
8
歲的兒童使
用電器及其電線。
• 兒童不應對產品進行清潔
及維護。
• 本產品應置於固定位置,
把手應移至合適方向
(如有),以防止灼熱液
體濺出。
• 此產品適用於家居及類似
的場所,譬如:
• 店鋪、辦公室和其他工
作環境的員工廚房;
• 農舍;
• 於酒店、汽車旅館及其
它居所;
• 睡覺及吃早餐等環境下。
• 如果電源線損壞,必須由
生產商、服務代理或類似
的合資格人士負責更換,
避免發生危險事故。
• 本電器不得以外部計時
器或其他遙控系統操作
使用。
• 警告:請避免電源連接器
洩漏,避免發生危險事
故。
• 警告:請遵循此說明並適
當地使用本產品,避免發
生潛在傷害。
• 注意:加熱元件表面可能
會在使用過後尚有餘熱。
• 在連接本產品前,請檢查
產品註明的指示電壓與當
地電源電壓是否對應。
• 僅將電飯煲連接上接地的
電源插座。務必確保插頭
已穩固插入電源插座。
• 如插頭、電源線、內鍋、
密封圈或機身受損,切勿
使用本產品。
• 請勿讓電源線懸掛於放置
在本產品的桌面或工作檯
邊緣。
• 將插頭插入電源插座前,
確保加熱元件、溫度感應
器及內鍋外部清潔乾爽。
• 請勿用濕手插入本產品的
電源,或按下控制面板的
按鈕。
注意
• 請勿使用任何其他廠商製
造而非
Philips
特別建議
使用的配件或零件。如使
用該等配件或零件,您的
保障將會失效。
• 請勿將產品暴露於高溫之
中,也不要放置於正在使
用或仍然燙熱的爐子或廚
具上。
• 請勿將產品暴露於直射陽
光下。
• 將產品放置於穩固、平坦
的水平表面上。
• 將插頭插入電源插座並開
啟之前,務必將內鍋放入
本產品內。
• 請勿將內鍋直接放置在開
放火源上煮飯。
•
如內鍋變形,則請勿使用。
• 產品運作期間,可接觸的
表面或會變熱。接觸本產
品時必須格外小心。
• 烹調期間,應留意蒸氣通
氣孔噴出的熱蒸氣;開蓋
時,亦應留意本產品噴出
的熱蒸氣。將雙手及臉部
遠離本產品,以免受蒸氣
燙傷。
• 產品運作時,請勿將其抬
起或移動。
• 請勿超出內鍋內部註明的
最高水位,以防止液體溢
出,避免發生危險事故。
• 烹調、保暖或翻熱米飯
期間,請勿將廚具放入
鍋內。
• 僅使用隨附的廚具。避免
使用尖銳的廚具。
• 為了避免刮花,不建議連
同甲殼類或貝類烹調材
料。烹調前取下硬殼。
• 請勿將金屬物件或異物插
入蒸氣氣孔。
• 請勿將磁性物質放在蓋
上。請勿在磁性物質附近
使用本產品。
• 清潔或移動本產品之前,
務必讓本產品冷卻下來。
• 使用後請清潔本產品。請
勿將本產品放入洗碗機內
清洗。
• 如長時間不使用本產品,
務必拔除插頭。
• 如不當使用本產品、使用
本產品作專業或半專業用
途,或沒有按照本用戶手
冊的說明使用本產品,保
用將會無效,而
Philips
亦拒絕承擔任何造成的
損毀。
電磁場(
EMF
)
這款
Philips
產品符合一切有關電磁場暴露的適用安全
標準及條例。
3
包裝盒內容
電飯煲主體
飯勺
量杯
蒸籠
用戶手冊
保用證
概覽
a
密封圈
j
加熱元件
b
水位顯示
k
磁控開關
c
內鍋
l
機身
d
烹調按鈕
m
開蓋按鈕
e
保溫按鈕
n
頂蓋
f
電源線
o
蒸氣通氣孔蓋
g
飯勺
p
可拆式蒸氣閥
h
蒸籠
q
分離式上蓋
i
量杯
4
使用電飯煲
首次使用前
1 從內鍋取出所有配件。拆取內鍋的包裝材料。
2 首次使用電飯煲前,煮沸水徹底清潔電飯煲。
3 首次使用電飯煲前,徹底清潔電飯煲的部件(請
參閱「清潔」章節)。
注意
• 開始使用電飯煲前,確保所有部件完全乾透。
使用前準備
使用電飯煲前,請遵循準備事項:
1 使用隨附的量杯量度米飯(圖
1
)。
2 徹底洗米(圖
2
)。
3 將事先洗好的米放入內鍋。
4 對應使用的杯數,將水加到內鍋刻度註明的水位
(圖
3
)。然後鋪平米的表面。
5 按下開蓋按鈕打開頂蓋(圖
4
)。
6 抹乾內鍋的外圍(圖
5
),然後將內鍋放入電飯煲
(圖
6
)。檢查內鍋與加熱元件適當接合。
7 關上電飯煲的頂蓋(圖
7
),將插頭插入電源插座
(圖
8
)。
注意
• 每杯未煮的米通常可以煮出
2
碗飯。請勿超出內鍋內部
註明的水量。
• 內鍋內標有的水平純屬指示。您可根據不同的米飯類型及
自己的喜好隨時調節水位。如居住地區的電壓不穩定,電
飯煲可能出現溢出的情況。
• 除了按照水位指示外,煮飯時亦可分別以
1:1
至
1.2
的比例
加入米和清水。請勿超出內鍋內部註明的水量。
• 請使用另一個容器洗米,以免令內鍋的不黏底外層受損。
• 確保內鍋外部乾爽清潔,加熱元件及磁控開關沒有異物。
煲飯
1 請遵從「使用前準備」內所述的步驟。
2 按下烹調按鈕(
Cook
),然後烹調指示燈將會亮
起(圖
9
)。
3 烹調完畢後,烹調指示燈將會熄滅。
4 電飯煲會自動切換至保溫模式,然後保溫指示燈
(
Warm
)將會亮起(圖
10
)。
注意
• 請勿超出內鍋註明的最高水平,否則可能令電飯煲溢出。
• 請勿在電飯煲進入保溫模式後立即打開頂蓋,如果您煮了
很多飯,請確保米飯在保溫模式中保溫
15
分鐘。
蒸煮
1 使用量杯量度幾杯水(圖
11
)。
2 將水倒入內鍋(圖
12
)。
3 將蒸籠放入內鍋(圖
13
)。
4 將食物放入蒸籠(圖
14
)。
5 關上電飯煲蓋,將插頭插入電源插座。
6 按下烹調按鈕(
Cook
),然後烹調指示燈將會亮
起(圖
9
)。
7 蒸煮完成後,拉起控制桿。
8 電飯煲會切換至保溫模式,然後保溫(
Warm
)指
示燈將會亮起(圖
10
)。
注意
• 因為盤子或蒸籠會非常燙手,所以請使用廚房隔熱手套
或布。
• 您在蒸煮的同時亦可以煮飯。請勿超出內鍋註明的水量或
將蒸籠浸在水中,否則可能令電飯煲溢出。
• 您可視需求調整水平。
5
清潔與保養
注意
• 開始清潔前,先拔除電飯煲的插頭。
• 等待電飯煲完全冷卻才清潔。
拆出內蓋
• 拉出分離式上蓋,並從頂蓋將它移除(圖
15
)。
內部
頂蓋內部和機身:
• 用擰乾的濕布擦拭。
• 確保清除所有黏在電飯煲上的所有食物殘渣。
加熱元件:
• 用擰乾的濕布擦拭。
• 用擰乾的濕布或牙籤清除食物殘渣。
外部
頂蓋表面和機身外部:
• 用沾有皂水的濕布擦拭。
• 僅用乾透的軟布擦拭控制面板。
• 確保清除控制按鈕附近的所有食物殘渣。
配件
飯勺、內鍋、蒸籠、可拆卸式蒸氣閥、分離式上蓋:
• 放入熱水浸泡,用海綿清潔。
6
回收
請勿在本產品使用壽命結束後當作一般家庭垃圾廢棄,
應交給官方回收站或循環再用。這樣做有助保護環境。
請遵守您的國家
/
地區分開處置電器和電子產品的法
則。正確處理有助避免對環境和人體造成負面影響。
7
保障及服務
如果您需要服務或資訊,或如有任何問題,請瀏覽
Philips
網站
www.philips.com
或聯絡您所在國家的
Philips
客戶服務中心。您可在全球保障單張內找到相
關電話號碼。如果您的國家沒有客戶服務中心,請前往
當地的
Philips
經銷商。
8
規格
型號
HD3126
標準輸出功率
400
瓦
標準容量
3.0L
米飯容量
1.0L
9
故障排除
使用本電飯煲時若遇到任何問題,請在送修前先行檢查
下列事項。如果無法解決問題,請聯絡您所在國家的
Philips
客戶服務中心。
問題 解決方案
按鈕的指示燈沒有
亮起。
連接有誤。檢查電源線已穩妥
接上電飯煲,以及插頭已穩固
插入電源插座。
指示燈損壞。請攜帶本產品前
往
Philips
經銷商或
Philips
認可的服務中心。
沒有烹調米飯。
水量不足。根據內鍋內的刻度
加入水。
您沒有按下控制鍵。
開啟電飯煲前,確保加熱元件
和內鍋外部沒有異物。
加熱元件受損,或者內鍋變
形。請將電飯煲拿至
Philips
經銷商或
Philips
認可的服務
中心。
米飯沒有烹調熟透。 添加更多水。
電飯煲沒有在「煮飯
模式」自動切換至保
溫模式。
溫度控制出現故障。請攜帶
本產品前往
Philips
經銷商或
Philips
認可的服務中心。
米飯燒焦了。
您沒有正確洗米。洗米直至水
呈透明色。
烹調期間,水濺出電
飯煲。
• 確保對應使用的杯數,將水
加到內鍋刻度註明的水位。
• 確保水沒有超越刻度的下一
個水位,否則可能令本產品
在烹調期間溢出。
烹調後飯有異味。
用洗潔劑和溫水清潔內鍋。
烹調後,確保徹底清潔蒸氣通
氣孔蓋、內蓋及內鍋。
Produktspezifikationen
Marke: | Philips |
Kategorie: | Reiskocher |
Modell: | Viva Collection HD3126 |
Brauchst du Hilfe?
Wenn Sie Hilfe mit Philips Viva Collection HD3126 benötigen, stellen Sie unten eine Frage und andere Benutzer werden Ihnen antworten
Bedienungsanleitung Reiskocher Philips
7 September 2025
7 September 2025
7 September 2025
7 September 2025
6 September 2025
30 Juli 2025
23 Juli 2025
23 Juli 2025
15 Juli 2025
15 Juli 2025
Bedienungsanleitung Reiskocher
- Champion
- Lauben
- Orion
- Tiger
- Cuckoo
- Breville
- Techwood
- Magic Chef
- SKG
- Bestron
- Princess
- High One
- Klarstein
- Team
- Brentwood
Neueste Bedienungsanleitung für -Kategorien-
6 September 2025
6 September 2025
6 September 2025
6 September 2025
6 September 2025
6 September 2025
6 September 2025
6 September 2025
6 September 2025
6 September 2025