TP-Link Festa F65-Outdoor Bedienungsanleitung
TP-Link Zugangspunkt Festa F65-Outdoor
Lies die bedienungsanleitung für TP-Link Festa F65-Outdoor (2 Seiten) kostenlos online; sie gehört zur Kategorie Zugangspunkt. Dieses Handbuch wurde von 35 Personen als hilfreich bewertet und erhielt im Schnitt 5.0 Sterne aus 4 Bewertungen. Hast du eine Frage zu TP-Link Festa F65-Outdoor oder möchtest du andere Nutzer dieses Produkts befragen? Stelle eine Frage
Seite 1/2
Overview
Package Contents
Panel Layout
Passive PoE Adapter
LED Status
Indication
Solid green
The device is initializing or working properly.
Flashing yellow
System errors. RAM, Flash, Ethernet, WLAN or
rmware may be malfunctioning.
Slowly Flashing yellow, green
Firmware update is in progress. Do not disconnect
or power o the device.
Quickly ashing yellow, green
The device is being reset to its factory default
settings.
Flashes green twice
Initialization is completed.
SYS LED Explanation
Quickly ashinggreen
Locate the device.
Slowly ashing green
The device is in an isolated state.
1
RESETGrounding
Terminal
Ethernet
Port
Power LEDPoE PortLAN Port
Waterproof Kit
Seal
(For Unshielded Cable)
O-Ring
Bracket
Seal
(For Shielded Cable)
Spiral Cover
Power Cord
Passive PoE Adapter
(Mounting Bracket Included)
Screw
(For Grounding
Wire Securing)
APInstallation Guide
Quick Installation Guide
Setup with videos
Visit https://www.tp-link.com/support/setup-video/ or scan the QR
code to search for the setup video of your product model.
Indoor/Outdoor Access Point
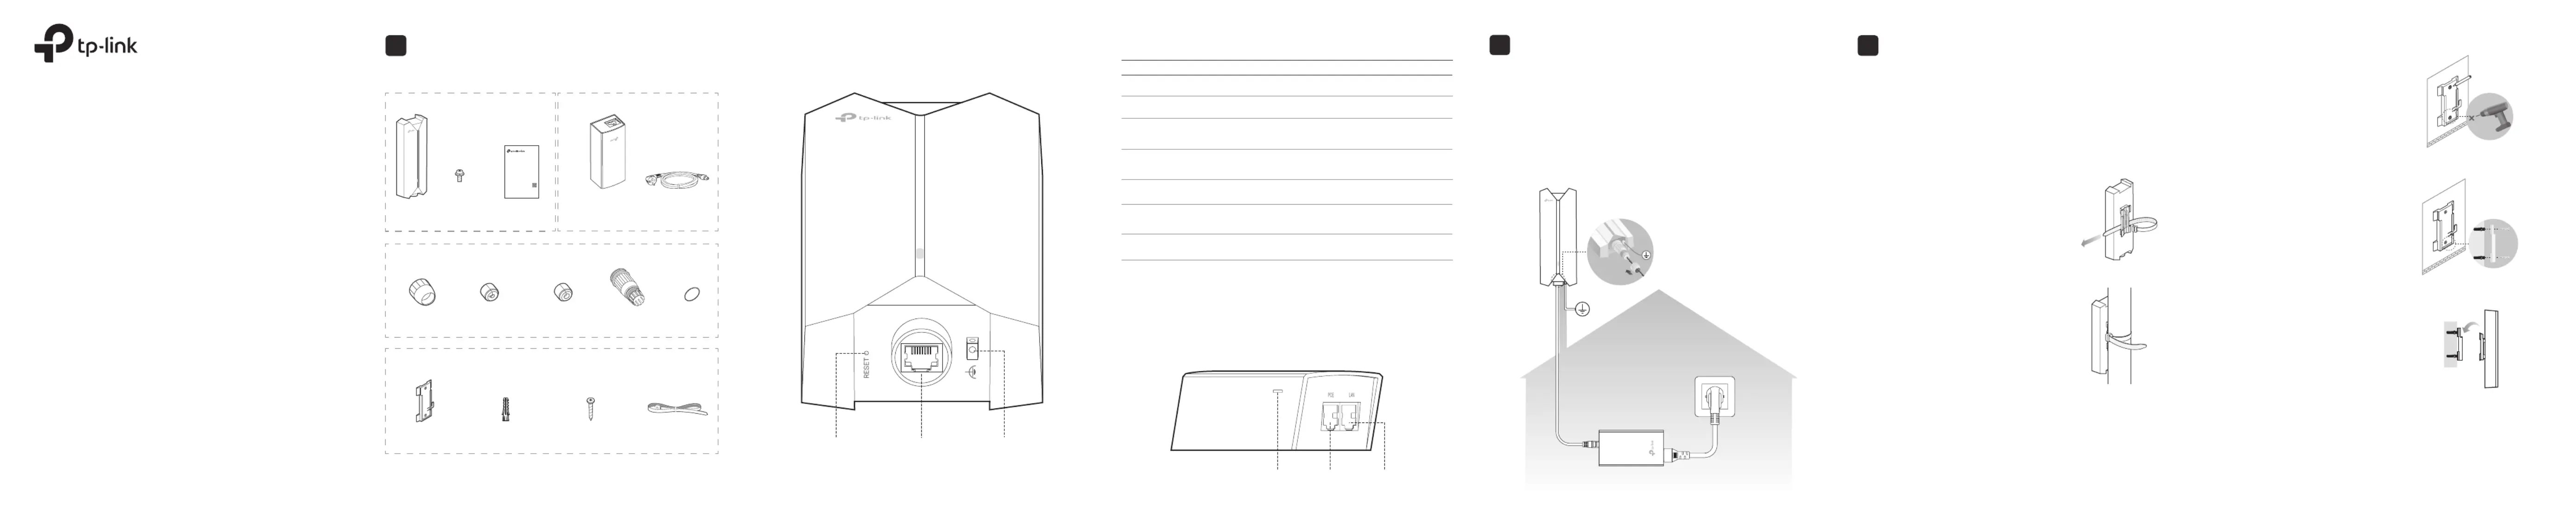
Plastic Wall AnchorsSelf-tapping ScrewsMounting Bracket
(For AP)
Pole Mounting Strap
Mounting Kit
* Accessories may vary by product.
Note: PoE Adapter may vary by model.
Lightning and ESD Protection
Before mounting the AP, consider Lightning and ESD Protection to ensure
safety.
Proper grounding is extremely important for outdoor devices. To reduce the
damage of potential lightning and ESD attacks, connect the grounding
terminal to grounding facilities using a proper grounding wire, which should
meet the local installation requirements. You need to secure the grounding
wire to the grounding terminal with the screw.
Hardware Installation
Mount the AP
The AP can be pole-mounted or wall-mounted. Follow the steps below
for the appropriate installation.
Option 1: Pole Mounting
Lead the end of the pole mounting strap
through the back of the AP.
Step 1:
Position the AP and wrap the pole
mounting strap around the pole.
Feed the end through the screw-block
and tighten the strap until the AP is
secure.
Step 2:
Option 2: Wall Mounting
Step 1:
Place the mounting bracket for AP in
the right position. Mark positions for
the screw holes .
Drill holes for the screws at the marked
positions.
Step 2:
Insert the plastic wall anchors into the
holes.
Align the mounting bracket to the
plastic wall anchors and drive the
self-tapping screws into the anchors
through the mounting bracket.
Step 3:
Align the mounting tabs on the back of
the AP with the slot of the mounting
bracket.
Push and slide the AP downward until
it locks into place.
3
2
Φ 7.6 mm (19/64 in)
AP
Grounded PoE Adapter
Ethernet Cable
Grounded 3-wire
Power Outlet
Indoor/Outdoor Access Point
Note: Festa F65-Outdoor is used as an example throughout the Guide. Images
may dier from your actual product.
©2024 TP-Link 7106511118 REV1.0.0
Quick Installation Guide
Produktspezifikationen
| Marke: | TP-Link |
| Kategorie: | Zugangspunkt |
| Modell: | Festa F65-Outdoor |
Brauchst du Hilfe?
Wenn Sie Hilfe mit TP-Link Festa F65-Outdoor benötigen, stellen Sie unten eine Frage und andere Benutzer werden Ihnen antworten
Bedienungsanleitung Zugangspunkt TP-Link

20 September 2025
7 September 2025
7 September 2025
17 August 2025
17 August 2025
17 August 2025
19 Juli 2025
18 Juli 2025
18 Juli 2025
4 Oktober 2024
Bedienungsanleitung Zugangspunkt
Neueste Bedienungsanleitung für -Kategorien-
16 März 2026
13 März 2026
12 März 2026
11 März 2026
10 März 2026
5 März 2026
2 März 2026
17 Februar 2026
1 Februar 2026