TP-Link Omada EAP650-Desktop Bedienungsanleitung
TP-Link Zugangspunkt Omada EAP650-Desktop
Lies die bedienungsanleitung für TP-Link Omada EAP650-Desktop (2 Seiten) kostenlos online; sie gehört zur Kategorie Zugangspunkt. Dieses Handbuch wurde von 51 Personen als hilfreich bewertet und erhielt im Schnitt 4.0 Sterne aus 3 Bewertungen. Hast du eine Frage zu TP-Link Omada EAP650-Desktop oder möchtest du andere Nutzer dieses Produkts befragen? Stelle eine Frage
Seite 1/2
Quick Installation Guide
Desktop Access Point
Note: This guide uses EAP650-Desktop for demonstration. Images may dier from your actual product.
©2024 TP-Link 7106511611 REV1.0.1
*
When the Locate feature is activated in the Omada Controller, the System LED will ash quickly for 10
minutes to help you locate and identify the device. You can disable this feature manually to stop the device
from ashing.
**
802.3at/bt PoE input is required. 802.3af and passive PoE inputs will disable 5 GHz band and PoE output and
thus not recommended.
***
The device can supply PoE output power only when it is receiving 802.3at/bt PoE input power.
Blue On: Power supply is normal.
Flash Orange: Power supply is insucient.
O: Power is o, or LEDs are turned o.
LEDIndication
Power
System
On: The EAP is initializing or working normally.
O: The EAP is working abnormally.
Flash: •
Flash Twice: Initialization is complete.
•
Flash Once per Second: The EAP is upgrading or resetting.
•
Quick Flash: The Controller is locating the EAP.
*
•Sustained Flash: The EAP is in the isolated state.
On: The SIP account is registered successfully.
Slow Flash: The phone is o hook.
Quick Flash: The phone is ringing.
O: No SIP account is registered.
FXS
Green On: The port is receiving 802.3bt PoE power.
Orange On: The port is receiving non-802.3bt PoE power
**
.
O: The port is not connected or not receiving PoE power.
On: The port is supplying power to a PoE powered device.
O: The port is not connected or not supplying power.
IN
(ETH0)
OUT
(ETH1)
On: The port is linked but has no activity.
Flash: The port is transmitting or receiving data.
O: The port is not linked.
Link/Act
(ETH0~ETH3)
With the EAP powered on, press and hold the button for about 5
seconds until the System LED ashes, then release the button.
The EAP will restore to factory settings.
Press the button to turn on/o the LEDs.
ButtonDescription
RESET
LED
Connect to a power socket via the provided power adapter.
Connect to a power sourcing equipment for both data
transmission and PoE input
**
.
Connect to a PoE powered device for both data transmission and
PoE output
***
.
Connect to a client device to transmit data.
Connect to a phone to make and receive calls over the internet.
InterfaceDescription
Power
ETH0
(PoE IN)
ETH1
(PoE OUT)
ETH2 ~ ETH3
FXS
Business CommunityDownload CenterSetup Videos
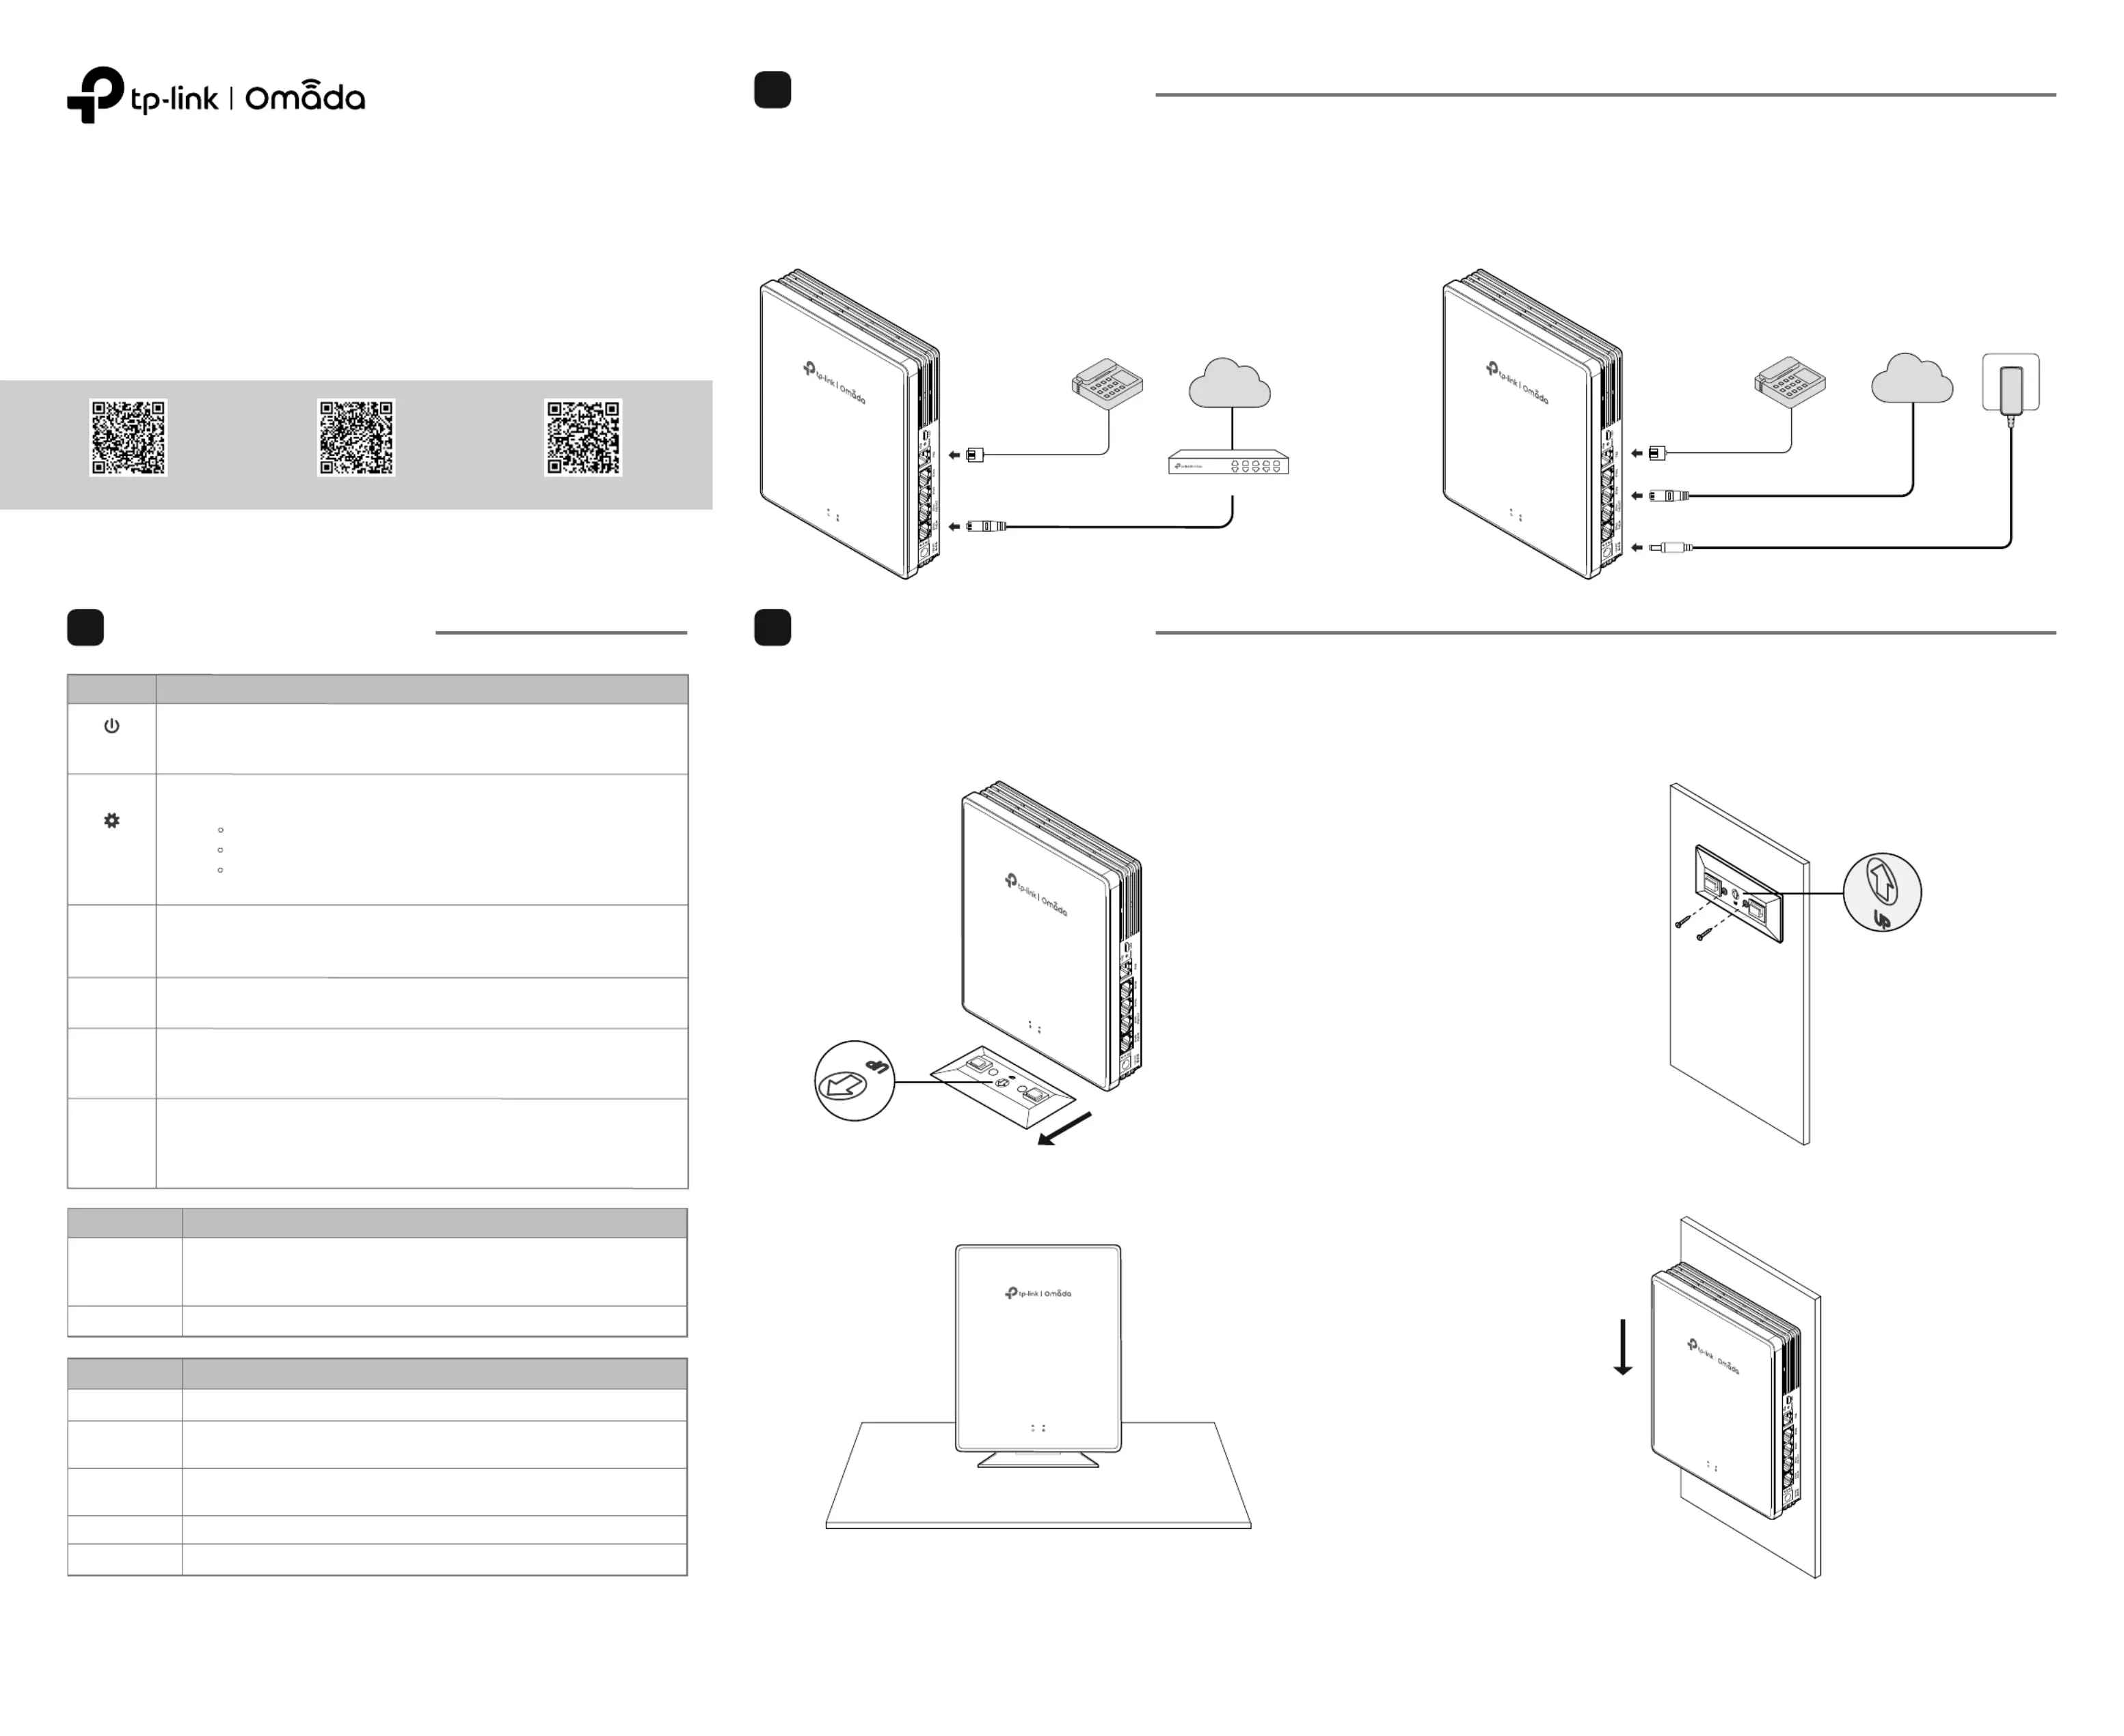
The EAP can only be powered by a power adapter, or by a PSE device (such as a PoE switch) that complies with Power Source Class 2 (PS2) or
Limited Power Source (LPS) defined in the standard of IEC 62368-1.
Note: For power supply specifications, refer to the product label.
Option 1: Power by PoE SwitchOption 2: Power by Power Adapter
Phone
Internet
Connect to FXS port
Connect to ETH0 (PoE IN)port
PoE Switch
Power Adapter
Internet
Connect to Power port
Connect to an Ethernet port
Connect to FXS port
Phone
Hardware Connection
2
Option 1: Desktop Mounting
1. Attach the EAP to the provided multi-functional base as shown in
the figure.
Option 2: Wall Mounting
1. Secure the provided multi-functional base to the wall in the correct
direction with the provided screws.
2. Attach the EAP to the base as shown in the figure.2. Place the EAP vertically on a horizontal surface (such as a desktop
or shelf) that is out of children’s reach.
Hardware Installation
3
Hardware Overview
1
Produktspezifikationen
| Marke: | TP-Link |
| Kategorie: | Zugangspunkt |
| Modell: | Omada EAP650-Desktop |
Brauchst du Hilfe?
Wenn Sie Hilfe mit TP-Link Omada EAP650-Desktop benötigen, stellen Sie unten eine Frage und andere Benutzer werden Ihnen antworten
Bedienungsanleitung Zugangspunkt TP-Link

20 September 2025
7 September 2025
7 September 2025
17 August 2025
17 August 2025
17 August 2025
19 Juli 2025
18 Juli 2025
18 Juli 2025
4 Oktober 2024
Bedienungsanleitung Zugangspunkt
Neueste Bedienungsanleitung für -Kategorien-
16 März 2026
13 März 2026
12 März 2026
11 März 2026
10 März 2026
5 März 2026
2 März 2026
17 Februar 2026
1 Februar 2026