Zenec ZE-RVSC175 Bedienungsanleitung
Zenec Nicht kategorisiert ZE-RVSC175
Lies die bedienungsanleitung für Zenec ZE-RVSC175 (2 Seiten) kostenlos online; sie gehört zur Kategorie Nicht kategorisiert. Dieses Handbuch wurde von 15 Personen als hilfreich bewertet und erhielt im Schnitt 4.7 Sterne aus 9 Bewertungen. Hast du eine Frage zu Zenec ZE-RVSC175 oder möchtest du andere Nutzer dieses Produkts befragen? Stelle eine Frage
Seite 1/2
EN
Technical Specifi cations:
Image device Cam1 / Cam2: ⅓" / 8.5 mm PC3089D CMOS sensor
Lens focal length Cam1 / Cam2: f6.0 / f2.25
View angle (horiz.) Cam1 / Cam2: 45° / 100°
TV system: NTSC / 60 fps
Sensor resolution: 728(H) x 488(V) pixels
Native sensor resolution (SOC): 732(H) x 504(V) pixels
Resolution of video-out signal: > 550 TV lines
Frame rate: 60 fi elds/sec.
Signal to noise ratio:> 46.5 dB
Light sensitivity: 0.4 Lux Cam1; 0.0 Lux Cam2 IR-ON
Video output: 1.0 Vp-p (+/-0.2 V), 75 ohms, CVBS
White balance: auto
Backlight compensation: auto
Dynamic range: 60,7 dB
Gain control: auto
Synchronization: auto
Power supply: DC 12V (9.0-16.0 V DC)
Current consumption (@DC12V): 40mA Cam1 + 80 mA Cam2 / 1440 mW
IP protection rating: IP68
Operating temperature: -20°C~+70°C
Rev. A
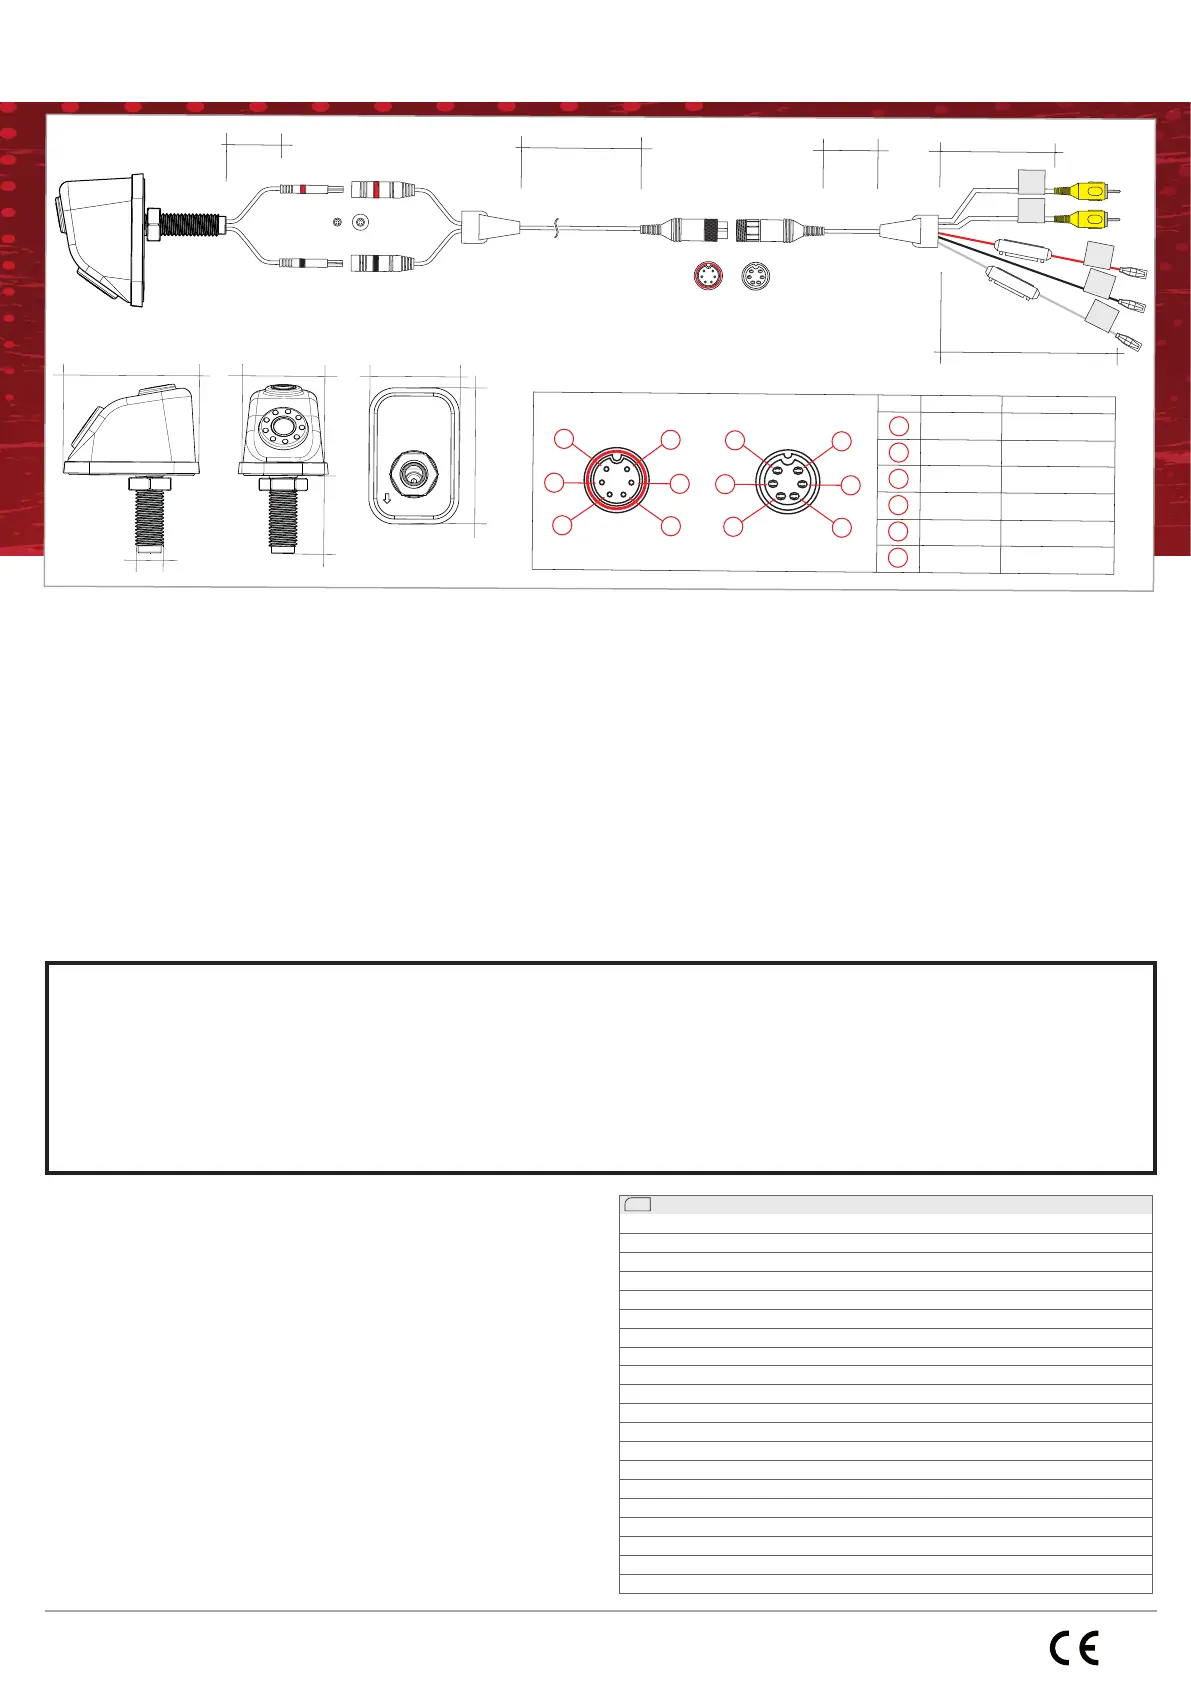
MOUNTING
INSTRUCTIONS
ZE-RVSC175
ZE-RVSC175
REAR VIEW CAMERA
REAR VIEW CAMERA
KEY FEATURES
• Compact and elegant twin-sensor rear view camera
• Cam1 sensor with 45° and Cam2 sensor with 100° horizontal view angle
• IR-LED night-illumination system for Cam2 with dynamic LDR brightness control
• High quality CMOS picture sensor with low power consumption
• Detailed high contrast picture under twilight conditions
• Plastic injection main housing with M16 threaded hollow bolt for mounting
• Separable 3-part system cable with 17.0 m main cable length
DESCRIPTION
The ZENEC ZE-RVSC175 twin-lens rear view camera was developed for semi- and fully-integrated motorhomes. Cam1 in the upper part
of the camera body provides a full view back like an interior mirror of normal vehicles. Cam2 located in the bottom part of the cam housing
provides a view down right behind the vehicle, to ease maneuvering and reversing. The integrated IR-LED illumination for Cam2 is another
convenient feature for trouble-free maneuvering with a motorhome at night.
This product is compatible with monitors and 1-DIN / 2-DIN device models of the aftermarket as well as ZENEC models, which support
connection and control of two camera systems.
NOTES:
■Use the included connection cable exclusively. Modifying the cable will void your warranty.
■The camera is water- and dustproof and has been licensed according to the international standard IP68. However, vehicle
cleaning using high pressure water and steam jet devices may still lead to damage of IP68 rated camera models by intrusion of
water.
■If the motorhome is treated with a water jet high pressure cleaning device, make sure to keep a distance of at least one meter
between the water nozzle and the camera sensor / housing.
Manufacturer: ACR AG · Bohrturmweg 1 · CH-5330 Bad Zurzach · Switzerland, EU legal representative: ACR S & V GmbH · Industriestraße 35 · D-79787 Lauchringen · Germany
Hersteller: ACR AG · Bohrturmweg 1 · CH-5330 Bad Zurzach · Schweiz, EU Gesetzlicher Vertreter: ACR S & V GmbH · Industriestraße 35 · D-79787 Lauchringen · Deutschland
MOUNTING
Find a suitable position for the camera on the outside of the vehicle.
The installation location should be as high as possible, but not too
high. Pay attention to the cable routing inside the vehicle. Mark the drill
hole for the camera mounting on the outside, then remove the plastic
covers on the inside of the vehicle so that nothing is drilled into in the
next step.
Use the 16 mm core drill included in the set to drill the 16 mm through
hole for the cable feed through and fixation of the camera. Deburr the
drill hole. Insert the threaded tube of the camera into the drilled hole
and secure the cam with the M16 counter nut. Plug in the extension
cable. Next, route the extension cable to the head unit in the dash
board for which you need to remove more plastic panels. Connect
both video cables to the control unit. Then connect the +12 V and
GND cable ends of the camera-sensor power supply to the respective
Cam1 and Cam2 power supply outputs of the head unit. Do a camera
function test with the head unit. If cam function is working OK, remount
all the plastic covers which got removed before to route the cable. The
camera installation is completed.
17 m
100 mm
ZE-RVSC175
Female
CAM 1
CAM 2
400 mm
Male
CAM 1
CAM 2
Fuse
Fuse
200 mm
4 PIN mini
150 mm
Female
Male
MALE
FEMALE
white
black
red
CAM 2
CAM 1
+12 V
CAM 1
+12 V
CAM 2
GND
73.0
46.0
50.0
60.0
16.0
76.0
1
2
3
6
5
4
1
2
3
6
5
4
+12 V CAM 2
CAM 1 signal +
N/A
+12 V CAM 1
GND
CAM 2 signal +
white
yellow RCA
N/A
red
black
white RCA
Original Connection
1
2
3
6
5
4
MALEFEMALE
Produktspezifikationen
| Marke: | Zenec |
| Kategorie: | Nicht kategorisiert |
| Modell: | ZE-RVSC175 |
Brauchst du Hilfe?
Wenn Sie Hilfe mit Zenec ZE-RVSC175 benötigen, stellen Sie unten eine Frage und andere Benutzer werden Ihnen antworten
Bedienungsanleitung Nicht kategorisiert Zenec

27 Januar 2026
24 Januar 2026
18 Januar 2026
17 Januar 2026
14 Juli 2025
17 Juni 2025
1 Dezember 2024
5 September 2024
5 September 2024
Bedienungsanleitung Nicht kategorisiert
Neueste Bedienungsanleitung für -Kategorien-
3 April 2026
3 April 2026
3 April 2026
3 April 2026
3 April 2026
3 April 2026
3 April 2026
3 April 2026
3 April 2026
3 April 2026