Hinkley Lighting Dot 15075SS Bedienungsanleitung
Hinkley Lighting Beleuchtung Dot 15075SS
Lies die bedienungsanleitung für Hinkley Lighting Dot 15075SS (1 Seiten) kostenlos online; sie gehört zur Kategorie Beleuchtung. Dieses Handbuch wurde von 33 Personen als hilfreich bewertet und erhielt im Schnitt 4.2 Sterne aus 5 Bewertungen. Hast du eine Frage zu Hinkley Lighting Dot 15075SS oder möchtest du andere Nutzer dieses Produkts befragen? Stelle eine Frage
Seite 1/1
Installation Instruction
start here
Item No:
1.
Find a clear area in which you can work.
2.
3.
1.
Encontrar un área clara en la que se puede trabajar.
2.
3.
empezar aquí
Número
Instrucciones de Instalacion
commencer ici
Número del
artículo:
del actculo:
HH
II
NN
KK
LL
EE
YY
HINKLEY 33000 Pin Oak Parkway, Avon Lake, OH 44012 800.446.5539 / 440.653.5500 hinkley.com
DOT FAMILY
• FOR OUTDOOR USE ONLY
• Luminaire or fitting is only for use with low voltage
landscape lighting power units with a maximum output
rating of 300 watts per secondary.
• The main low voltage cable is intended for shallow
burial – less than 6 inches (152 mm)
• SUITABLE FOR GROUND INSTALLATION
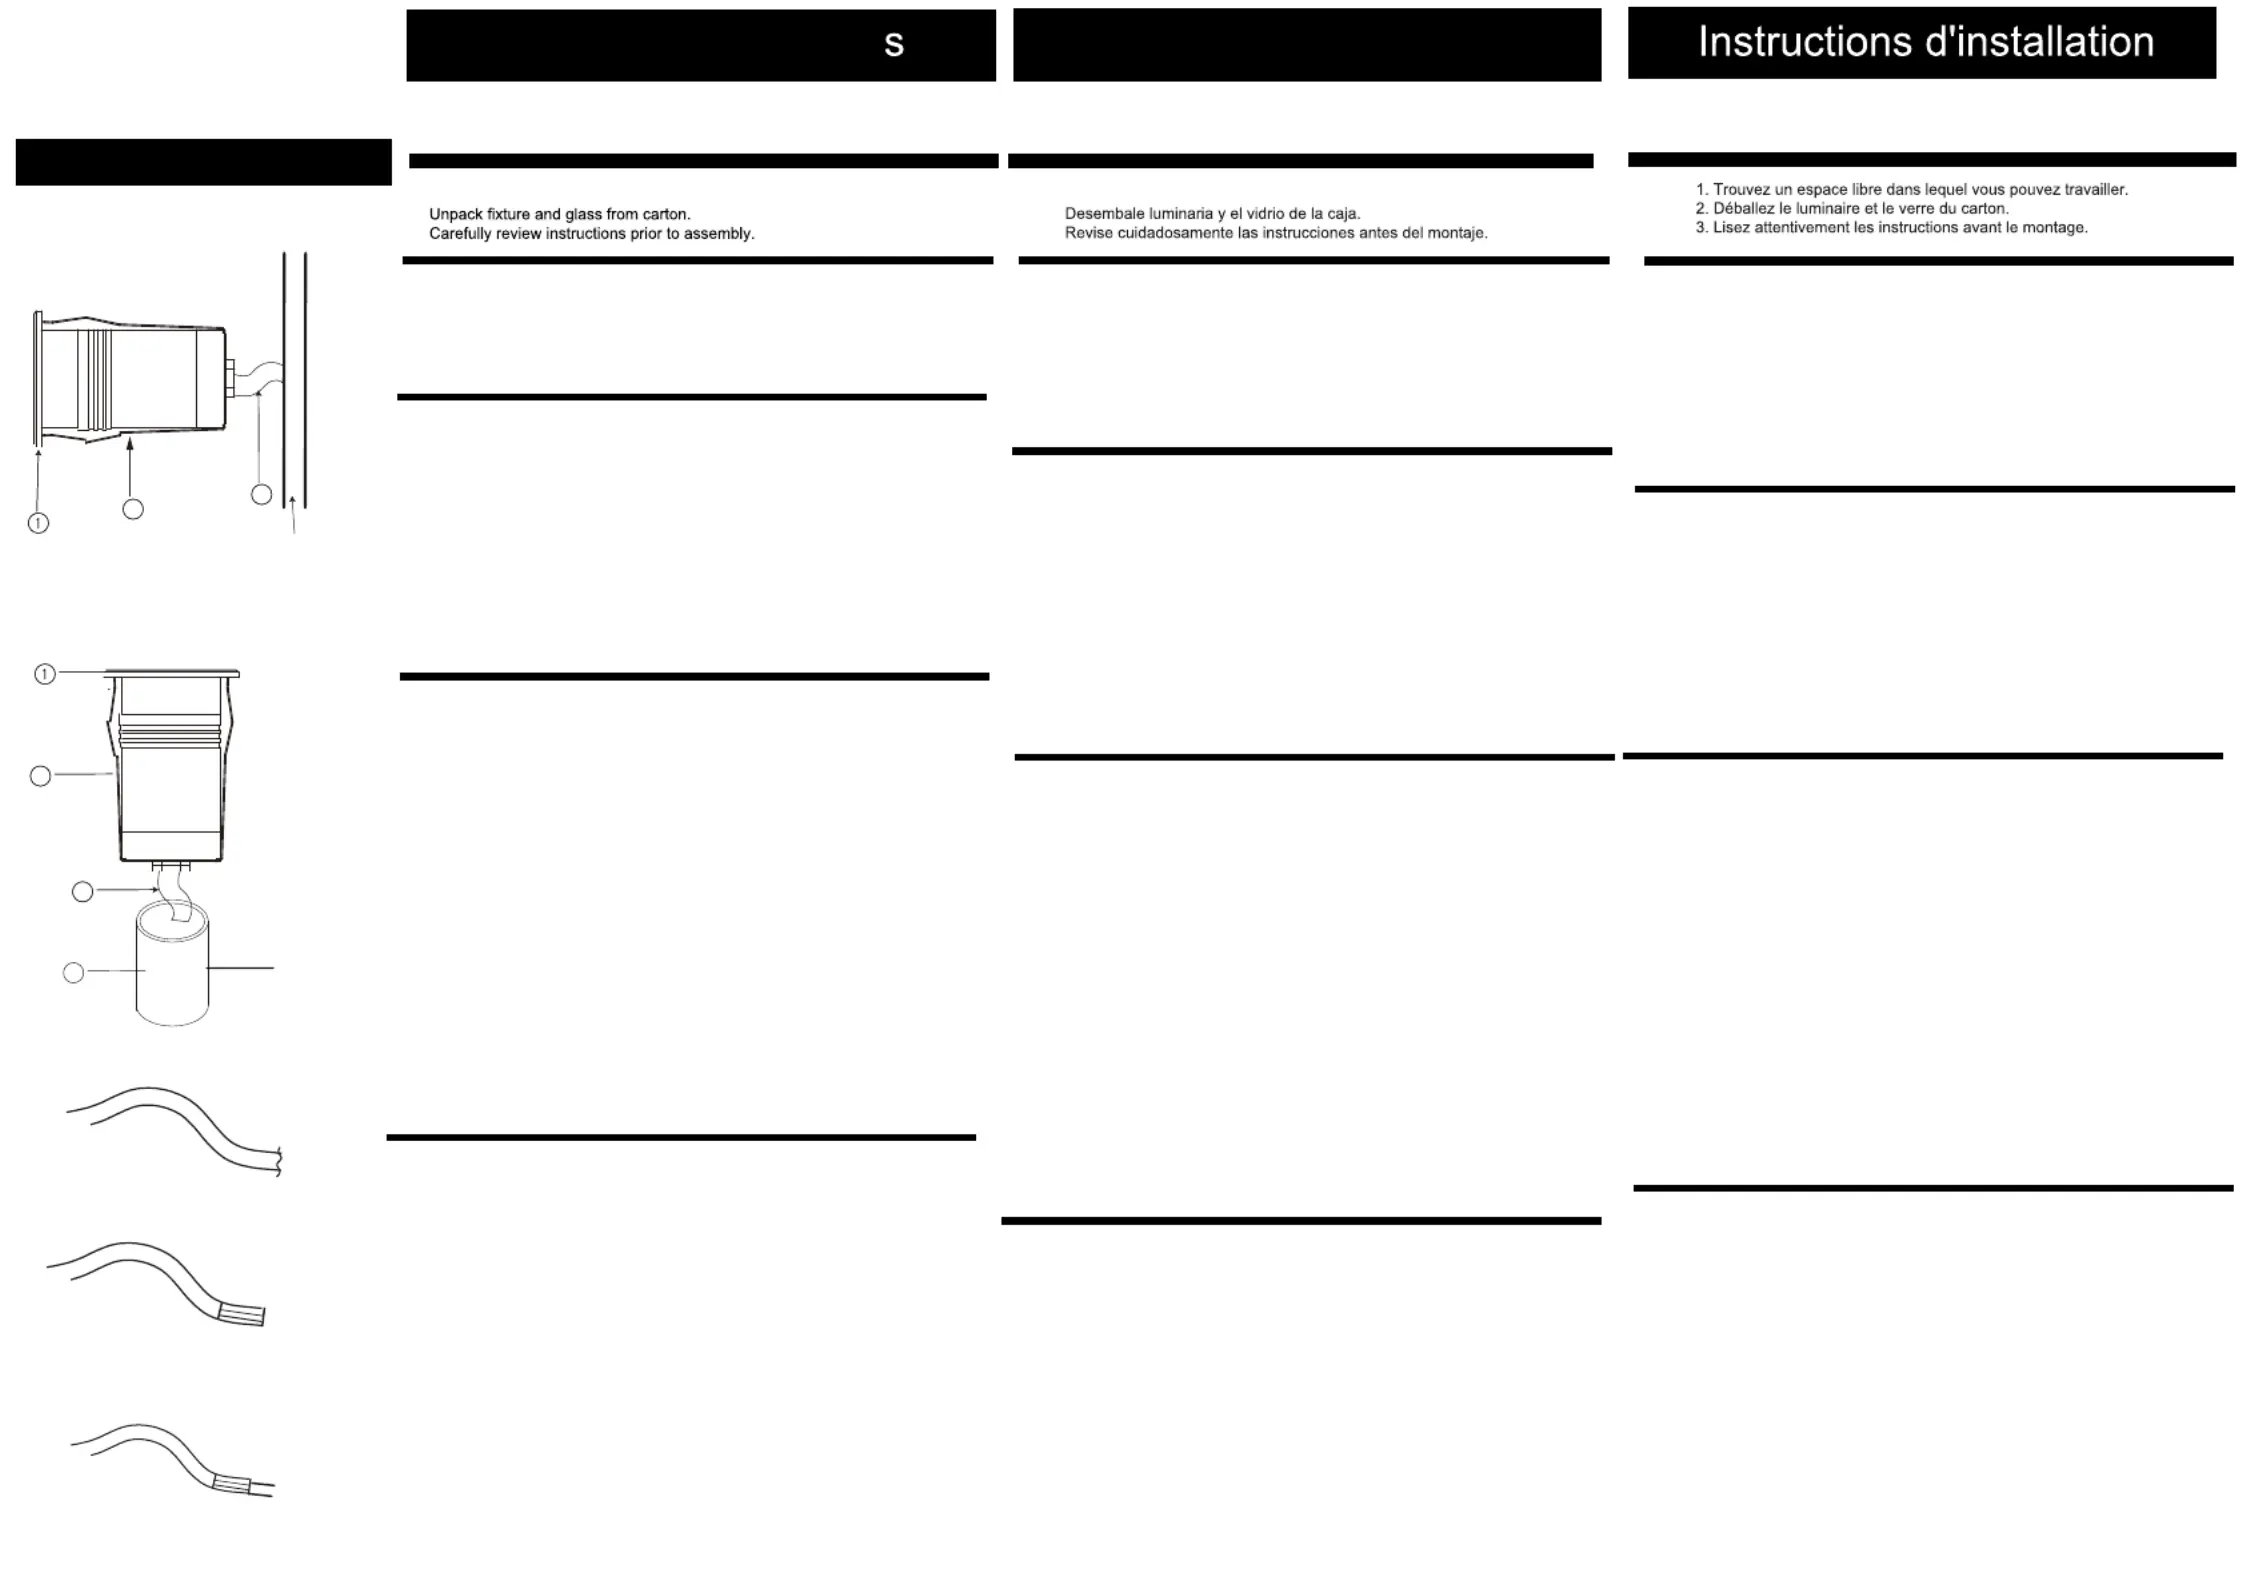
1.Fixture can be mounted
2 different ways
Option 1 Surface Mount into ¼” or
Deeper Wall Depth using 1-3/4" Drill
Option
2 Cast in or Bury in SleeveMount
–using provided extruded PVC
2.Remove excess wire and use applicable
tool to
remove the outer jacket of the cable toexpose the
Positive (black) and Negative
(white) lead wires
3.Connect wires (3) to a 12V transformer orother
low voltage power supply.
4.Place fixture housing (2) and front coverinto
mounting sleeve (4) , PVC sleeve, or
wall.
5.Fixture is now ready to be powered on.
Note: Multiple fixtures can be wired to one
transformer or power source. Please refer to the
specifications of the power source or transformer
for information on max load
• SOLO PARA USO EN EXTERIORES
• La luminaria o accesorio es solo para uso con
unidades de potencia de iluminación de jardines de
bajo voltaje con una potencia de salida máxima de 300
vatios por secundario.
• El cable principal de bajo voltaje está diseñado para
un entierro poco profundo: menos de 6 pulgadas (152
mm)
• APTO PARA INSTALACIÓN A TIERRA
Nota: Se pueden conectar varios dispositivos a un
transformador o fuente de alimentación. Consulte las
especificaciones de la fuente de alimentación o del
transformador para obtener información sobre la carga
máxima.
Remarque: plusieurs appareils peuvent être câblés
à un transformateur ou à une source d'alimentation.
Veuillez vous référer aux spécifications de la source
d'alimentation ou du transformateur pour plus
d'informations sur la charge maximale
SAFETY WARNING: TURN POWER SUPPLY OFF
DURING INSTALLATION. IF NEW WIRING IS
REQUIRED, CONSULT A QUALIFIED ELECTRICIAN OR
LOCAL AUTHORITY FORCODE REQUIREMENTS.
ADVERTENCIA DE SEGURIDAD: APAGUE EL
SUMINISTRO ELÉCTRICO DURANTE LA
INSTALACIÓN. SI SE REQUIERE UN NUEVO
CABLEADO, CONSULTE A UN ELECTRICISTA
CALIFICADO O A LA AUTORIDAD LOCAL PARA LOS
REQUISITOS DEL CÓDIGO.
AVERTISSEMENT DE SÉCURITÉ: COUPEZ
L'ALIMENTATION PENDANT
L'INSTALLATION. SI UN NOUVEAU CÂBLAGE
EST NÉCESSAIRE, CONSULTER UN
ÉLECTRICIEN QUALIFIÉ OU UNE AUTORITÉ
LOCALE POUR LES EXIGENCES DE CODE.
15075/15085
15075/
115085
15075/
15085
Wall of at least
1/4' thickness
Option 1
Option 2
Extruded
PVC
22
33
22
33
4
1.El accesorio se puede montar de formas diferentes2
Opción 1 Montaje en superficie en ¼ ”o una
profundidad de pared más profunda con un taladro de
1-
3 / 4”segundo.
Opción Montaje con manguito fundido o fundido,2
utilizando PVC extruido proporcionado
2.
Retire el cable sobrante y use la herramienta
correspondiente para quitar la cubierta exterior del
cable para exponer los cables conductores positivo
(negro) y negativo (blanco).
3.Conecte los cables (3) a un transformador de 12 V u
otra fuente de alimentación de bajo voltaje.
4.Coloque la carcasa del accesorio (2) y la cubierta
frontal en el manguito de montaje (4), manguito de PVC
oen la pared.
5.El dispositivo ahora está listo para ser encendido.
1.L'accessoire peut être monté de
2 manières
différentes
Option 1 Montage en surface ¼ ”ou profondeur de
mur plus profonde avec un deuxième trou de 1-3 / 4”.
Option 2 Montage du manchon moulé ou moulé, en
utilisant le PVC extrudé fourni
Retirez l'excédent de câble et utilisez l'outil approprié
pour retirer la gaine extérieure du câble afin
d'exposer les fils positifs (noirs) et négatifs (blancs).
3.
Connectez les fils (3) à un transformateur 12 V ou
à une autre source d'alimentation basse tension.
4.Placez le boîtier d'accessoires (2) et le couvercle
avant sur le manchon de montage (4), le manchon
en PVC ou sur le mur.
5.L'appareil est maintenant prêt à être allumé.
Cut wire to desired
length
Remove outer wiring jacket
Strip inline leads so
wires nuts can be
used
• POUR USAGE EXTÉRIEUR UNIQUEMENT
• Le luminaire ou le luminaire ne doit être utilisé qu'avec
des unités d'alimentation d'éclairage paysager basse
tension avec une puissance nominale maximale de 300
watts par secondaire.
• Le câble basse tension principal est destiné à un
enfouissement peu profond - moins de 6 pouces (152
mm)
• ADAPTÉ POUR UNE INSTALLATION AU SOL
Produktspezifikationen
| Marke: | Hinkley Lighting |
| Kategorie: | Beleuchtung |
| Modell: | Dot 15075SS |
Brauchst du Hilfe?
Wenn Sie Hilfe mit Hinkley Lighting Dot 15075SS benötigen, stellen Sie unten eine Frage und andere Benutzer werden Ihnen antworten
Bedienungsanleitung Beleuchtung Hinkley Lighting

13 Februar 2026
8 Februar 2026
6 Februar 2026
5 Februar 2026
5 Februar 2026
29 Juli 2025
28 Juli 2025
28 Juli 2025
28 Juli 2025
Bedienungsanleitung Beleuchtung
Neueste Bedienungsanleitung für -Kategorien-
1 April 2026
1 April 2026
1 April 2026
1 April 2026
1 April 2026
1 April 2026
1 April 2026
1 April 2026
1 April 2026
1 April 2026