Insignia NS-SCR115 Bedienungsanleitung
Insignia Projektionsleinwand NS-SCR115
Lies die bedienungsanleitung für Insignia NS-SCR115 (2 Seiten) kostenlos online; sie gehört zur Kategorie Projektionsleinwand. Dieses Handbuch wurde von 15 Personen als hilfreich bewertet und erhielt im Schnitt 4.0 Sterne aus 6 Bewertungen. Hast du eine Frage zu Insignia NS-SCR115 oder möchtest du andere Nutzer dieses Produkts befragen? Stelle eine Frage
Seite 1/2
PACKAGE CONTENTS
• 75" Tripod Projector Screen
• Quick Setup Guide
FEATURES
• Durable, high-contrast material
• Easy to operate
Before using your new product, please read
these instructions to prevent any damage.
Quick Setup Guide
|
NS-SCR115
75" Tripod Projector Screen
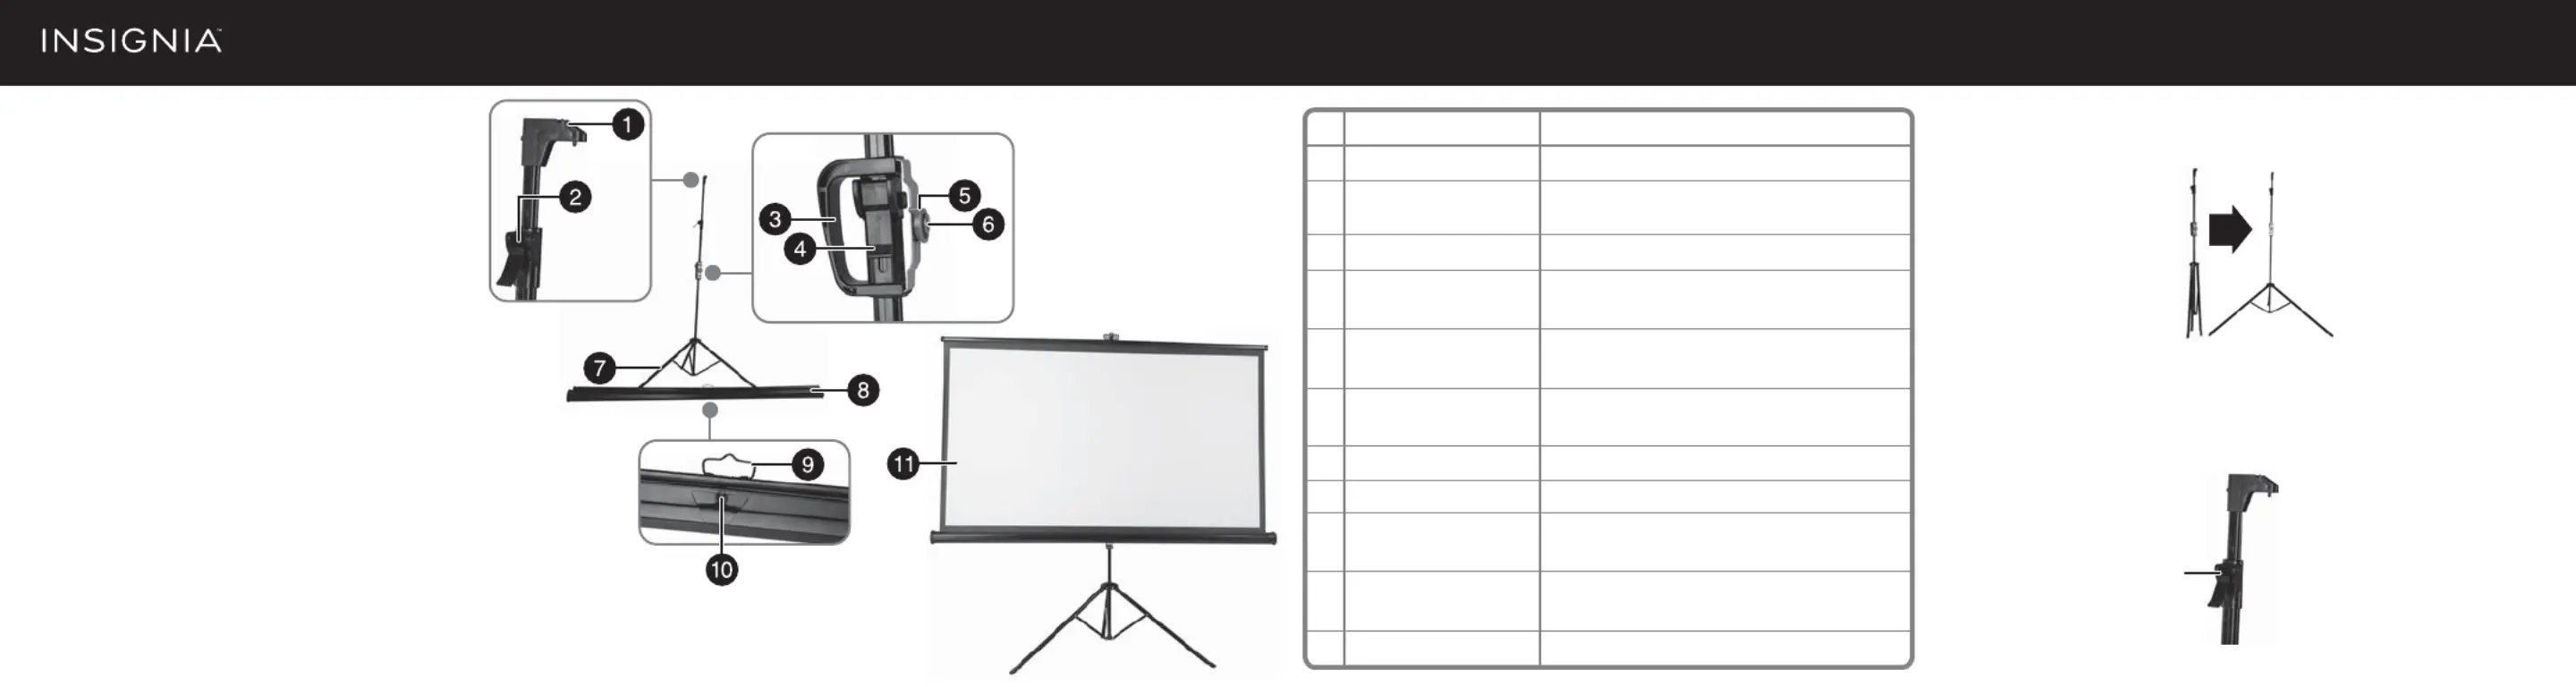
# ITEM
1 Screen hanger notch
2 Flip-lever center column
lock
3 Screen height handle
4 Flip-lever for the screen
height handle lock
5 Positioning pin release
lever
6 Positioning hole
7 Tripod leg
8 Screen enclosure
9 Projector screen hanging
bracket
10 Positioning pin
11 Projector screen
DESCRIPTION
Provides a notch to hang the projector screen.
Locks or unlocks the rst section of the tripod center
column.
Hold this handle to raise or lower the center column.
Locks or unlocks to slide up or down the screen height
handle.
Push this release lever to insert or release the
positioning pin in the positioning hole.
Attaches to the positioning pin on the back of the
projector screen.
Supports the tripod and projector screen.
Enclosure for the screen when not in use.
Hang the projector screen using this bracket.
Position projector screen by inserting it into
positioning hole.
Displays pictures from the projector.
Flip-lever center
column lock
USING YOUR TRIPOD PROJECTOR SCREEN
1Open the three legs of the tripod and stand the tripod up.
2Loosen the ip-lever center column lock, then raise the center column so
that the screen hanger notch is just below your eye-level (this position
makes it easier to attach the projector screen hanging bracket), then fasten
the ip-lever center column lock to secure the column in place.
Produktspezifikationen
| Marke: | Insignia |
| Kategorie: | Projektionsleinwand |
| Modell: | NS-SCR115 |
Brauchst du Hilfe?
Wenn Sie Hilfe mit Insignia NS-SCR115 benötigen, stellen Sie unten eine Frage und andere Benutzer werden Ihnen antworten
Bedienungsanleitung Projektionsleinwand Insignia

30 August 2025
30 August 2025
30 August 2025
30 August 2025
Bedienungsanleitung Projektionsleinwand
Neueste Bedienungsanleitung für -Kategorien-
23 März 2026
22 März 2026
22 März 2026
22 März 2026
27 Januar 2026
31 Dezember 2026
1 Dezember 2025
19 November 2025
18 November 2025
18 November 2025