MeldaProduction MAutoEqualizer Bedienungsanleitung


Lies die bedienungsanleitung für MeldaProduction MAutoEqualizer (79 Seiten) kostenlos online; sie gehört zur Kategorie audio-software. Dieses Handbuch wurde von 2 Personen als hilfreich bewertet und erhielt im Schnitt 4.4 Sterne aus 1.5 Bewertungen. Hast du eine Frage zu MeldaProduction MAutoEqualizer oder möchtest du andere Nutzer dieses Produkts befragen? Stelle eine Frage

Seite 1/79
MAutoEqualizer
Overview
An equalizer is doubtless the most important audio processing tool. Unfortunately it is also one of the hardest to master too, with years of
experience necessary in order to use it properly. MAutoEqualizer not only sounds great, it also greatly simplifies this task.
MAutoEqualizer is a revolutionary mastering plugin that can also be used for mixing and creative effects. It combines a powerful equalizer
(including a state-of-the-art linear-phase version) and an analyser to achieve the first truly automatic equalization functionality. It is the first
plugin to feature our MeldaProduction Filter Adaptation (MFA) technology, which can actually perform the equalization for you based
on an analysis of your recording, another recording or indeed any spectral content that you can literally "draw" using our MeldaProduction
Envelope System (MES).
Do not be mistaken, this has nothing to do with FFT. MAutoEqualizer is a parametric equalizer. The filter adaptation really configures the
bands only. It does not suffer from distortion, transient smearing or other artifacts caused by simple FFT algorithms.
MAutoEqualizer provides an automatic equalization feature that lets you focus on what spectrum you want to get, not how to get it. With a
standard equalizer you are listening to the whole spectrum while amplifying or attenuating frequencies. This is very difficult even for a very
experienced user with advanced listening skills. With MAutoEqualizer you can make your recording sound like a commercial song. You no
longer need to be worried if your ears aren't objective enough.
You can give your recordings a professional sound. And you can ensure that all of the recordings on your album sound uniform. Or you can
draw your desired frequency response. MAutoEqualizer will work out how to do what you want and configure the parametric equalizer bands
for you.
Introduction
The MAutoEqualizer package contains two plugins - the linear phase version (MAutoEqualizerLinearPhase) and the minimum phase version
(MAutoEqualizer). The linear phase version implements three equalization algorithms - minimum phase, linear phase and FFT based linear
phase. The disadvantage of the linear phase version is that it induces latency.
Please note that the response of the linear phase version in
minimum phase mode is different from the response of the native minimum phase version.
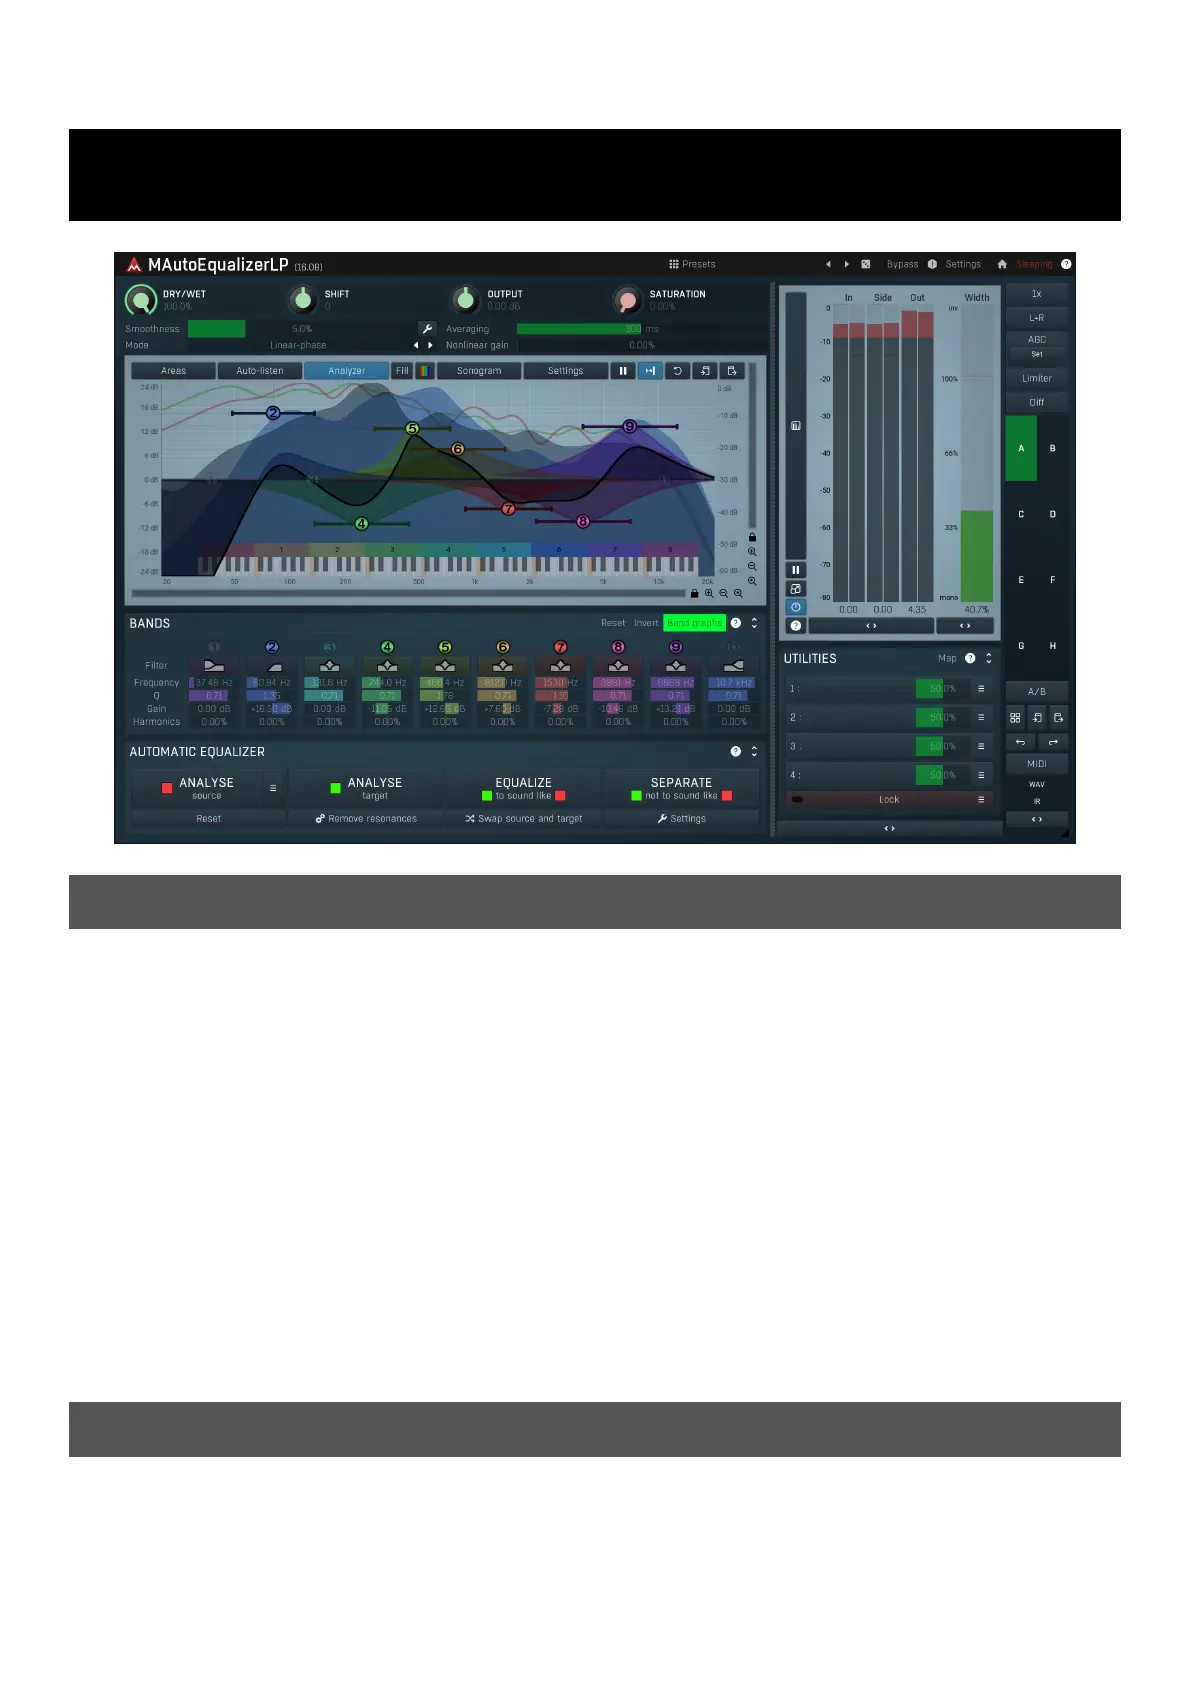
First look at the spectral analyser view. By default, the view is set to display the input and output levels: the moving green line displays the
power of the output signal after processing and the moving dark green line shows the power of the incoming signal before processing.
The static black or white line defines the equalizer frequency response. You can use the band points or the controls in the Bands panel
below to control the equalizer manually.
Automatic equalization
To make the plugin generate the equalizer settings for you, follow these steps:
1. Analyse your recording - start playback and press the Analyse target button. Most of the graphs in the spectral view will disappear and
a green line, depicting a long term analysis, will be displayed. It will eventually stop moving, which usually means that the analysis is
finished.
2. Get a source analysis - you can either load a predefined analysis using the Load button, or analyse another recording using the Analyse
source button (by the same method used to analyse the target), draw the requested frequency response using the Draw button or even
analyze an audio file using the File button.
3. Click the Equalize or Separate button and the plugin will adjust the bands.
You should notice the Smoothness parameter, which spreads the energy in the spectral view. It makes the analysis easier to understand
visually, but it also affects the automatic equalization as well. A higher smoothness setting typically provides more natural results.
If you are having problems mixing in a particular track, you can also analyse your whole mix (without the problematic track) and let the
plugin help fit the track into the mix, and make the mix clearer, less muddy. See Separate button for more information.
Presets
Presets button shows a window with all available presets. A preset can be loaded from the preset window by double-clicking on it, selecting
via the buttons or by using your keyboard. You can also manage the directory structure, store new presets, replace existing ones etc.
Presets are global, so a preset saved from one project, can easily be used in another. The arrow buttons next to the preset button can be
used to switch between presets easily.
Holding Ctrl while pressing the button loads a random preset. There must be some presets for this feature to work of course.
Presets can be backed up by 3 different methods:
A) Using "Backup" and "Restore" buttons in each preset window, which produces a single archive of all presets on the computer.
B) Using "Export/Import" buttons, which export a single folder of presets for one plugin.
C) By saving the actual preset files, which are found in the following directories (not recommended):
Windows: C:\Users\{username}\AppData\Roaming\MeldaProduction
Mac OS X: /Library/Application support/MeldaProduction
Files are named based on the name of the plugin like this: "{pluginname}.presets", so for example MAutopan.presets or MDynamics.presets.
If the directory cannot be found on your computer for some reason, you can just search for the particular file.
Please note that prior to version 16 a different format was used and the naming was "{pluginname}presets.xml".
The plugin also supports
an online preset exchange. If the computer is connected to the internet, the plugin connects to our server once a week, submits your
presets and downloads new ones if available. This feature is manually maintained in order to remove generally unusable presets, so it may
take some time before any submitted presets become available. This feature relies on each user so we strongly advise that any submitted
presets be named and organised in the same way as the factory presets, otherwise they will be removed.
Left arrow
Left arrow button loads the previous preset.
Right arrow
Right arrow button loads the next preset.
Randomize
Randomize button loads a random preset.
Panic
Panic button resets the plugin state. You can use it to force the plugin to report latency to the host again and to avoid any audio problems.
For example, some plugins, having a look-ahead feature, report the size of the look-ahead delay as latency, but it is inconvenient to do that
every time the look-ahead changes as it usually causes the playback to stop. After you tweak the latency to the correct value, just click this
button to sync the track in time with the others, minimizing phasing artifacts caused by the look-ahead delay mixing with undelayed audio
signals in your host. It may also be necessary to restart playback in your host.
Another example is if some malfunctioning plugin generates extremely high values for the input of this plugin. A potential filter may start
generating very high values as well and as a result the playback will stop. You can just click this button to reset the plugin and the playback
will start again.
Settings


Produktspezifikationen

Marke: MeldaProduction
Kategorie: audio-software
Modell: MAutoEqualizer

Brauchst du Hilfe?

Wenn Sie Hilfe mit MeldaProduction MAutoEqualizer benötigen, stellen Sie unten eine Frage und andere Benutzer werden Ihnen antworten


Bedienungsanleitung audio-software MeldaProduction

Bedienungsanleitung audio-software

Neueste Bedienungsanleitung für -Kategorien-