MeldaProduction MTurbocomp Bedienungsanleitung
MeldaProduction audio-software MTurbocomp
Lies die bedienungsanleitung für MeldaProduction MTurbocomp (162 Seiten) kostenlos online; sie gehört zur Kategorie audio-software. Dieses Handbuch wurde von 25 Personen als hilfreich bewertet und erhielt im Schnitt 4.8 Sterne aus 4 Bewertungen. Hast du eine Frage zu MeldaProduction MTurbocomp oder möchtest du andere Nutzer dieses Produkts befragen? Stelle eine Frage
Seite 1/162
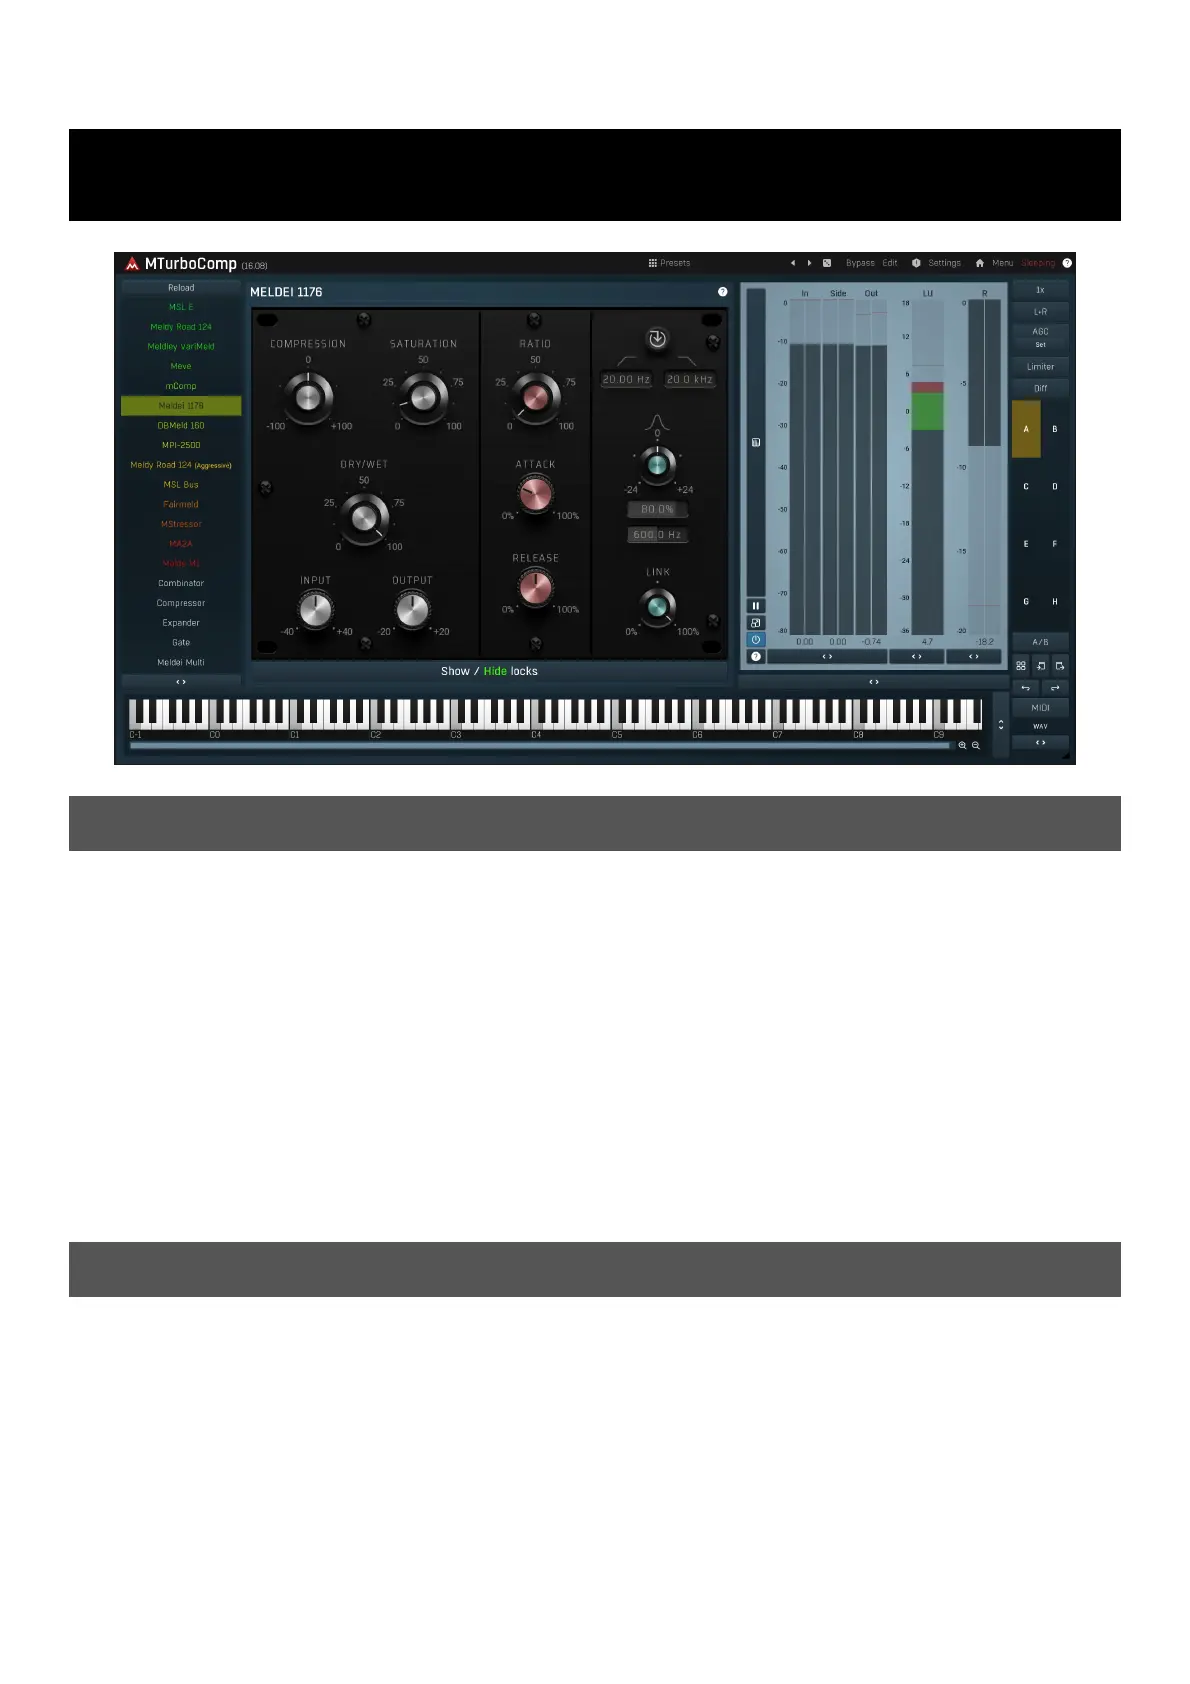
MTurboComp
Overview
MTurboComp is an extremely powerful dynamics processor. It has been designed to be versatile, so that it can simulate any compressor out
there, primarily the vintage ones of course. It features 4 ultra-powerful followers, which you can be combined at will, 4 processors to build
the transfer curve, a dynamic equalizer and 2 saturators. We then used machine analysis and learning to make the beast's response similar
to the vintage compressors that we wanted to simulate.
MTurboComp provides emulations of 14 classic compressors/limiters, plus several units that we designed, not necessarily compressors.
All are available from the Devices list on the left-hand side. It doesn't stop there however. Many of the classic units had a really odd user
interface, missing features etc. Therefore we created a generalized compressor interface, meaning that all of the simulations have
almost the same controls and they also feature things that the originals didn't have, such as a side-chain detector EQ, saturation control etc.
Hence using MTurboComp and comparing different models is very quick and easy.
Compressors are traditionally controlled via thresholds and ratios. In most character compression scenarios this is extremely difficult to use -
the effect of each parameter changes the actual character and also it changes the output level, hence one needs to tweak the output gain
at the same time to be able to compare whether the change is good. Using MTurboComp is entirely different. The initial settings of each
simulation are set so that the compressor "is already doing something", so that you can hear how it actually sounds. All of them then
feature the big Compression (in some emulations it has a different name) knob, which lets you increase or decrease the amount of
compression and aims to change the output level as little as possible. They all provide a Dry/Wet knob for parallel compression. And also
there's the big Saturation control, which defines the amount of saturation, higher harmonics and character to be applied.
How to use the compressor
We propose the following efficient way to use MTurboComp, which should speed up your workflow tremendously and make it accessible to
beginners as well:
1. Select a compressor device that you like.
2. Use the Gain In knob to set the input level to some reasonable value if needed.
3. Adjust the attack/release settings if needed - e.g. if you want more attack to go through witohut compression etc. These define the
compression character. It may be useful to over-compress the material first by increasing the Compression control, so that you can hear
how it actually sounds in the extreme.
4. Change the amount of compression using Compression and Dry/Wetknobs to your liking.
5. Use the Saturation knob to adjust the amount of saturation, character and loudness.
6. Listen :).
If you are not certain that the results are satisfactory, switch to a different A-H preset (copying the current settings into the new preset if
you wish) and try again. Then you can create and compare up to 8 settings easily.
Produktspezifikationen
| Marke: | MeldaProduction |
| Kategorie: | audio-software |
| Modell: | MTurbocomp |
Brauchst du Hilfe?
Wenn Sie Hilfe mit MeldaProduction MTurbocomp benötigen, stellen Sie unten eine Frage und andere Benutzer werden Ihnen antworten
Bedienungsanleitung audio-software MeldaProduction

25 August 2025
24 August 2025
24 August 2025
24 August 2025
24 August 2025
24 August 2025
24 August 2025
24 August 2025
24 August 2025
24 August 2025
Bedienungsanleitung audio-software
Neueste Bedienungsanleitung für -Kategorien-
25 März 2026
24 März 2026
24 März 2026
23 März 2026
23 März 2026
23 März 2026
23 März 2026